crwdns2915892:0crwdne2915892:0
Use this guide to replace the trackpad assembly in your Retina MacBook 2015. This assembly includes the trackpad and the Haptic Engine.
A malfunctioning trackpad may simply need to be calibrated rather than replaced outright. Unfortunately the calibration software is not available outside of Apple.
To avoid logic board damage, when your MacBook repair is complete but before powering it on, connect it to low-voltage power using a 5-Watt iPhone charger and a USB-C to USB-A cable. These accessories are not included with your MacBook, so make sure you have them ready before you begin.
crwdns2942213:0crwdne2942213:0
crwdns2936621:0crwdne2936621:0
-
crwdns2935267:0crwdne2935267:0Magnetic Project Mat$19.95
-
Remove the following eight screws securing the lower case:
-
Two 1.8 mm P5 Pentalobe screws
-
Four 2.9 mm P5 Pentalobe screws
-
Two 6.1 mm P5 Pentalobe screws
-
-
-
Wedge your fingers between the upper case and the lower case, starting from the rear of the MacBook between the hinges.
-
Keeping a firm grip, lift steadily until the lower case separates slightly from the upper case.
-
-
-
While holding the lower case in place, carefully flip the MacBook over so the Apple logo faces up.
-
-
-
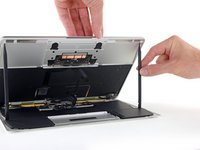
Lift the upper case and display together from the front edge and raise it to about a 45˚ angle.
-
-
-
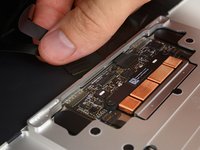
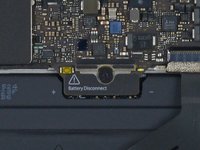
Use the flat end of a spudger to press and hold the small gold 'battery disconnect' button.
-
If the power LED is lit up, continue holding the button until the LED goes dark, and then release. This may take up to 10 seconds.
-
If the LED does not light, release the button after 5-10 seconds. Press and hold it again for 5-10 seconds, and release. Finally, press and hold it a third time for 5-10 seconds, and release.
-
-
-
Close the MacBook and carefully flip it upside-down.
-
-
-
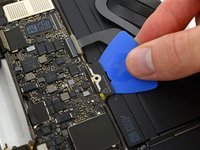
Lifting from the front edge, open the lower case to an angle of about 45°.
-
-
crwdns2935267:0crwdne2935267:0Tweezers$4.99
-
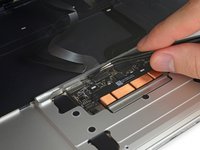
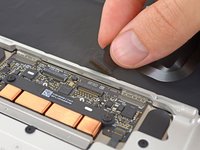
Use tweezers to peel back the tape covering the trackpad cable ZIF connector.
-
-
-
-
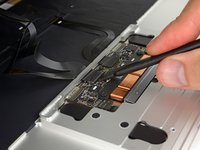
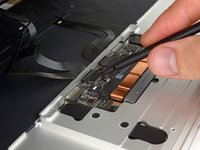
Use a spudger to carefully flip up the retaining flap on the trackpad cable ZIF connector.
-
-
-
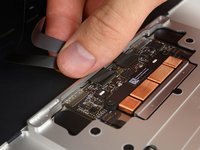
Disconnect the trackpad ribbon cable from the trackpad by pulling it gently through its slot in the frame.
-
-
-
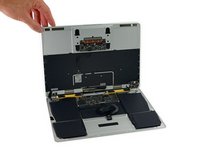
Carefully turn the MacBook over, so that the lower case lays flat.
-
Raise the upper case/display assembly to about a 90° angle, and prop it up against something sturdy so you don't have to hold it.
-
Add a piece of tape near the track pad to secure the upper case and prevent accidental movement.
-
-
-
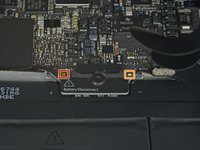
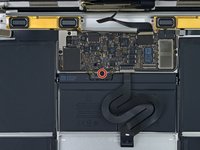
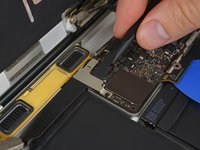
Remove the single 2.9 mm T5 Torx screw securing the battery connector to the logic board.
-
-
crwdns2935267:0crwdne2935267:0Battery Blocker$3.99
-
As an added precaution, you may physically disconnect the battery by inserting a battery isolation pick between the logic board and the battery connector.
-
-
-
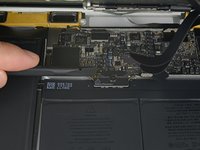
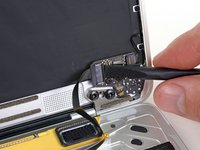
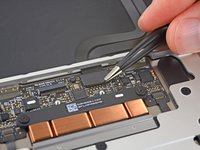
Remove the two screws securing the USB-C port cable bracket:
-
1.1 mm Tri-point Y00 screw
-
3.5 mm T5 Torx screw
-
-
-
Use the flat end of a spudger to disconnect the USB-C port cable bracket by prying it straight up from the logic board.
-
-
-
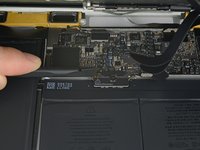
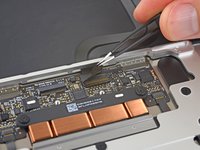
Use a spudger to flip open the retaining flap on the audio jack board cable ZIF connector.
-
-
-
Disconnect the audio jack board ribbon cable by pulling it straight back out of the ZIF connector.
-
-
crwdns2935267:0crwdne2935267:0Tweezers$4.99
-
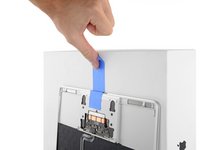
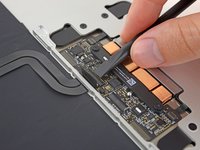
Use a pair of tweezers to remove the tape covering the keyboard ribbon cable connector on the trackpad.
-
-
-
Using a spudger, flip open the retaining flap on the keyboard ribbon cable ZIF connector.
-
-
-
Gently pull the keyboard ribbon cable out of its slot in the frame.
-
-
-
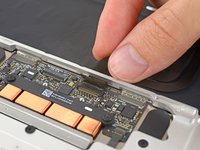
Remove the five 2.5 mm T3 Torx screws securing the trackpad to the case.
-
-
-
Hinge open the display just slightly to free the trackpad assembly from the upper case, and remove the trackpad assembly.
-


To reassemble your device, follow these instructions in reverse order. To avoid logic board damage, when your MacBook repair is complete but before powering it on, connect it to low-voltage power using a 5-Watt iPhone charger and a USB-C to USB-A cable.
crwdns2935221:0crwdne2935221:0
crwdns2935229:012crwdne2935229:0


crwdns2947412:02crwdne2947412:0
Excellent instructions, a big thanks to the author. After completing them the MACBOOK worked OK and then I started to get intermittent problems with the power button and the system bringing the shutdown dialogue without pressing the power button. On closer examination and second removal of the trackpad IPD flex ribbon cable (which also routes keyboard signals to the logic board) the cable came apart at the fold half way along the cable. This cable is very fragile and as mentioned in step 7 you need to be very careful on handling them. In my case I think the cable was fatigued or mechanically damaged where the fold was during manufacture . A replacement cable has been installed and the laptop now works ok.
Hi. I've replaced the trackpad after the old one got damaged and started heating up. Macbook turns on perfectly without any trackpad connected, but doesn't even boot when the new trackpad is connected. The motherboard's LED near the battery connector is blinking. Is there something im missing?