crwdns2915892:0crwdne2915892:0
Over time, thermal paste can dry out and lose its ability to transfer heat between the GPU and the heatsink. This can lead to overheating and reduce your card's performance.
It is recommended to replace your card's thermal paste every two years.
This tutorial shows you how to replace the thermal paste on an AMD Radeon HD 7890 card.
crwdns2942213:0crwdne2942213:0
-
-
In this accessible tutorial, I will show you how to replace the thermal paste on a graphics card. The method applies to all cards.
-
-
-
You will have to remove the Phillips screws to detach the heat sink and the fan from the card. Some cards may be equipped with a shroud, but there isn't one on this one.
-
The screws to be removed (Red Circles)
-
I also advise to unscrew the screws in an "X" pattern (a turn or two at a time for each) so that the force exerted by the screws is very uniform and does not damage the card.
-
-
-
-
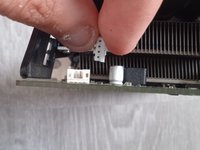
It is important to remove the fan leads with care not to damage them. Disconnecting them can be tricky.
-
Graphics processor (GPU) in my case, it's a Radeon HD 7790
-
Video memory chips (VRAM) in GDDR5, on this card we have a total of 1gb of memory spread over 4 256 MB chips.
-
6-pin 12v connector for power supply.
-
The voltage regulator modules (VRM) permit the delivery and regulate the power supplied to the GPU, VRAM etc ...
-
Connectors for video and audio such as HDMI, DVI and Display Port.
-
VRAM dedicated thermal pads.
-
Heat sink to dissipate the heat generated by the GPU VRM's and VRAM.
-
-
-
Remove the old thermal paste with a cotton swab and isopropyl alcohol. Then, apply a new dose of thermal paste (it's inexpensive).
-


To reassemble your device, follow the instructions in reverse order.
crwdns2935221:0crwdne2935221:0
crwdns2935229:02crwdne2935229:0
crwdns2934873:0crwdne2934873:0
100%


crwdns2934885:0crwdne2934885:0 crwdns2934875:0crwdne2934875:0
crwdns2934877:0crwdne2934877:0 ›

crwdns2947412:02crwdne2947412:0
Do i have to replace the thermal pads too?
I'm sorry, i was a bit busy, but if the thermal pads are still intact and making contact with the chip and heatsink, you can keep them.
Shibe -