crwdns2915892:0crwdne2915892:0
You need to disconnect or replace the Jack port on your Dell XPS 13 9380, this guide is for you!
crwdns2942213:0crwdne2942213:0
-
-
Use a Torx T5 driver to unscrew the eight screws securing the back panel.
-
Use a spudger to pry up and loosen the back panel.
-
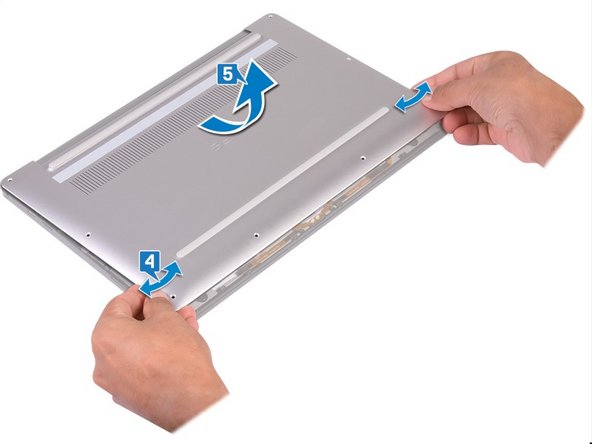
Lift the back panel up slightly from the non-hinged edge.
-
Pull the back panel away from the hinged edge, wiggling it back and forth to loosen the clips.
-
When the back panel clips are free, remove the back panel.
-
-
-
-
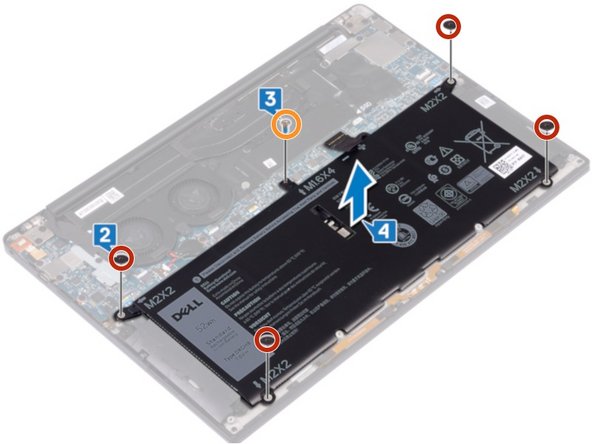
Disconnect the cable from the battery by pulling the connector towards the battery.
-
Remove the four screws (M2 x 2) securing the battery.
-
Remove the screw (M1.6 x 4) securing the battery.
-
Remove the battery from its recess.
-
-
-
1- Remove the two screws (M2.5 x 4) that fix the left hinge.
-
2- Place the back of the computer screen on a clean and flat surface, then open and close the computer.
-
3- Disconnect the cable from the Jack port of the motherboard.
-
4- Remove the screw (M1,6x3) that fixes the jack port.
-
5- Remove the Jack port.
-


To reassemble your device, follow the instructions in reverse order.
To reassemble your device, follow the instructions in reverse order.
crwdns2935221:0crwdne2935221:0
crwdns2935227:0crwdne2935227:0
crwdns2934873:0crwdne2934873:0
100%

crwdns2934883:0Schwarzercrwdne2934883:0 crwdns2934875:0crwdne2934875:0
crwdns2934877:0crwdne2934877:0 ›

crwdns2915084:0crwdne2915084:0

i.Fixit FR Team crwdns2935289:0i.Fixit FR Teamcrwdne2935289:0
Community
crwdns2931471:03crwdne2931471:0
crwdns2935297:040crwdne2935297:0
crwdns2947410:01crwdne2947410:0
Where did you get the replacement part?