crwdns2933423:0crwdne2933423:0

Repairing a Broken 3-Prong Bodycord for a Fencing Sword

crwdns2942213:0crwdne2942213:0

  1. Repairing a Broken 3-Prong Bodycord for a Fencing Sword, Repairing a Broken 3-Prong Bodycord for a Fencing Sword: crwdns2935265:01crwdnd2935265:01crwdnd2935265:03crwdne2935265:0 Repairing a Broken 3-Prong Bodycord for a Fencing Sword, Repairing a Broken 3-Prong Bodycord for a Fencing Sword: crwdns2935265:01crwdnd2935265:02crwdnd2935265:03crwdne2935265:0 Repairing a Broken 3-Prong Bodycord for a Fencing Sword, Repairing a Broken 3-Prong Bodycord for a Fencing Sword: crwdns2935265:01crwdnd2935265:03crwdnd2935265:03crwdne2935265:0
    • Remove the three bolts from the clamshell using a 4mm screwdriver.

    • The clam shell is the hard plastic that protects the internal wiring of the prongs.

    • During reassembly, remember to replace the nuts into their respective holes if they fell out during disassembly.

  2. Repairing a Broken 3-Prong Bodycord for a Fencing Sword: crwdns2935265:02crwdnd2935265:01crwdnd2935265:03crwdne2935265:0 Repairing a Broken 3-Prong Bodycord for a Fencing Sword: crwdns2935265:02crwdnd2935265:02crwdnd2935265:03crwdne2935265:0 Repairing a Broken 3-Prong Bodycord for a Fencing Sword: crwdns2935265:02crwdnd2935265:03crwdnd2935265:03crwdne2935265:0
    • Remove the top piece of the clamshell.

    • When reassembling, run the wires within the grooves to prevent pinching. If the wires are pinched, they can become damaged.

  3. Repairing a Broken 3-Prong Bodycord for a Fencing Sword: crwdns2935265:03crwdnd2935265:01crwdnd2935265:03crwdne2935265:0 Repairing a Broken 3-Prong Bodycord for a Fencing Sword: crwdns2935265:03crwdnd2935265:02crwdnd2935265:03crwdne2935265:0 Repairing a Broken 3-Prong Bodycord for a Fencing Sword: crwdns2935265:03crwdnd2935265:03crwdnd2935265:03crwdne2935265:0
    • Mark the wires with a marker in unique patterns to remember their order.

    • In this case, a solid line marks the wire that leads to the prong that is on the outside and near to the middle prong. A dashed line marks the wire leading to the prong that is far from the middle prong.

  4. Repairing a Broken 3-Prong Bodycord for a Fencing Sword: crwdns2935265:04crwdnd2935265:01crwdnd2935265:03crwdne2935265:0 Repairing a Broken 3-Prong Bodycord for a Fencing Sword: crwdns2935265:04crwdnd2935265:02crwdnd2935265:03crwdne2935265:0 Repairing a Broken 3-Prong Bodycord for a Fencing Sword: crwdns2935265:04crwdnd2935265:03crwdnd2935265:03crwdne2935265:0
    • Lift the wires and prongs out of the clamshell.

  5. Repairing a Broken 3-Prong Bodycord for a Fencing Sword: crwdns2935265:05crwdnd2935265:01crwdnd2935265:02crwdne2935265:0 Repairing a Broken 3-Prong Bodycord for a Fencing Sword: crwdns2935265:05crwdnd2935265:02crwdnd2935265:02crwdne2935265:0
    • Pull the shrink wrap down the cord.

    • During reassembly, remember to place the shrink wrap partly into the clamshell.

  6. Repairing a Broken 3-Prong Bodycord for a Fencing Sword: crwdns2935265:06crwdnd2935265:01crwdnd2935265:03crwdne2935265:0 Repairing a Broken 3-Prong Bodycord for a Fencing Sword: crwdns2935265:06crwdnd2935265:02crwdnd2935265:03crwdne2935265:0 Repairing a Broken 3-Prong Bodycord for a Fencing Sword: crwdns2935265:06crwdnd2935265:03crwdnd2935265:03crwdne2935265:0
    • Be careful to cut all three wires to the same length.

    • Cut the wires below the break point.

    • Usually the break point is at the place where the wires enter the clamshell.

    • Start by cutting small amounts at a time; if you did not cut below the break point, you may cut more of the wire as needed.

  7. Repairing a Broken 3-Prong Bodycord for a Fencing Sword: crwdns2935265:07crwdnd2935265:01crwdnd2935265:02crwdne2935265:0 Repairing a Broken 3-Prong Bodycord for a Fencing Sword: crwdns2935265:07crwdnd2935265:02crwdnd2935265:02crwdne2935265:0
    • Loosen the grub screws on each prong using a 2mm screwdriver.

    • You can remove the screws. However, it is easier to just loosen them for reassembly.

  8. Repairing a Broken 3-Prong Bodycord for a Fencing Sword: crwdns2935265:08crwdnd2935265:01crwdnd2935265:02crwdne2935265:0 Repairing a Broken 3-Prong Bodycord for a Fencing Sword: crwdns2935265:08crwdnd2935265:02crwdnd2935265:02crwdne2935265:0
    • Remove the wires from the prongs using fingers or needle nose pliers.

    • Set the prongs aside.

    • If pulling straight out is difficult, try a gentle twisting motion inline with the prong.

  9. Repairing a Broken 3-Prong Bodycord for a Fencing Sword: crwdns2935265:09crwdnd2935265:01crwdnd2935265:03crwdne2935265:0 Repairing a Broken 3-Prong Bodycord for a Fencing Sword: crwdns2935265:09crwdnd2935265:02crwdnd2935265:03crwdne2935265:0 Repairing a Broken 3-Prong Bodycord for a Fencing Sword: crwdns2935265:09crwdnd2935265:03crwdnd2935265:03crwdne2935265:0
    • Peel the wires of the cord apart about 1" (2cm).

    • Use the part of the wire that you cut off as a reference for how far to peel the wires apart.

  10. Repairing a Broken 3-Prong Bodycord for a Fencing Sword: crwdns2935265:010crwdnd2935265:01crwdnd2935265:03crwdne2935265:0 Repairing a Broken 3-Prong Bodycord for a Fencing Sword: crwdns2935265:010crwdnd2935265:02crwdnd2935265:03crwdne2935265:0 Repairing a Broken 3-Prong Bodycord for a Fencing Sword: crwdns2935265:010crwdnd2935265:03crwdnd2935265:03crwdne2935265:0
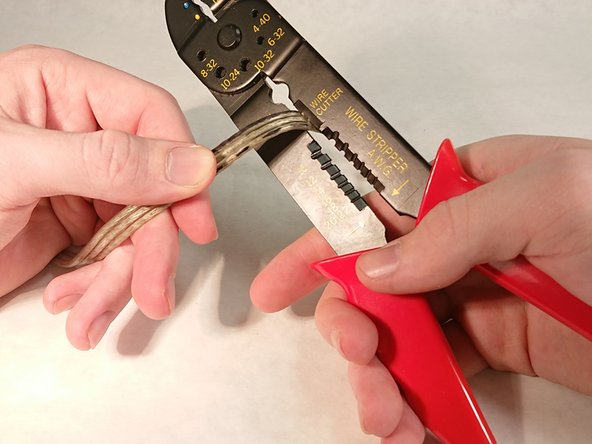
    • Strip the wires, about 1/4", or 5 mm, from the end.

    • Stripping the wires is removing the plastic insulation to expose the inner metal conductor.

    • Repeat for each wire.

  11. Repairing a Broken 3-Prong Bodycord for a Fencing Sword: crwdns2935265:011crwdnd2935265:01crwdnd2935265:02crwdne2935265:0 Repairing a Broken 3-Prong Bodycord for a Fencing Sword: crwdns2935265:011crwdnd2935265:02crwdnd2935265:02crwdne2935265:0
    • Twist the loose wire strands together.

    • Repeat for each wire.

    • This step facilitates reinsertion of the wires into the prongs.

crwdns2915888:0crwdne2915888:0

To reassemble your bodycord, follow steps 1-8 in reverse order, skipping steps 3 and 6.

To keep your bodycord in working order longer, remember to always pull it out of the sockets by holding onto the plastic, not the wires.

crwdns2935227:0crwdne2935227:0

Aidan Fox-Tierney

crwdns2935283:002/20/20crwdne2935283:0

205 crwdns2915208:0crwdne2915208:0

crwdns2935295:0crwdne2935295:0

crwdns2915084:0crwdne2915084:0

UC Davis, Team S2-G6, Andersen Winter 2020 crwdns2935289:0UC Davis, Team S2-G6, Andersen Winter 2020crwdne2935289:0

UCD-ANDERSEN-W20S2G6

crwdns2931471:03crwdne2931471:0

crwdns2935297:02crwdne2935297:0

crwdns2944067:00crwdne2944067:0

crwdns2917038:0crwdne2917038:0

crwdns2936625:0crwdne2936625:0:

crwdns2936751:024crwdne2936751:0 1

crwdns2936753:07crwdne2936753:0 8

crwdns2936753:030crwdne2936753:0 24

crwdns2942667:0crwdne2942667:0 435