crwdns2933423:0crwdne2933423:0

Removing the Ink Cartridge Rail

crwdns2862623:0crwdne2862623:0
crwdns2942641:0crwdne2942641:0

crwdns2942213:0crwdne2942213:0

  1. Removing the Ink Cartridge Rail, Ink Cartridge Rail: crwdns2935265:01crwdnd2935265:01crwdnd2935265:02crwdne2935265:0 Removing the Ink Cartridge Rail, Ink Cartridge Rail: crwdns2935265:01crwdnd2935265:02crwdnd2935265:02crwdne2935265:0
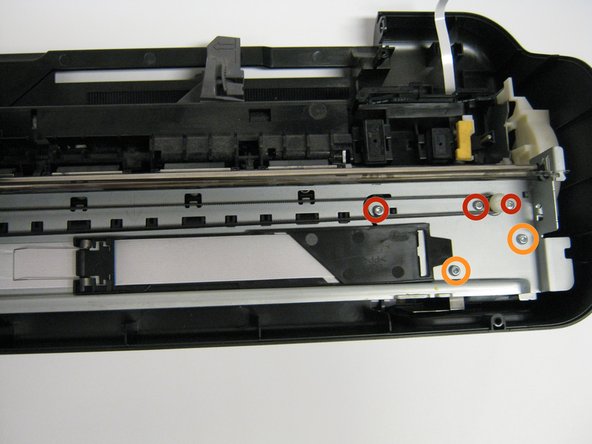
    • Remove the five 13.0 mm Torx #10 screws found on top of the frame.

    • Remove the four 9.0 mm Torx #10 smaller screws.

  2. Removing the Ink Cartridge Rail: crwdns2935265:02crwdnd2935265:01crwdnd2935265:02crwdne2935265:0 Removing the Ink Cartridge Rail: crwdns2935265:02crwdnd2935265:02crwdnd2935265:02crwdne2935265:0
    • Lift the rail carefully as a strip and motor will be connected to the bottom part of the printer.

    • Now detach the white strip and wires by gently lifting them up.

crwdns2915888:0crwdne2915888:0

To reassemble your device, follow these instructions in reverse order.

Justin Taiki Fukada

crwdns2935283:001/25/14crwdne2935283:0

912 crwdns2915208:0crwdne2915208:0

crwdns2935297:07crwdne2935297:0

crwdns2915084:0crwdne2915084:0

Cal Poly, Team 1-41, Maness Winter 2014 crwdns2935289:0Cal Poly, Team 1-41, Maness Winter 2014crwdne2935289:0

CPSU-MANESS-W14S1G41

crwdns2931471:04crwdne2931471:0

crwdns2935297:014crwdne2935297:0

crwdns2947412:00crwdne2947412:0

crwdns2917038:0crwdne2917038:0

crwdns2936625:0crwdne2936625:0:

crwdns2936751:024crwdne2936751:0 0

crwdns2936753:07crwdne2936753:0 0

crwdns2936753:030crwdne2936753:0 0

crwdns2942667:0crwdne2942667:0 41