crwdns2933423:0crwdne2933423:0

Removing the HP Elitebook 6930p Top Cover

crwdns2942213:0crwdne2942213:0

  1. Removing the HP Elitebook 6930p Top Cover, Battery Removal: crwdns2935265:01crwdnd2935265:01crwdnd2935265:03crwdne2935265:0 Removing the HP Elitebook 6930p Top Cover, Battery Removal: crwdns2935265:01crwdnd2935265:02crwdnd2935265:03crwdne2935265:0 Removing the HP Elitebook 6930p Top Cover, Battery Removal: crwdns2935265:01crwdnd2935265:03crwdnd2935265:03crwdne2935265:0
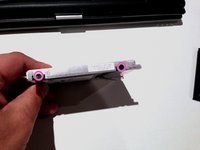
    • Flip laptop over and locate the battery release button

    • Push release button to the left to release battery and gently pull battery from the laptop

  2. Removing the HP Elitebook 6930p Top Cover, Hard Drive: crwdns2935265:02crwdnd2935265:01crwdnd2935265:03crwdne2935265:0 Removing the HP Elitebook 6930p Top Cover, Hard Drive: crwdns2935265:02crwdnd2935265:02crwdnd2935265:03crwdne2935265:0 Removing the HP Elitebook 6930p Top Cover, Hard Drive: crwdns2935265:02crwdnd2935265:03crwdnd2935265:03crwdne2935265:0
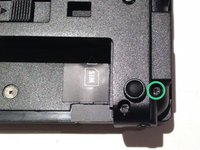
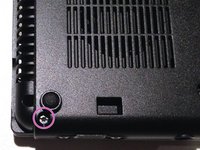
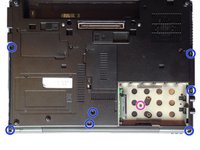
    • With the bottom of the laptop facing up and the front toward you locate and loosen the two M2.0×5.0 captive screws holding the hard drive bay cover closed.

    • Lift the left side of the bay cover and swing it up and to the right to remove it.

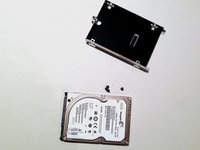
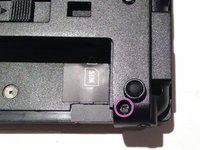
    • Loosen the M2.5×10.0 captive screw that holds the hard drive in.

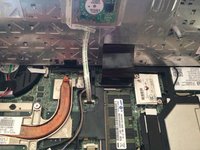
    • Grasp the plastic tab and slide the hard drive to the right to disconnect it from the motherboard.

    • Lift the hard drive straight up and out of the laptop.

  3. Removing the HP Elitebook 6930p Top Cover: crwdns2935265:03crwdnd2935265:01crwdnd2935265:02crwdne2935265:0 Removing the HP Elitebook 6930p Top Cover: crwdns2935265:03crwdnd2935265:02crwdnd2935265:02crwdne2935265:0
    • To remove the hard drive from the bracket remove the two M3.0×4.0 screws from each side of the hard drive.

  4. Removing the HP Elitebook 6930p Top Cover, Keyboard: crwdns2935265:04crwdnd2935265:01crwdnd2935265:03crwdne2935265:0 Removing the HP Elitebook 6930p Top Cover, Keyboard: crwdns2935265:04crwdnd2935265:02crwdnd2935265:03crwdne2935265:0 Removing the HP Elitebook 6930p Top Cover, Keyboard: crwdns2935265:04crwdnd2935265:03crwdnd2935265:03crwdne2935265:0
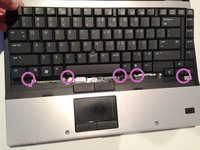
    • Loosen the three Phillips 2.5×9.0 captive screws that secure the keyboard to the laptop

    • Turn the laptop so the keyboard is facing up and locate the 4 retention tabs along the back edge of the keyboard

    • Slide the retention clips toward the keyboard to release the keyboard

  5. Removing the HP Elitebook 6930p Top Cover: crwdns2935265:05crwdnd2935265:01crwdnd2935265:03crwdne2935265:0 Removing the HP Elitebook 6930p Top Cover: crwdns2935265:05crwdnd2935265:02crwdnd2935265:03crwdne2935265:0 Removing the HP Elitebook 6930p Top Cover: crwdns2935265:05crwdnd2935265:03crwdnd2935265:03crwdne2935265:0
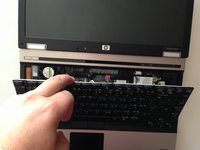
    • Use a plastic pry tool to lift the rear edge of the keyboard.

    • Pull the keyboard slightly towards the display to disengage the tabs along the front of the keyboard from the laptop palm rest.

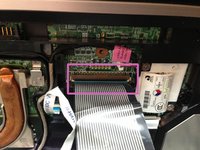
    • Lift the keyboard up to reveal the ribbon connectors

  6. Removing the HP Elitebook 6930p Top Cover: crwdns2935265:06crwdnd2935265:01crwdnd2935265:03crwdne2935265:0 Removing the HP Elitebook 6930p Top Cover: crwdns2935265:06crwdnd2935265:02crwdnd2935265:03crwdne2935265:0 Removing the HP Elitebook 6930p Top Cover: crwdns2935265:06crwdnd2935265:03crwdnd2935265:03crwdne2935265:0
    • Release the larger ribbon cable by flipping the brown retainer up so it is parallel with the ribbon cable

    • Release the smaller ribbon cable by lifting up the white retainer

    • I found it easier to reinstall both cables with the new keyboard resting on the back edge

  7. Removing the HP Elitebook 6930p Top Cover, Switch Cover: crwdns2935265:07crwdnd2935265:01crwdnd2935265:03crwdne2935265:0 Removing the HP Elitebook 6930p Top Cover, Switch Cover: crwdns2935265:07crwdnd2935265:02crwdnd2935265:03crwdne2935265:0 Removing the HP Elitebook 6930p Top Cover, Switch Cover: crwdns2935265:07crwdnd2935265:03crwdnd2935265:03crwdne2935265:0
    • Remove the two M2.0×4.0 broad-head screws.

    • Remove the three Torx T8 M2.5×7.0 screws.

  8. Removing the HP Elitebook 6930p Top Cover: crwdns2935265:08crwdnd2935265:01crwdnd2935265:03crwdne2935265:0 Removing the HP Elitebook 6930p Top Cover: crwdns2935265:08crwdnd2935265:02crwdnd2935265:03crwdne2935265:0 Removing the HP Elitebook 6930p Top Cover: crwdns2935265:08crwdnd2935265:03crwdnd2935265:03crwdne2935265:0
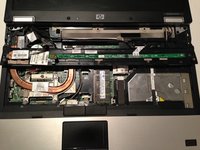
    • Turn the computer over with the front toward you and the open the computer as far as possible.

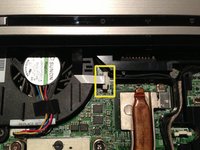
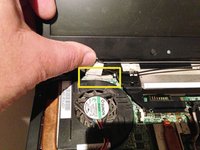
    • Release the ZIF connector for the power button board cable.

    • Remove the switch cover by lifting it straight up and flip it forward.

    • Release the ZIF connector for the LED board cable.

  9. Removing the HP Elitebook 6930p Top Cover, Display Assembly: crwdns2935265:09crwdnd2935265:01crwdnd2935265:02crwdne2935265:0 Removing the HP Elitebook 6930p Top Cover, Display Assembly: crwdns2935265:09crwdnd2935265:02crwdnd2935265:02crwdne2935265:0
    • Close the lid and turn the laptop so the rear is facing you

    • Locate and remove the two Torx T8 2.5×7.0 screws at each corner

    • The screws may have rubber caps over them. If so remove with a spudger or similar tool.

  10. Removing the HP Elitebook 6930p Top Cover: crwdns2935265:010crwdnd2935265:01crwdnd2935265:02crwdne2935265:0 Removing the HP Elitebook 6930p Top Cover: crwdns2935265:010crwdnd2935265:02crwdnd2935265:02crwdne2935265:0
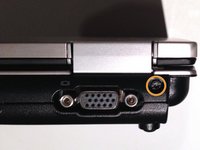
    • With the laptop upside down, locate and remove the two Torx T8 2.5×7.0 screws.

    • The screws may have rubber caps over them. If so remove with a spudger or similar tool.

  11. Removing the HP Elitebook 6930p Top Cover: crwdns2935265:011crwdnd2935265:01crwdnd2935265:03crwdne2935265:0 Removing the HP Elitebook 6930p Top Cover: crwdns2935265:011crwdnd2935265:02crwdnd2935265:03crwdne2935265:0 Removing the HP Elitebook 6930p Top Cover: crwdns2935265:011crwdnd2935265:03crwdnd2935265:03crwdne2935265:0
    • Turn the computer right-side up with the front toward you and open the computer lid past 90 degrees.

    • Locate and disconnect the display panel cable.

    • Locate and disconnect the microphone cable.

    • Locate and disconnect the webcam cable.

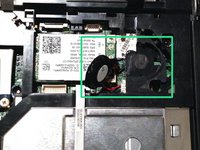
    • Locate and disconnect the 3 antenna cables.

    • Unclip the antenna cables from the retaining clips.

    • NOTE There are 2 antenna cables that go from the display assembly through the hole shown and connect to the WWAN (3G) WiFi card if it is installed. In my case they were just threaded into the hole to make things tidy as I didn't have a WWAN card.

  12. Removing the HP Elitebook 6930p Top Cover: crwdns2935265:012crwdnd2935265:01crwdnd2935265:02crwdne2935265:0 Removing the HP Elitebook 6930p Top Cover: crwdns2935265:012crwdnd2935265:02crwdnd2935265:02crwdne2935265:0
    • The display assembly will be unsupported when the following screws are removed. To prevent damage support the display before removing the screws.

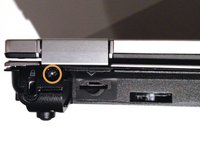
    • Remove the two T8 2.5×7.0 screws holding the display assembly to the laptop.

    • Lift the display assembly straight up to remove it from the laptop.

  13. Removing the HP Elitebook 6930p Top Cover, Top Cover: crwdns2935265:013crwdnd2935265:01crwdnd2935265:03crwdne2935265:0 Removing the HP Elitebook 6930p Top Cover, Top Cover: crwdns2935265:013crwdnd2935265:02crwdnd2935265:03crwdne2935265:0 Removing the HP Elitebook 6930p Top Cover, Top Cover: crwdns2935265:013crwdnd2935265:03crwdnd2935265:03crwdne2935265:0
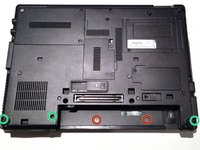
    • Turn the laptop upside down with the front toward you.

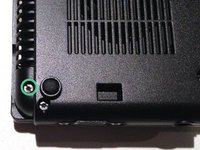
    • Locate and remove seven Torx T8 2.5×7.0 screws.

    • The screws may have rubber caps over them. If so remove with a spudger or similar tool.

    • Locate and remove one Philips M2.0×5.0 screw.

    • Turn the laptop right-side up with the front toward you.

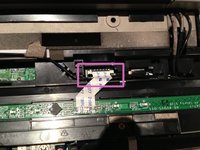
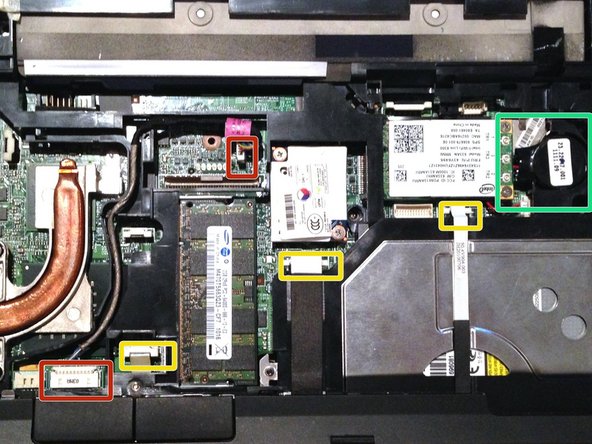
    • Release the three ZIF connectors and disconnect the ribbon cables.

    • This cable is routed over the top cover and needs to be disconnected at one end to allow the top cover to be removed.

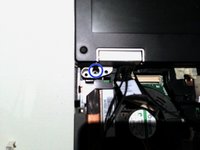
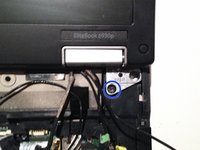
    • Remove the RTC battery from its holder

  14. Removing the HP Elitebook 6930p Top Cover: crwdns2935265:014crwdnd2935265:01crwdnd2935265:01crwdne2935265:0
    • Lift the rear edge of the top cover until it separates from the base of the laptop and lifting it straight up.

crwdns2915888:0crwdne2915888:0

To reassemble your device, follow these instructions in reverse order.

crwdns2935229:09crwdne2935229:0

Richdave

crwdns2935283:004/09/10crwdne2935283:0

32,006 crwdns2915208:0crwdne2915208:0

crwdns2935297:030crwdne2935297:0

crwdns2915084:0crwdne2915084:0

Master Techs crwdns2935289:0Master Techscrwdne2935289:0

Community

crwdns2931471:0322crwdne2931471:0

crwdns2935297:02,498crwdne2935297:0

crwdns2944067:03crwdne2944067:0

Excellent and concise instructions. Thank you.

David Mullins - crwdns2934203:0crwdne2934203:0

Excellent, I have been looking for this kind of perfect description

Asia Goldy - crwdns2934203:0crwdne2934203:0

Pls help. My display is on but the backlight is not showing. I have tested the screen, display panel cable and the inverter on another laptop and they are working very well.

Pls what can be the solution to this.

My laptop is HP Elitebook 6930p.

thanks in advance.

Don Sky - crwdns2934203:0crwdne2934203:0

crwdns2917038:0crwdne2917038:0

crwdns2936625:0crwdne2936625:0:

crwdns2936751:024crwdne2936751:0 3

crwdns2936753:07crwdne2936753:0 11

crwdns2936753:030crwdne2936753:0 40

crwdns2942667:0crwdne2942667:0 8,514