crwdns2942213:0crwdne2942213:0
-
-
In this step, you have two options. You can either cut the rubber strips around the screws in order to keep using them, or you can peel them off completely, in which case you will have to replace them.
-
If you choose to cut around the screws, cut about a quarter inch on each end of the strips. You should see screws.
-
Next, make two cuts in the middle of the top strip (the one closest to the exhaust)
-
Use a Phillips 1 bit to remove the five main screws, and a Torx T5 bit to remove the small silver screw near the bottom.
-
-
-
-
Use a Jimmy to pry open the panel starting by the hinge assembly
-
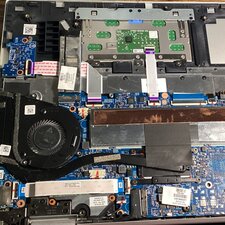
Work the Jimmy all the way around until panel pops free, then lift it up to reveal the inside of the device
-
To reassemble your device, follow these instructions in reverse order.
To reassemble your device, follow these instructions in reverse order.