crwdns2933423:0crwdne2933423:0
crwdns2947577:0crwdnd2947577:0crwdne2947577:0

Reformat SD Card

crwdns2869540:0crwdne2869540:0: 1,7 mil

crwdns2959988:0crwdne2959988:0

crwdns2959990:0crwdne2959990:0
3
crwdns2959992:0crwdne2959992:0
27
crwdns2959994:0crwdne2959994:0
86
crwdns2959996:0crwdne2959996:0
1.685
crwdns2955950:0crwdne2955950:0: 0

crwdns2959998:0crwdne2959998:0

crwdns2960000:0crwdne2960000:0
crwdns2959984:0crwdne2959984:0: 0

crwdns2959956:0crwdne2959956:0

crwdns2959986:0crwdne2959986:0: 0

crwdns2959958:0crwdne2959958:0

crwdns2955944:0crwdne2955944:0: crwdns2931287:05crwdne2931287:0
crwdns2955970:0crwdne2955970:0: crwdns2937585:0crwdne2937585:0
Reformat SD Card

crwdns2915892:0crwdne2915892:0

crwdns2959928:0crwdne2959928:0 ↓

The SD Card is required to save each photo before taking the next photo. This guide will show the proper steps to reformat the SD Card.

    1. Reformat SD Card, Reformat SD Card: crwdns2935265:01crwdnd2935265:01crwdnd2935265:02crwdne2935265:0 Reformat SD Card, Reformat SD Card: crwdns2935265:01crwdnd2935265:02crwdnd2935265:02crwdne2935265:0
      • Turn the camera on by sliding the switch from the "Off" position to the "On" position. The switch is located above the touchscreen and to the left.

      • The screen will say "Sensor cleaning" once the switch is moved to "On".

      crwdns2952109:0crwdne2952109:0

      crwdns2917038:0crwdne2917038:0

    2. Reformat SD Card: crwdns2935265:02crwdnd2935265:01crwdnd2935265:01crwdne2935265:0
      • Push the black button that says "Menu", located below the "ON/OFF" switch.

      crwdns2952109:0crwdne2952109:0

      crwdns2917038:0crwdne2917038:0

    3. Reformat SD Card: crwdns2935265:03crwdnd2935265:01crwdnd2935265:01crwdne2935265:0
      • Using the thumb pad, scroll to the 9th menu from the left.

      crwdns2952109:0crwdne2952109:0

      crwdns2917038:0crwdne2917038:0

    4. Reformat SD Card: crwdns2935265:04crwdnd2935265:01crwdnd2935265:01crwdne2935265:0
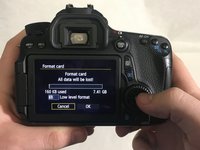
      • Scroll down the list using the thumb pad and select, "Format card" by pressing the center of the thumb pad labeled, "SET".

      crwdns2952109:0crwdne2952109:0

      crwdns2917038:0crwdne2917038:0

    5. Reformat SD Card: crwdns2935265:05crwdnd2935265:01crwdnd2935265:02crwdne2935265:0 Reformat SD Card: crwdns2935265:05crwdnd2935265:02crwdnd2935265:02crwdne2935265:0
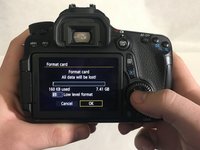
      • Once you select "OK", all pictures will be erased from the SD Card.

      • Press the right side of the thumb pad to move over the "Ok" button.

      • Once "OK" is highlighted, press the middle of thumb pad to initiate the formatting of the card.

      crwdns2952109:0crwdne2952109:0

      crwdns2917038:0crwdne2917038:0

    6. Reformat SD Card: crwdns2935265:06crwdnd2935265:01crwdnd2935265:01crwdne2935265:0
      • Wait.

      crwdns2952109:0crwdne2952109:0

      crwdns2917038:0crwdne2917038:0

    7. Reformat SD Card: crwdns2935265:07crwdnd2935265:01crwdnd2935265:01crwdne2935265:0
      • SD Card is now formatted.

      crwdns2952109:0crwdne2952109:0

      crwdns2917038:0crwdne2917038:0

crwdns2915888:0crwdne2915888:0

To reassemble your device, follow these instructions in reverse order.

crwdns2935221:0crwdne2935221:0

crwdns2862417:0crwdne2862417:0

crwdns2935293:0crwdne2935293:0

John Webb

crwdns2935283:003/26/18crwdne2935283:0

169 crwdns2915208:0crwdne2915208:0

crwdns2935295:0crwdne2935295:0

crwdns2935287:0crwdne2935287:0

University of Memphis, Team S2-G5, Kim Spring 2018 crwdns2935289:0University of Memphis, Team S2-G5, Kim Spring 2018crwdne2935289:0

UM-KIM-S18S2G5

crwdns2931471:03crwdne2931471:0

crwdns2935297:060crwdne2935297:0

crwdns2947412:00crwdne2947412:0

crwdns2917038:0crwdne2917038:0

crwdns2936625:0crwdne2936625:0:

crwdns2936751:024crwdne2936751:0 3

crwdns2936753:07crwdne2936753:0 27

crwdns2936753:030crwdne2936753:0 86

crwdns2959996:0crwdne2959996:0 1,685