crwdns2915892:0crwdne2915892:0
Screen and / or digitizer are broken but the rest of the phone is still fully functional.
crwdns2942213:0crwdne2942213:0
-
-
Use a pin to remove the SIM & SD card
-
-
-
With the help of a silicone spatula or similar opening tool, press gently into the separation between housing and screen
-
Gently pry the frame away from the screen .
There is no glue used between rear cover and frame.
This is correct. That is why no glue is mentioned in the instructions.
Is something specific you are referring to?
Frederic -
No, I was just surprised that it is just press-fitted:)
-
-
-
Disconnect the rest of all the connectors. (Image shows fingerprint scanner connector already removed)
-
-
-
First disconnect the connector for the fingerprint scanner
-
Then carefully pry the scanner (it is adhered to the board )
-
Preheating the scanner area with a hair dryer can help
I think the best would be to first disconnect battery just for safety.
Hi, thanks for your remark. I just changed the steps of the instruction.
-
-
-
Remove all Phillips screws screws eg with a #00 Phillips driver
-
-
-
Remove the rest of the screws
-
Gently pry off the plastic covers
-
-
-
Remove the plastic cover from the top of the phone
-
Gentle prying may be help to loosen it.
-
Remove the screw hidden under the cover.
-
-
-
Move the plastic tab to the side to remove the main board
-
-
-
-
Disconnect the ribbon cable
-
Remove the screw.
-
Carefully remove the circuit board
-
-
-
Gently separate the side button bar from the frame
-
-
-
Remove the upper speaker
-
Caution: When removing the speaker, the two parts of the speaker can separate from each other. They are only held together by two very thin copper cables!
-
The best way to get to the bottom of the speaker and pry it out carefully is by using the direction of the red arrow.
remove the silicone part from the front camera and pry from down there trying to reach the bottom-most part of the speaker
-
-
-
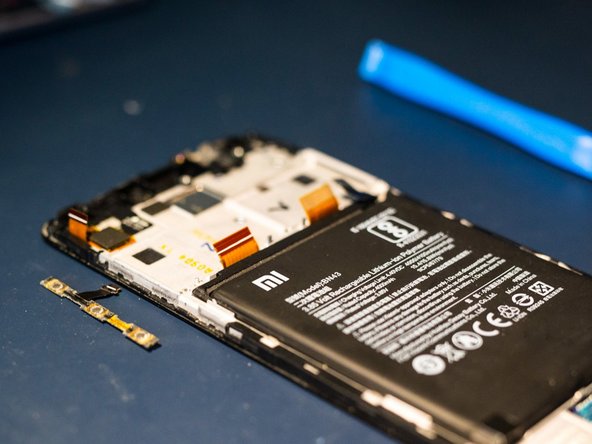
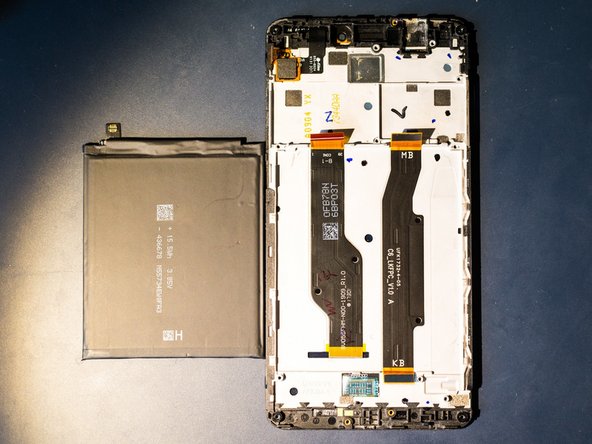
Peel off the two battery adhesive strips to remove the battery
-
Pull as flat as possible and rather slowly. Heating the display with a hair dryer makes the whole thing a little easier.
Möglichst flach und eher langsam ziehen.
Mit einem Föhn das Display erwärmen macht das ganze etwas einfacher.
-
-
-
Disconnect the ribbon cable for the charging board. Keep it safe for later reuse.
-
-
-
Depending on the completeness of the replacement part, the LED lighting may also be removed
-
T o remove it, gently pry with some pointed tweezers or similar tool
Step missing here. After this step you have to use a heat gun to soften the adhesive on the actual screen to remove it from the frame. But this is a difficult step.
Hi Don, using a heat gun is not necessary at this step because the instruction is for a a complete screen and digitizer exchange. As you say this is a very difficult step, which is out of scope of this instruction.
-
-
-
For testing purposes, the button bar, the screen and the battery can be connected.
-
Attention! When doing so, there is an increased risk of damaging the connections or the battery. Be very careful!
-
A long press on the bottom button should start the phone
-
-
-
Insert the upper speaker and press it into the end position
-
-
-
If previously removed, insert the LED bar (red circle)
-
Insert the charging board into proper position and tighten (blue circle)
-
-
-
Remove the blue protective strip from the corresponding adhesive surface. Insert the ribbon cable into the power supply
-
Press the cable flat onto the adhesive area
-
Ensure everything is properly aligned
-
-
-
Install the lower plastic cover and screw it in place
-
-
-
Insert the motherboard
-
Use the metal pin and the plastic hook to check proper alignment.
-
-
-
Remove the cover from the two adhesive strips for the battery
-
Insert the battery and reconnect it.
-
-
-
Press the fingerprint scanner back into its position.
-
Press the display back into the housing. Done!
-


Repeat the steps in reverse order to reassemble your device.
Repeat the steps in reverse order to reassemble your device.
crwdns2935221:0crwdne2935221:0
crwdns2935229:04crwdne2935229:0
crwdns2934873:0crwdne2934873:0
100%


crwdns2934885:0crwdne2934885:0 crwdns2934875:0crwdne2934875:0
crwdns2934877:0crwdne2934877:0 ›
crwdns2947412:03crwdne2947412:0
There are major steps missing between step 14 and step 15. This is not a complete guide on screen replacement.
Hi Don, which steps are you missing between 14 and 15 ? Once all parts are removed from the old display one can try the test fit on the new display.
Watch and pray ,global warming.