crwdns2933423:0crwdne2933423:0

Rebuilding the ASF Assy

crwdns2942213:0crwdne2942213:0

  1. Rebuilding the ASF Assy, previous steps: crwdns2935265:01crwdnd2935265:01crwdnd2935265:03crwdne2935265:0 Rebuilding the ASF Assy, previous steps: crwdns2935265:01crwdnd2935265:02crwdnd2935265:03crwdne2935265:0 Rebuilding the ASF Assy, previous steps: crwdns2935265:01crwdnd2935265:03crwdnd2935265:03crwdne2935265:0
    • remove the rear housing

    • remove the side panels

    • remove the upper housing

  2. Rebuilding the ASF Assy, Overview: crwdns2935265:02crwdnd2935265:01crwdnd2935265:01crwdne2935265:0
    • This is the "ASF Assy" which we will be removing.

    • I have separated the "Panel FFC" (control panel) from the upper housing and reattached it to the printer for testing purposes.

  3. Rebuilding the ASF Assy, Bracket removal overview: crwdns2935265:03crwdnd2935265:01crwdnd2935265:01crwdne2935265:0
    • Our first task is to remove the metal brackets which hold the Guide Roller in place.

    • metal brackets

    • Guide Roller

  4. Rebuilding the ASF Assy, Unscrew the Guide Roller brackets.: crwdns2935265:04crwdnd2935265:01crwdnd2935265:03crwdne2935265:0 Rebuilding the ASF Assy, Unscrew the Guide Roller brackets.: crwdns2935265:04crwdnd2935265:02crwdnd2935265:03crwdne2935265:0 Rebuilding the ASF Assy, Unscrew the Guide Roller brackets.: crwdns2935265:04crwdnd2935265:03crwdnd2935265:03crwdne2935265:0
    • Note the vertical position of the screws holding the metal brackets. They move up and down to adjust the position of the Guide Roller. Mine were in the highest position, which puts the least amount of pressure on the Guide Roller.

    • Remove the screws.

  5. Rebuilding the ASF Assy, Disengage brackets from the Roller Guide: crwdns2935265:05crwdnd2935265:01crwdnd2935265:03crwdne2935265:0 Rebuilding the ASF Assy, Disengage brackets from the Roller Guide: crwdns2935265:05crwdnd2935265:02crwdnd2935265:03crwdne2935265:0 Rebuilding the ASF Assy, Disengage brackets from the Roller Guide: crwdns2935265:05crwdnd2935265:03crwdnd2935265:03crwdne2935265:0
    • Gently pull on the Roller Guide to release the metal bracket from the shaft.

    • Tilt the metal bracket sideways and off of the cam.

  6. Rebuilding the ASF Assy, Free bracket from Print Assembly: crwdns2935265:06crwdnd2935265:01crwdnd2935265:02crwdne2935265:0 Rebuilding the ASF Assy, Free bracket from Print Assembly: crwdns2935265:06crwdnd2935265:02crwdnd2935265:02crwdne2935265:0
    • Because the Roller Guide flexes slightly, you can now shift the metal bracket toward the rear of the printer, to disengage it from the carriage assembly.

    • (needs new picture)

  7. Rebuilding the ASF Assy, Remove Roller Guide brackets: crwdns2935265:07crwdnd2935265:01crwdnd2935265:02crwdne2935265:0 Rebuilding the ASF Assy, Remove Roller Guide brackets: crwdns2935265:07crwdnd2935265:02crwdnd2935265:02crwdne2935265:0
    • Rotate the metal bracket upward around the Roller Guide and remove it.

    • (needs another picture)

  8. Rebuilding the ASF Assy, Right side disconnects: crwdns2935265:08crwdnd2935265:01crwdnd2935265:03crwdne2935265:0 Rebuilding the ASF Assy, Right side disconnects: crwdns2935265:08crwdnd2935265:02crwdnd2935265:03crwdne2935265:0 Rebuilding the ASF Assy, Right side disconnects: crwdns2935265:08crwdnd2935265:03crwdnd2935265:03crwdne2935265:0
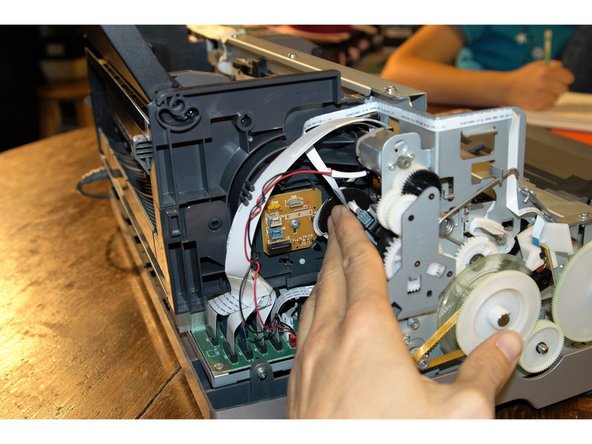
    • Disconnect the sheet feeder motor at the relay connector and unroute the relay wire from the 'ASF Assy'.

    • The release tab for the relay connector is on the motor side of the connector.

    • Separate the sheet feeder motor ground wire from the chassis ground.

    • I like to put the grounding screw back to keep it from getting lost.

  9. Rebuilding the ASF Assy, Left side disconnects: crwdns2935265:09crwdnd2935265:01crwdnd2935265:03crwdne2935265:0 Rebuilding the ASF Assy, Left side disconnects: crwdns2935265:09crwdnd2935265:02crwdnd2935265:03crwdne2935265:0 Rebuilding the ASF Assy, Left side disconnects: crwdns2935265:09crwdnd2935265:03crwdnd2935265:03crwdne2935265:0
    • Disconnect the FFC (flat flexible cable) (which links the main board to the relay board) at CN1

    • Disconnect the Paper Edge sensor at CN2

    • Disconnect the APG (automatic paper guide?) sensors at CN4 and CN5.

    • Disconnect the FFC which links the Paper Feed Encoder to the relay board at CN6. The Paper Feed Encoder's FFC is also tacked to the Sheet Feeder by double sided tape. Carefully separate the cable from the Sheet Feeder's frame.

    • Deroute the red & black APG motor wires from the ASF (automatic sheet feeder) housing.

    • Deroute the Flat Flexible Cables from the groove in the Automatic Sheet Feeder housing.

  10. Rebuilding the ASF Assy, Remove 3 screws: crwdns2935265:010crwdnd2935265:01crwdnd2935265:03crwdne2935265:0 Rebuilding the ASF Assy, Remove 3 screws: crwdns2935265:010crwdnd2935265:02crwdnd2935265:03crwdne2935265:0 Rebuilding the ASF Assy, Remove 3 screws: crwdns2935265:010crwdnd2935265:03crwdnd2935265:03crwdne2935265:0
    • Remove right side screws.

    • Remove left side screw.

    • todo: update left side picture to show correct disassembly state.

  11. Rebuilding the ASF Assy, Remove the Sheet Feeder: crwdns2935265:011crwdnd2935265:01crwdnd2935265:02crwdne2935265:0 Rebuilding the ASF Assy, Remove the Sheet Feeder: crwdns2935265:011crwdnd2935265:02crwdnd2935265:02crwdne2935265:0
    • Hold the Sheet Feeder here and lift it free.

    • Because many of these printers were used in semi-professional settings, they were often modified. This one has a waste ink tank, bypassing the waste ink pads and the associated end-of-life error.

crwdns2915888:0crwdne2915888:0

Congratulations, you just saved a 700$ printer.

crwdns2935229:02crwdne2935229:0

ciradrak

crwdns2935283:003/15/10crwdne2935283:0

448 crwdns2915208:0crwdne2915208:0

crwdns2935297:02crwdne2935297:0

crwdns2944067:02crwdne2944067:0

I am impressed by the quality of the instructions and photos. But do not why the ASF had to be removed. Is it to add a replacment? My concern is that my printer won't load paper. I am wondering whether I just need to increase the pressure on the pickup roller. With my printer the ASF mechanism is working it does try to pick up the paper.

ed - crwdns2934203:0crwdne2934203:0

*sigh* Well you can see it takes me a while to get back to working on projects that I start. Anyway, the reason I was taking out the sheet feeder was that the sheet feeder builds up too much friction which the printer doesn't like and causes the sheet of paper to be ejected without printing anything. By removing it, lubricating it, and fixing the rubber bits; the printer will print again. My fault was that I haven't finished writing the guide yet.

ciradrak -

crwdns2917038:0crwdne2917038:0

crwdns2936625:0crwdne2936625:0:

crwdns2936751:024crwdne2936751:0 1

crwdns2936753:07crwdne2936753:0 3

crwdns2936753:030crwdne2936753:0 26

crwdns2942667:0crwdne2942667:0 1,523