crwdns2933423:0crwdne2933423:0

Razer Naga Expert MMO Motherboard Replacement

crwdns2942213:0crwdne2942213:0

  1. Razer Naga Expert MMO Motherboard Replacement, Top Plastic Shell: crwdns2935265:01crwdnd2935265:01crwdnd2935265:01crwdne2935265:0
    • Peel back the two teflon tape from the top corners and the one larger one from the bottom with a spudger.

  2. Razer Naga Expert MMO Motherboard Replacement: crwdns2935265:02crwdnd2935265:01crwdnd2935265:01crwdne2935265:0
    • Remove the four 7mm screws using a Phillips #00 screwdriver.

  3. Razer Naga Expert MMO Motherboard Replacement: crwdns2935265:03crwdnd2935265:01crwdnd2935265:01crwdne2935265:0
    • Gently remove the top plastic plate of the mouse.

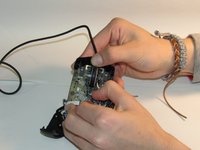
    • Unplug the white cord from the circuit board.

  4. Razer Naga Expert MMO Motherboard Replacement: crwdns2935265:04crwdnd2935265:01crwdnd2935265:01crwdne2935265:0
    • Lightly pull the two plastic sides of the mouse to remove them.

  5. Razer Naga Expert MMO Motherboard Replacement, Scroll Wheel: crwdns2935265:05crwdnd2935265:01crwdnd2935265:01crwdne2935265:0
    • Using a Phillips #00 screwdriver, remove the 5mm screw holding the scroll wheel in place.

  6. Razer Naga Expert MMO Motherboard Replacement: crwdns2935265:06crwdnd2935265:01crwdnd2935265:01crwdne2935265:0
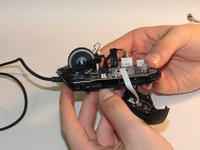
    • Unplug the cord that connects the scroll wheel to the motherboard.

  7. Razer Naga Expert MMO Motherboard Replacement: crwdns2935265:07crwdnd2935265:01crwdnd2935265:01crwdne2935265:0
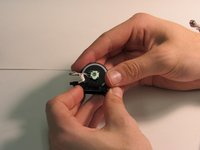
    • Slide the chip out of the scroll wheel.

  8. Razer Naga Expert MMO Motherboard Replacement: crwdns2935265:08crwdnd2935265:01crwdnd2935265:02crwdne2935265:0 Razer Naga Expert MMO Motherboard Replacement: crwdns2935265:08crwdnd2935265:02crwdnd2935265:02crwdne2935265:0
    • Gently wiggle the scroll wheel up and back to remove the scroll wheel from the mouse.

    • Use your fingers to simultaneously push the scroll wheel and its frame forward and pull back on the plastic tab directly behind the scroll wheel until it is loose.

    • Use your thumbs to pop the scroll wheel out from its plastic frame.

  9. Razer Naga Expert MMO Motherboard Replacement: crwdns2935265:09crwdnd2935265:01crwdnd2935265:01crwdne2935265:0
    • Place the new scroll wheel in the mount.

    • Upon reassembly, be careful to ensure the silver box on the side of the wheel is placed into the frame with the tab facing downward so upon entry into the frame it fits into its slot.

  10. Razer Naga Expert MMO Motherboard Replacement, Motherboard: crwdns2935265:010crwdnd2935265:01crwdnd2935265:01crwdne2935265:0
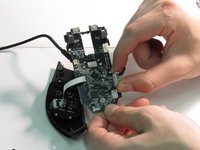
    • Using a Phillips #00 screwdriver, remove all five 5mm screws that connect the motherboard to the main frame.

  11. Razer Naga Expert MMO Motherboard Replacement: crwdns2935265:011crwdnd2935265:01crwdnd2935265:02crwdne2935265:0 Razer Naga Expert MMO Motherboard Replacement: crwdns2935265:011crwdnd2935265:02crwdnd2935265:02crwdne2935265:0
    • Place the new motherboard in the mouse.

    • When reassembling the mouse, place the loose plastic piece that holds the scroll wheel and wire in place into the rectangular slots in the circuit board.

crwdns2915888:0crwdne2915888:0

To reassemble your device, follow these instructions in reverse order.

crwdns2935227:0crwdne2935227:0

Jacqueline Scalzo

crwdns2935283:001/29/18crwdne2935283:0

253 crwdns2915208:0crwdne2915208:0

crwdns2935297:02crwdne2935297:0

crwdns2915084:0crwdne2915084:0

University of Alabama, Team S1-G2, Bedsole Spring 2018 crwdns2935289:0University of Alabama, Team S1-G2, Bedsole Spring 2018crwdne2935289:0

UA-BEDSOLE-S18S1G2

crwdns2931471:04crwdne2931471:0

crwdns2935297:05crwdne2935297:0

crwdns2944067:04crwdne2944067:0

Surprised this is rated Difficult. :f

Sumona Florence - crwdns2934203:0crwdne2934203:0

Do you know where I can find the motherboard for the mouse?

aldo serrano - crwdns2934203:0crwdne2934203:0

Where can I get a replacement motherboard?

David Mendo Diaz - crwdns2934203:0crwdne2934203:0

I followed these steps for the razer naga hex and it's the same. Just a tip for people that want to take off the teflon tapes, you don't need to take off the big one to the side, the only 4 screws holding the case to the top part of the mouse are under the 4 small teflon tapes in each corner. Good luck!

Vlad Gosa - crwdns2934203:0crwdne2934203:0

crwdns2917038:0crwdne2917038:0

crwdns2936625:0crwdne2936625:0:

crwdns2936751:024crwdne2936751:0 0

crwdns2936753:07crwdne2936753:0 3

crwdns2936753:030crwdne2936753:0 15

crwdns2942667:0crwdne2942667:0 2,147