crwdns2915892:0crwdne2915892:0
In this replacement guide we will go over how to disassemble the Razer BlackWidow Chroma. After disassembling the keyboard there will be a link on how to solder and replace the lights.
crwdns2942213:0crwdne2942213:0
-
-
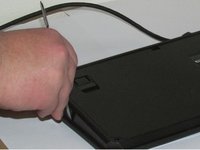
Gently pull off the four rubber tabs located on the corners of the keyboard with your fingers.
-
-
-
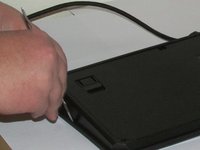
Using a metal spudger, gently remove the plastic tabs that are covering the two screws.
-
-
-
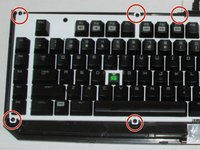
There are six 10mm screws indicated by the red markups . Remove the screws using the Phillips #0 Screwdriver.
-
-
-
-
Using a metal spudger, begin prying off the faceplate of the keyboard. There are small tabs along the edge of the keyboard and the faceplate that must be released. There are four tabs along the front of the keyboard and two along each side.
-
-
-
Using a plastic opening tool, lift the plastic covering away from the LED light.
-
-
-
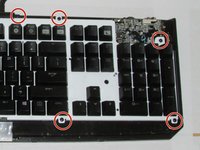
Using the Phillips #0 Screwdriver, remove the ten 10mm screws that are indicated by the red markers.
-
-
-
Click the link below to watch a video that will guide you through the rest of the steps on how to replace LEDs in the keyboard. This step does require soldering . How to Replace Back-light LEDs
-


To reassemble your device, follow these instructions in reverse order.
To reassemble your device, follow these instructions in reverse order.
crwdns2935221:0crwdne2935221:0
crwdns2935229:03crwdne2935229:0
crwdns2915084:0crwdne2915084:0

UW Tacoma, Team 2-6, Rose Winter 2017 crwdns2935289:0UW Tacoma, Team 2-6, Rose Winter 2017crwdne2935289:0
UWT-ROSE-W17S2G6
crwdns2931471:03crwdne2931471:0
crwdns2935297:04crwdne2935297:0
crwdns2947412:02crwdne2947412:0
Anyone know what type of LEDs are need for the replacement?
High brightness led’s, 3mm.