crwdns2933423:0crwdne2933423:0

Raptor 2 / T REX 3 Y End Stop Adaptor

crwdns2942213:0crwdne2942213:0

  1. Raptor 2 / T REX 3 Y End Stop Adaptor, Y End Stop Adaptor: crwdns2935265:01crwdnd2935265:01crwdnd2935265:03crwdne2935265:0 Raptor 2 / T REX 3 Y End Stop Adaptor, Y End Stop Adaptor: crwdns2935265:01crwdnd2935265:02crwdnd2935265:03crwdne2935265:0 Raptor 2 / T REX 3 Y End Stop Adaptor, Y End Stop Adaptor: crwdns2935265:01crwdnd2935265:03crwdnd2935265:03crwdne2935265:0
    • Retain all fasteners until after assembly.

    • Find the file for printing at http://bit.ly/2RFHGyT

    • To start this process, you will need to remove all 4 corner leveling knobs. There may also be a star washer between the knob and Y carriage plate on each corner.

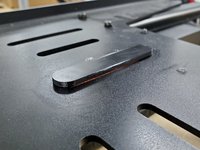
    • The screw that is not allowing the new chain to sit flat, needs to be removed. Use an M2.5 hex for this.

    • The screw is no longer needed.

    • The raised part sits closer to one side. It should face the end stop.

    • Test fit the printed part first to make sure it sits all the way flush.

  2. Raptor 2 / T REX 3 Y End Stop Adaptor, Y End Stop Adaptor: crwdns2935265:02crwdnd2935265:01crwdnd2935265:03crwdne2935265:0 Raptor 2 / T REX 3 Y End Stop Adaptor, Y End Stop Adaptor: crwdns2935265:02crwdnd2935265:02crwdnd2935265:03crwdne2935265:0 Raptor 2 / T REX 3 Y End Stop Adaptor, Y End Stop Adaptor: crwdns2935265:02crwdnd2935265:03crwdnd2935265:03crwdne2935265:0
    • Loosen the socket head screw using a M4 hex .

    • Reposition the end stop so that the new printed part triggers the lever.

    • Using a RTV silicone based adhesive (high temp suggested) or another glue that works with plastic/metal, apply a small amount of glue to the sides of the printed part on the inside corner.

  3. Raptor 2 / T REX 3 Y End Stop Adaptor, Y End Stop Adaptor: crwdns2935265:03crwdnd2935265:01crwdnd2935265:02crwdne2935265:0 Raptor 2 / T REX 3 Y End Stop Adaptor, Y End Stop Adaptor: crwdns2935265:03crwdnd2935265:02crwdnd2935265:02crwdne2935265:0
    • Clean up any excess glue using a paper towel.

    • Double check that the end stop is triggered by the new part. Reposition the end stop bracket if necessary.

    • Tighten the end stop bracket.

    • This is held in with a bolt and T Nut. Make sure the bracket is secure after tightening the bolt.

    • Continue on with Step 10 on the Cable Chain Install Guide by clicking http://bit.ly/2Runj7r.

crwdns2915888:0crwdne2915888:0

To reassemble your device, follow these instructions in reverse order.

Tiny Machines 3D

crwdns2935283:011/16/19crwdne2935283:0

2,970 crwdns2915208:0crwdne2915208:0

crwdns2935297:014crwdne2935297:0

crwdns2915084:0crwdne2915084:0

Tiny Machines 3D crwdns2935289:0Tiny Machines 3Dcrwdne2935289:0

Community

crwdns2931471:05crwdne2931471:0

crwdns2935297:040crwdne2935297:0

crwdns2944067:00crwdne2944067:0

crwdns2917038:0crwdne2917038:0

crwdns2936625:0crwdne2936625:0:

crwdns2936751:024crwdne2936751:0 0

crwdns2936753:07crwdne2936753:0 4

crwdns2936753:030crwdne2936753:0 8

crwdns2942667:0crwdne2942667:0 131