crwdns2933423:0crwdne2933423:0

RYOBI AG454 Motor Replacement

crwdns2942213:0crwdne2942213:0

  1. RYOBI AG454 Motor Replacement, Rotator Handle: crwdns2935265:01crwdnd2935265:01crwdnd2935265:01crwdne2935265:0
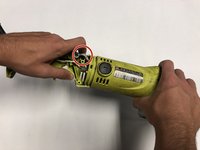
    • Lay the handle on it's side, with the screws facing up.

  2. RYOBI AG454 Motor Replacement: crwdns2935265:02crwdnd2935265:01crwdnd2935265:01crwdne2935265:0
    • Remove the five 14mm screws from the rotating handle using the Phillips #1 screwdriver.

  3. RYOBI AG454 Motor Replacement: crwdns2935265:03crwdnd2935265:01crwdnd2935265:01crwdne2935265:0
    • Take the top part of the handle off.

  4. RYOBI AG454 Motor Replacement: crwdns2935265:04crwdnd2935265:01crwdnd2935265:01crwdne2935265:0
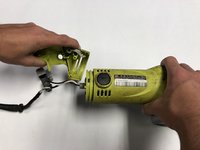
    • Unscrew the two 14mm screws from the clear bracket using the Phillips #1 screwdriver.

    • Remove the bracket.

  5. RYOBI AG454 Motor Replacement: crwdns2935265:05crwdnd2935265:01crwdnd2935265:02crwdne2935265:0 RYOBI AG454 Motor Replacement: crwdns2935265:05crwdnd2935265:02crwdnd2935265:02crwdne2935265:0
    • Push handle rotation latch and seperate the rest of the handle from main body.

  6. RYOBI AG454 Motor Replacement, Carbon Brush: crwdns2935265:06crwdnd2935265:01crwdnd2935265:01crwdne2935265:0
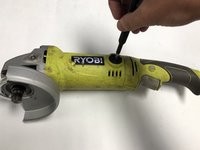
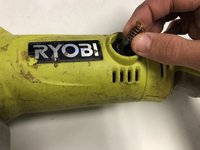
    • Remove the brush caps from each side of the body using the 4 mm flat head screwdriver.

  7. RYOBI AG454 Motor Replacement: crwdns2935265:07crwdnd2935265:01crwdnd2935265:01crwdne2935265:0
    • Remove the carbon brushes.

  8. RYOBI AG454 Motor Replacement, Driveshaft: crwdns2935265:08crwdnd2935265:01crwdnd2935265:02crwdne2935265:0 RYOBI AG454 Motor Replacement, Driveshaft: crwdns2935265:08crwdnd2935265:02crwdnd2935265:02crwdne2935265:0
    • Remove the two carbon brushes from both sides of the device.

  9. RYOBI AG454 Motor Replacement: crwdns2935265:09crwdnd2935265:01crwdnd2935265:01crwdne2935265:0
    • Remove the four 20mm screws that secures the gear box using a Phillips #1 screwdriver.

  10. RYOBI AG454 Motor Replacement: crwdns2935265:010crwdnd2935265:01crwdnd2935265:01crwdne2935265:0
    • Seperate the gear box case from body.

  11. RYOBI AG454 Motor Replacement: crwdns2935265:011crwdnd2935265:01crwdnd2935265:01crwdne2935265:0
    • Pull out drive shaft and remove it from the device.

  12. RYOBI AG454 Motor Replacement, Motor: crwdns2935265:012crwdnd2935265:01crwdnd2935265:02crwdne2935265:0 RYOBI AG454 Motor Replacement, Motor: crwdns2935265:012crwdnd2935265:02crwdnd2935265:02crwdne2935265:0
    • Remove the carbon brushes on both sides of the grinder.

  13. RYOBI AG454 Motor Replacement: crwdns2935265:013crwdnd2935265:01crwdnd2935265:01crwdne2935265:0
    • Remove the four 20mm screws securing gear box case using a Phillips #1 screwdriver.

  14. RYOBI AG454 Motor Replacement: crwdns2935265:014crwdnd2935265:01crwdnd2935265:01crwdne2935265:0
    • Seperate gear box case from body.

  15. RYOBI AG454 Motor Replacement: crwdns2935265:015crwdnd2935265:01crwdnd2935265:01crwdne2935265:0
    • Pull drive shaft from body of device.

  16. RYOBI AG454 Motor Replacement: crwdns2935265:016crwdnd2935265:01crwdnd2935265:01crwdne2935265:0
    • After removing the drive shaft pull out the cap.

  17. RYOBI AG454 Motor Replacement: crwdns2935265:017crwdnd2935265:01crwdnd2935265:01crwdne2935265:0
    • To remove the handle, remove the five screws using a Phillips #1 screwdriver.

  18. RYOBI AG454 Motor Replacement: crwdns2935265:018crwdnd2935265:01crwdnd2935265:01crwdne2935265:0
    • Cut the white wire that's located below the trigger in rear rotator handle with wire strippers.

    • When reassembling the handle twist the ends of the two wires together and crimp them.

  19. RYOBI AG454 Motor Replacement: crwdns2935265:019crwdnd2935265:01crwdnd2935265:02crwdne2935265:0 RYOBI AG454 Motor Replacement: crwdns2935265:019crwdnd2935265:02crwdnd2935265:02crwdne2935265:0
    • Using a Phillips #1 screwdriver, remove the two screws from the bracket on the bottom of the body.

    • Remove the bracket from the device.

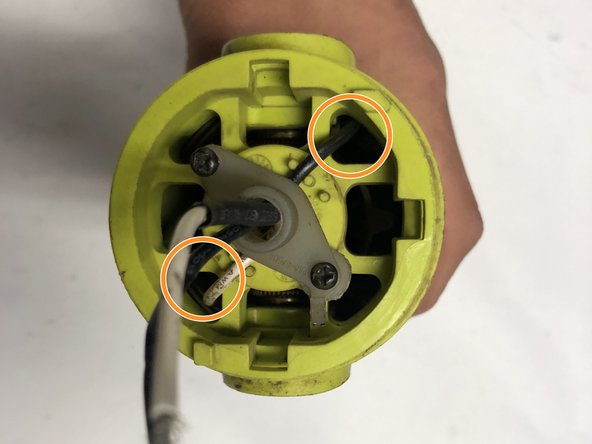
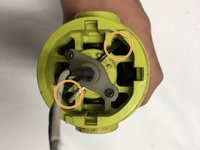
    • When reassembling be sure to pull the wires back through these two holes.

  20. RYOBI AG454 Motor Replacement: crwdns2935265:020crwdnd2935265:01crwdnd2935265:01crwdne2935265:0
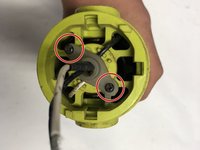
    • Remove two screws from the motor using the Phillips #1 screwdriver.

  21. RYOBI AG454 Motor Replacement: crwdns2935265:021crwdnd2935265:01crwdnd2935265:01crwdne2935265:0
    • From the bottom of the body, slide the two coils off the brushes with a Jimmy.

    • When putting the coils back in place, use the Jimmy on top of the coils and push down the roll around the edges to push the coil down.

    • Another way of putting the coils back on is to push the Jimmy on top of coil and use another Jimmy to push down the back of the coil.

    • Putting on the coils may take multiple attempts so do not get frustrated if you can't get it on first try.

  22. RYOBI AG454 Motor Replacement: crwdns2935265:022crwdnd2935265:01crwdnd2935265:01crwdne2935265:0
    • Carefully pull motor along with wires straight out from the body and remove it from the device.

crwdns2915888:0crwdne2915888:0

To reassemble your device, follow these instructions in reverse order.

Erica Faulkner

crwdns2935283:009/18/19crwdne2935283:0

716 crwdns2915208:0crwdne2915208:0

crwdns2935297:05crwdne2935297:0

crwdns2915084:0crwdne2915084:0

Embry-Riddle Aeronautical University, Team S12-G4, Lamothe Fall 2019 crwdns2935289:0Embry-Riddle Aeronautical University, Team S12-G4, Lamothe Fall 2019crwdne2935289:0

ERAU-LAMOTHE-F19S12G4

crwdns2931471:04crwdne2931471:0

crwdns2935297:05crwdne2935297:0

crwdns2944067:00crwdne2944067:0

crwdns2917038:0crwdne2917038:0

crwdns2936625:0crwdne2936625:0:

crwdns2936751:024crwdne2936751:0 0

crwdns2936753:07crwdne2936753:0 1

crwdns2936753:030crwdne2936753:0 7

crwdns2942667:0crwdne2942667:0 554