crwdns2915892:0crwdne2915892:0
If your RIDGID Belt Sander R2740 doesn’t have power the cause could be from a faulty power cord. This guide will teach you how to replace a power cord on a RIDGID Belt Sander R2740 . For this guide, you will need a screwdriver with a T10, T20 and a Phillips #3 head.
crwdns2942213:0crwdne2942213:0
-
-
Orient the belt sander so that the RIDGID logo is facing you.
-
Remove the six 19 mm and three 51 mm T20 screws that hold the cover into place.
-
Remove the cover from the belt sander.
-
-
-
-
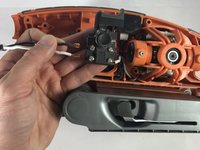
Remove the two 16 mm T10 screws.
-
Remove the support bracket that holds the power cord into place.
-
-
-
Lift the power cord from the resting grooves.
-
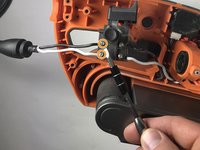
Rotate the switch so that the lock-on button is facing you.
-
Loosen the two 8 mm Phillips #3 screws.
-
Pull the two wires away from the switch.
-


To reassemble your device, follow these instructions in reverse order.
To reassemble your device, follow these instructions in reverse order.
crwdns2935221:0crwdne2935221:0
crwdns2935229:03crwdne2935229:0

crwdns2915084:0crwdne2915084:0

Oregon Institute of Technology, Team S1-G1, Lancaster Winter 2019 crwdns2935289:0Oregon Institute of Technology, Team S1-G1, Lancaster Winter 2019crwdne2935289:0
OIT-LANCASTER-W19S1G1
crwdns2931471:04crwdne2931471:0
crwdns2935297:06crwdne2935297:0
crwdns2947410:01crwdne2947410:0
On the motor cover, the upper left screw is the same as for handle screws, the other 3 are 2inches. In testing the switch with an ohm meter, the motor resistance is 50M ohms. So with switch off, there is a infinity, very high and the tens of Mega ohms. I also disconnected the output wires, connected to a spare power cord ( white is hot, black is return. On you right hand, if the thumb is earth ground, then the middle is hot, index is return.) For me it ran fine. Just to check I put the wires back into the switch and it now works. Maybe a poor wire to the switch. Pays to rewire and just check again. Every is very clean, dust bag still doesn't work.