crwdns2933423:0crwdne2933423:0

RCA RCR8622 Buttons Replacement

crwdns2942213:0crwdne2942213:0

  1. RCA RCR8622 Buttons Replacement, Speaker: crwdns2935265:01crwdnd2935265:01crwdnd2935265:03crwdne2935265:0 RCA RCR8622 Buttons Replacement, Speaker: crwdns2935265:01crwdnd2935265:02crwdnd2935265:03crwdne2935265:0 RCA RCR8622 Buttons Replacement, Speaker: crwdns2935265:01crwdnd2935265:03crwdnd2935265:03crwdne2935265:0
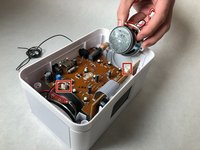
    • Remove the casing. Slide the plastic cover with the graphic off the main base. Be careful and hold both sides.

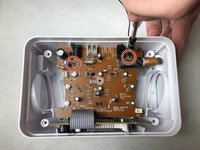
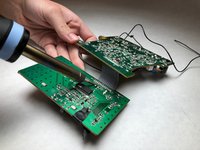
    • Flip the device over and unscrew the five 11 mm screws with a Phillip's #1 screwdriver.

    • A magnetic screwdriver will help you remove the screws from their slots.

  2. RCA RCR8622 Buttons Replacement: crwdns2935265:02crwdnd2935265:01crwdnd2935265:03crwdne2935265:0 RCA RCR8622 Buttons Replacement: crwdns2935265:02crwdnd2935265:02crwdnd2935265:03crwdne2935265:0 RCA RCR8622 Buttons Replacement: crwdns2935265:02crwdnd2935265:03crwdnd2935265:03crwdne2935265:0
    crwdns2935267:0crwdne2935267:0
    Tweezers
    $4.99
    crwdns2942207:0crwdne2942207:0
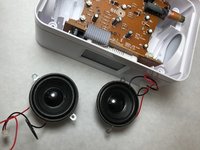
    • Pull the top of the device off and look closely at the motherboard. You will see two speakers, one on each side of the device.

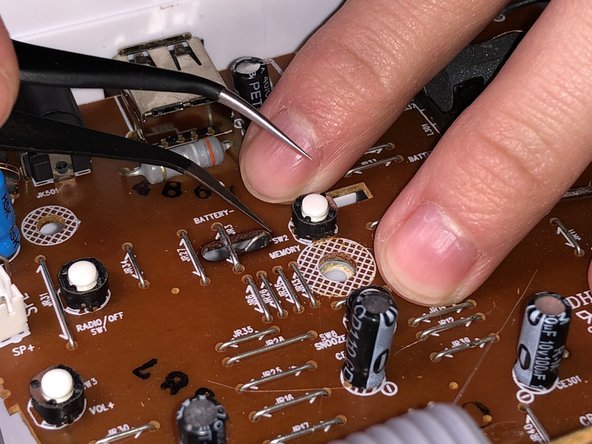
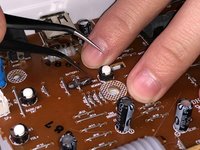
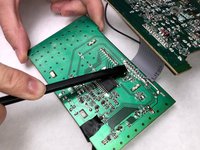
    • Grab the tweezers and follow the red and black wires leading from the speaker to the motherboard. They will attach to a white casing. Lift the white plug out with the tweezers to disconnect.

  3. RCA RCR8622 Buttons Replacement: crwdns2935265:03crwdnd2935265:01crwdnd2935265:02crwdne2935265:0 RCA RCR8622 Buttons Replacement: crwdns2935265:03crwdnd2935265:02crwdnd2935265:02crwdne2935265:0
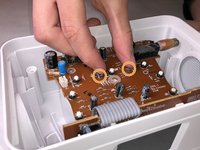
    • Grab the speaker and pull upward. The Speakers will be loose.

    • Repeat this step with the other speaker.

  4. RCA RCR8622 Buttons Replacement, LCD Screen: crwdns2935265:04crwdnd2935265:01crwdnd2935265:03crwdne2935265:0 RCA RCR8622 Buttons Replacement, LCD Screen: crwdns2935265:04crwdnd2935265:02crwdnd2935265:03crwdne2935265:0 RCA RCR8622 Buttons Replacement, LCD Screen: crwdns2935265:04crwdnd2935265:03crwdnd2935265:03crwdne2935265:0
    • Remove the two 11mm screws from the motherboard with the Phillip's #1 screwdriver.

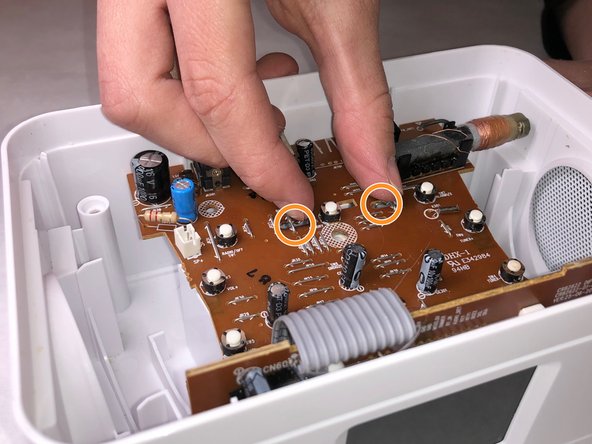
    • Squeeze the 2 metal prongs on the interior of the motherboard inward until a clicking noise is heard.

  5. RCA RCR8622 Buttons Replacement: crwdns2935265:05crwdnd2935265:01crwdnd2935265:03crwdne2935265:0 RCA RCR8622 Buttons Replacement: crwdns2935265:05crwdnd2935265:02crwdnd2935265:03crwdne2935265:0 RCA RCR8622 Buttons Replacement: crwdns2935265:05crwdnd2935265:03crwdnd2935265:03crwdne2935265:0
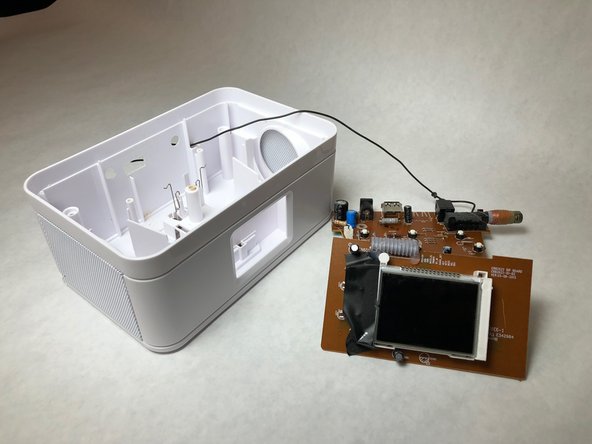
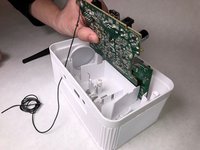
    • Lift the motherboard out of the interior of the device.

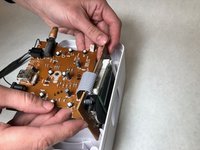
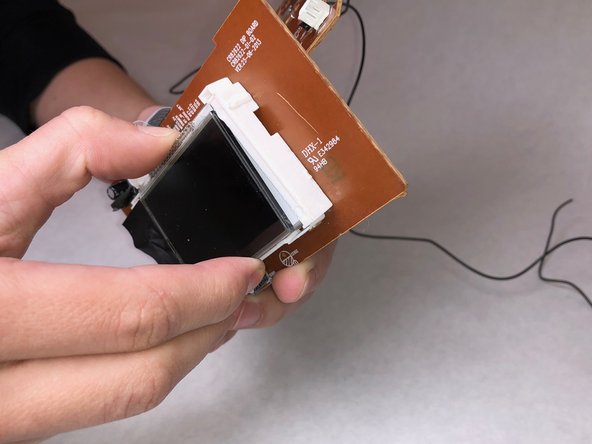
    • Remove the screen section of the device by lifting upward on the circuit it is connected to by sliding it upwards.

    • Both sections will be connected with a ribbon connection.

  6. RCA RCR8622 Buttons Replacement: crwdns2935265:06crwdnd2935265:01crwdnd2935265:03crwdne2935265:0 RCA RCR8622 Buttons Replacement: crwdns2935265:06crwdnd2935265:02crwdnd2935265:03crwdne2935265:0 RCA RCR8622 Buttons Replacement: crwdns2935265:06crwdnd2935265:03crwdnd2935265:03crwdne2935265:0
    • Flip both components of the circuitry over and from the main motherboard you will see metal pins that lead to the LCD screen.

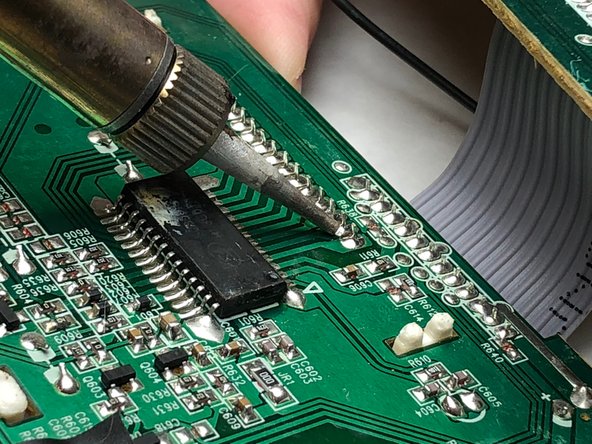
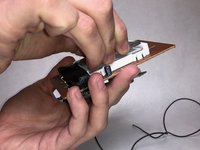
    • Heat the solder around the pins with a soldering iron so the pins can be removed and the screen can be detached. Use a flat object to help push out the pins.

  7. RCA RCR8622 Buttons Replacement: crwdns2935265:07crwdnd2935265:01crwdnd2935265:02crwdne2935265:0 RCA RCR8622 Buttons Replacement: crwdns2935265:07crwdnd2935265:02crwdnd2935265:02crwdne2935265:0
    • Lift the screen upward, taking care not to allow the films below it to fall out.

  8. RCA RCR8622 Buttons Replacement, Buttons: crwdns2935265:08crwdnd2935265:01crwdnd2935265:03crwdne2935265:0 RCA RCR8622 Buttons Replacement, Buttons: crwdns2935265:08crwdnd2935265:02crwdnd2935265:03crwdne2935265:0 RCA RCR8622 Buttons Replacement, Buttons: crwdns2935265:08crwdnd2935265:03crwdnd2935265:03crwdne2935265:0
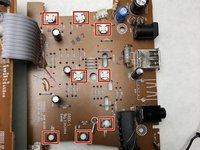
    • Identify which button needs to be changed out. There will be lables on the board indicating functionality of each button.

    • Flip the board over and find the button by the circles on the board.

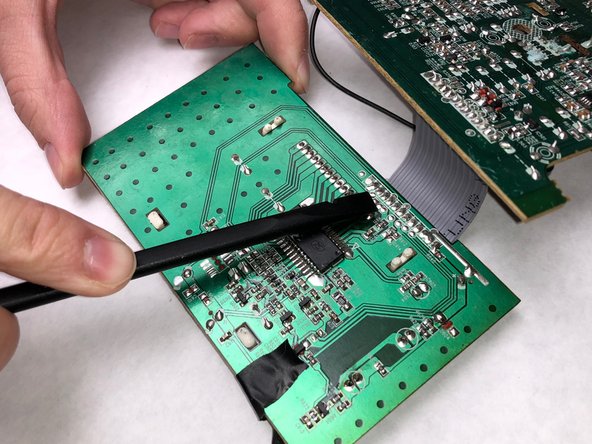
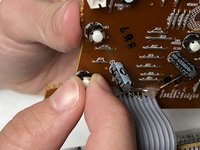
    • Solder the 2 pins off the button and pinch the top of the button on the other side to pull off.

crwdns2915888:0crwdne2915888:0

To reassemble your device, follow these instructions in reverse order.

Josh Excell

crwdns2935283:003/20/18crwdne2935283:0

449 crwdns2915208:0crwdne2915208:0

crwdns2935297:04crwdne2935297:0

crwdns2915084:0crwdne2915084:0

IUPUI, Team S6-G5, Baechle Spring 2018 crwdns2935289:0IUPUI, Team S6-G5, Baechle Spring 2018crwdne2935289:0

IUPUI-BAECHLE-S18S6G5

crwdns2931471:03crwdne2931471:0

crwdns2935297:04crwdne2935297:0

crwdns2944067:00crwdne2944067:0

crwdns2917038:0crwdne2917038:0

crwdns2936625:0crwdne2936625:0:

crwdns2936751:024crwdne2936751:0 0

crwdns2936753:07crwdne2936753:0 5

crwdns2936753:030crwdne2936753:0 13

crwdns2942667:0crwdne2942667:0 282