crwdns2933423:0crwdne2933423:0

crwdns2942213:0crwdne2942213:0

crwdns2935311:0crwdnd2935311:0crwdne2935311:0 crwdns2935313:0Pyrex Professional Kitchen Timer and Thermometercrwdnd2935313:0crwdnd2935313:0crwdne2935313:0

  1. Pyrex Professional Kitchen Timer and Thermometer Teardown, Pyrex Professional Kitchen Timer and Thermometer Teardown: crwdns2935265:01crwdnd2935265:01crwdnd2935265:03crwdne2935265:0 Pyrex Professional Kitchen Timer and Thermometer Teardown, Pyrex Professional Kitchen Timer and Thermometer Teardown: crwdns2935265:01crwdnd2935265:02crwdnd2935265:03crwdne2935265:0 Pyrex Professional Kitchen Timer and Thermometer Teardown, Pyrex Professional Kitchen Timer and Thermometer Teardown: crwdns2935265:01crwdnd2935265:03crwdnd2935265:03crwdne2935265:0
    • Disconnect the temperature probe and turn the device off

    • Turn the unit over and remove the battery.

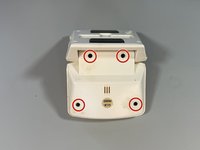
    • Remove the 4 screws from the bottom of the device.

  2. Pyrex Professional Kitchen Timer and Thermometer Teardown: crwdns2935265:02crwdnd2935265:01crwdnd2935265:02crwdne2935265:0 Pyrex Professional Kitchen Timer and Thermometer Teardown: crwdns2935265:02crwdnd2935265:02crwdnd2935265:02crwdne2935265:0
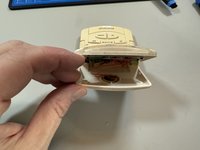
    • Carefully pull the back off. Keep an eye out for the C/F switch that is held in place by the bottom cover. Don't pull too hard or you may break the wires from the battery compartment.

    • Set the plastic C/F switch in a safe place as it bounces away easy and is small.

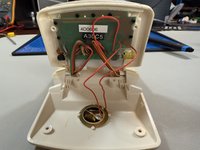
    • If you need to completely separate the cover from the case you will need to unsolder the wires to the battery compartment.

    • To reassemble, put the C/F switch in its spot and press the cover back on being careful not to pinch wires. Reinstall the 4 screws.

  3. Pyrex Professional Kitchen Timer and Thermometer Teardown: crwdns2935265:03crwdnd2935265:01crwdnd2935265:03crwdne2935265:0 Pyrex Professional Kitchen Timer and Thermometer Teardown: crwdns2935265:03crwdnd2935265:02crwdnd2935265:03crwdne2935265:0 Pyrex Professional Kitchen Timer and Thermometer Teardown: crwdns2935265:03crwdnd2935265:03crwdnd2935265:03crwdne2935265:0
    • To dissemble the back, remove the 4 #1 Philips screws.

    • Carefully pry the back off being careful not to pull on the transducer wires.

    • You now have access to the display board and the transducer.

    • To reassemble, place the back on being careful not to pinch wires and reinstall the 4 screws.

rickwag

crwdns2935283:010/18/10crwdne2935283:0

1,266 crwdns2915208:0crwdne2915208:0

crwdns2935297:011crwdne2935297:0

crwdns2947412:00crwdne2947412:0

crwdns2917038:0crwdne2917038:0

crwdns2936625:0crwdne2936625:0:

crwdns2936751:024crwdne2936751:0 1

crwdns2936753:07crwdne2936753:0 3

crwdns2936753:030crwdne2936753:0 18

crwdns2942667:0crwdne2942667:0 101