crwdns2915892:0crwdne2915892:0
This guide shows how to remove the side panel from the camera, how to remove the back panel, and how to replace the lens.
crwdns2942213:0crwdne2942213:0
-
-
Slide the battery eject button open to release the battery door.
-
-
-
With the battery door open, carefully remove all four 5 mm Phillips #1 screws.
-
-
-
Rotate the camera so that the underside is facing up.
-
Remove the four 5 mm Phillips #1 screws.
-
-
-
Place the camera on a flat surface, with its underside facing you.
-
Gently pull up on the side panel to remove it from the camera.
-
-
-
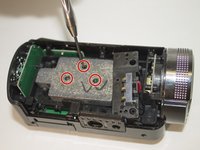
Remove the three 4 mm Phillips #1 screws holding the weight.
-
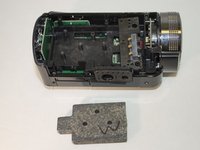
Remove the weight.
-
-
-
-
Remove the two 4 mm Phillips #1 screws holding the back panel in place.
-
-
-
Apply pressure to the back panel (away from the camera) to remove.
-
-
-
Set aside back panel for now.
-
Remove the final 4 mm Phillips #1 screw holding the screen in place. It is very small and hard to see.
-
-
-
Carefully apply pressure, away from the camera, to the screen to detach it from the body.
-
The white cable should still be connected to the body.
-
OPTIONAL: Remove the screen to make accessing the lens easier
-
-
-
Unscrew the two 4 mm Phillips #1 screws holding onto the lens casing
-
-
-
Pull forward on the lens casing to remove it. The cord connecting the light to the motherboard should still be attached.
-
-
-
Unscrew the three 4 mm Phillips #1 screws holding the plastic lens holder.
-
-
-
Push the lens out of the plastic casing from the back.
-


To reassemble your device, follow these instructions in reverse order.
To reassemble your device, follow these instructions in reverse order.
crwdns2915084:0crwdne2915084:0

Eastern Washington University, Team 1-2, Giguere Spring 2016 crwdns2935289:0Eastern Washington University, Team 1-2, Giguere Spring 2016crwdne2935289:0
EWU-GIGUERE-S16S1G2
crwdns2931471:04crwdne2931471:0
crwdns2935297:07crwdne2935297:0