crwdns2933423:0crwdne2933423:0

PowerA Enhanced1516953-01 Vibration Motors Replacement

crwdns2942213:0crwdne2942213:0

  1. PowerA Enhanced1516953-01 Vibration Motors Replacement, Rear Case: crwdns2935265:01crwdnd2935265:01crwdnd2935265:03crwdne2935265:0 PowerA Enhanced1516953-01 Vibration Motors Replacement, Rear Case: crwdns2935265:01crwdnd2935265:02crwdnd2935265:03crwdne2935265:0 PowerA Enhanced1516953-01 Vibration Motors Replacement, Rear Case: crwdns2935265:01crwdnd2935265:03crwdnd2935265:03crwdne2935265:0
    • Lay the controller face down.

    • Use a Phillips screwdriver to remove the eight 9.2 mm screws that secure the rear case.

    • Lift the rear case up and off of the chassis.

  2. PowerA Enhanced1516953-01 Vibration Motors Replacement, Motherboard: crwdns2935265:02crwdnd2935265:01crwdnd2935265:03crwdne2935265:0 PowerA Enhanced1516953-01 Vibration Motors Replacement, Motherboard: crwdns2935265:02crwdnd2935265:02crwdnd2935265:03crwdne2935265:0 PowerA Enhanced1516953-01 Vibration Motors Replacement, Motherboard: crwdns2935265:02crwdnd2935265:03crwdnd2935265:03crwdne2935265:0
    • Remove the two 3.3 mm Phillips screws that secure the motherboard to the front case.

    • Lift the motherboard up and out of the chassis.

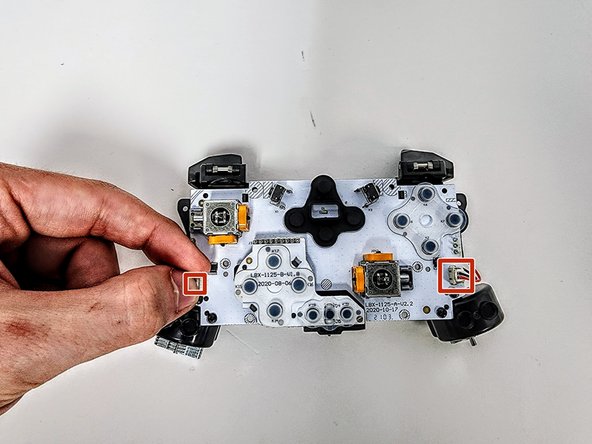
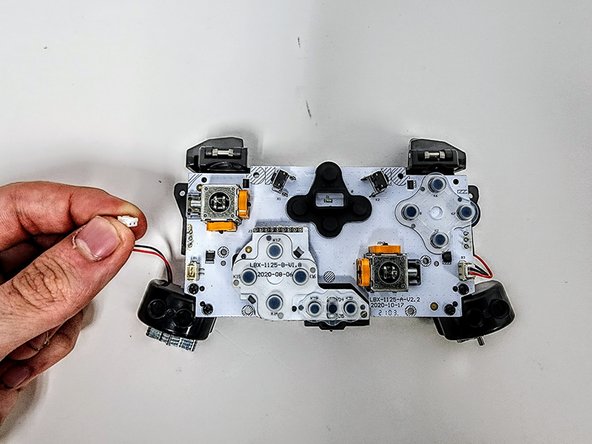
  3. PowerA Enhanced1516953-01 Vibration Motors Replacement, Vibration Motors: crwdns2935265:03crwdnd2935265:01crwdnd2935265:03crwdne2935265:0 PowerA Enhanced1516953-01 Vibration Motors Replacement, Vibration Motors: crwdns2935265:03crwdnd2935265:02crwdnd2935265:03crwdne2935265:0 PowerA Enhanced1516953-01 Vibration Motors Replacement, Vibration Motors: crwdns2935265:03crwdnd2935265:03crwdnd2935265:03crwdne2935265:0
    • Grip the white vibration motor connectors and pull them straight up and out of their sockets.

    • Do not pull on the wires.

    • Gently pull the connector from the pins

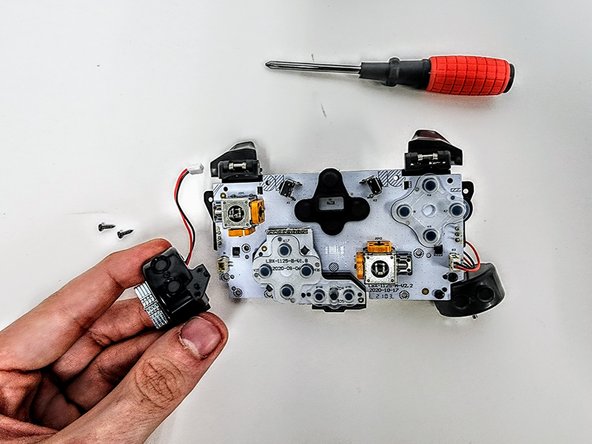
  4. PowerA Enhanced1516953-01 Vibration Motors Replacement: crwdns2935265:04crwdnd2935265:01crwdnd2935265:02crwdne2935265:0 PowerA Enhanced1516953-01 Vibration Motors Replacement: crwdns2935265:04crwdnd2935265:02crwdnd2935265:02crwdne2935265:0
    • Remove the four 3.3 mm Phillips screws that secure the motors.

    • Two screws secure each motor.

    • Once the second screw is removed on each motor, the vibration motor will immediately release itself. Support the motor while you remove the second screw.

crwdns2915888:0crwdne2915888:0

To reassemble your device, follow these instructions in reverse order.

Austin Fox

crwdns2935283:001/30/24crwdne2935283:0

578 crwdns2915208:0crwdne2915208:0

crwdns2935297:05crwdne2935297:0

crwdns2915084:0crwdne2915084:0

Austin Community College, Team 9-3, Watkins Spring 2024 crwdns2935289:0Austin Community College, Team 9-3, Watkins Spring 2024crwdne2935289:0

AUSTINCC-WATKINS-S24S9G3

crwdns2931471:04crwdne2931471:0

crwdns2935297:05crwdne2935297:0

crwdns2947412:00crwdne2947412:0

crwdns2917038:0crwdne2917038:0

crwdns2936625:0crwdne2936625:0:

crwdns2936751:024crwdne2936751:0 0

crwdns2936753:07crwdne2936753:0 5

crwdns2936753:030crwdne2936753:0 33

crwdns2942667:0crwdne2942667:0 179