crwdns2933423:0crwdne2933423:0

Power Mac G4 Quicksilver Hard Drive Replacement

crwdns2942213:0crwdne2942213:0

  1. Power Mac G4 Quicksilver Hard Drive Replacement, Opening the case: crwdns2935265:01crwdnd2935265:01crwdnd2935265:01crwdne2935265:0
    • The handle to open your computer is located on top of the right side panel.

  2. Power Mac G4 Quicksilver Hard Drive Replacement: crwdns2935265:02crwdnd2935265:01crwdnd2935265:02crwdne2935265:0 Power Mac G4 Quicksilver Hard Drive Replacement: crwdns2935265:02crwdnd2935265:02crwdnd2935265:02crwdne2935265:0
    • Grab the circular handle and pull outward.

  3. Power Mac G4 Quicksilver Hard Drive Replacement: crwdns2935265:03crwdnd2935265:01crwdnd2935265:01crwdne2935265:0
    • Your computer is now open and ready for repair.

  4. Power Mac G4 Quicksilver Hard Drive Replacement, Hard Drive: crwdns2935265:04crwdnd2935265:01crwdnd2935265:01crwdne2935265:0
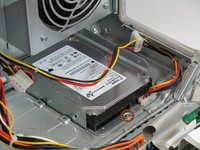
    • The hard drive is located in the rear right corner of the case.

  5. Power Mac G4 Quicksilver Hard Drive Replacement: crwdns2935265:05crwdnd2935265:01crwdnd2935265:01crwdne2935265:0
    • Unplug the IDE ribbon cable. This is the wide flat grey cable.

  6. Power Mac G4 Quicksilver Hard Drive Replacement: crwdns2935265:06crwdnd2935265:01crwdnd2935265:02crwdne2935265:0 Power Mac G4 Quicksilver Hard Drive Replacement: crwdns2935265:06crwdnd2935265:02crwdnd2935265:02crwdne2935265:0
    • Remove the screw holding down the hard drive enclosure.

  7. Power Mac G4 Quicksilver Hard Drive Replacement: crwdns2935265:07crwdnd2935265:01crwdnd2935265:01crwdne2935265:0
    • Lift the hard drive enclosure straight up and out.

    • Be carful not to pull the attached cable.

  8. Power Mac G4 Quicksilver Hard Drive Replacement: crwdns2935265:08crwdnd2935265:01crwdnd2935265:01crwdne2935265:0
    • Disconnect the MOLEX connector.

    • This cable may be hard to remove. Grab the connector on either side as pictured and wiggle it back and forth to remove it.

  9. Power Mac G4 Quicksilver Hard Drive Replacement: crwdns2935265:09crwdnd2935265:01crwdnd2935265:01crwdne2935265:0
    • Remove the four screws holding the hard drive to the enclosure.

  10. Power Mac G4 Quicksilver Hard Drive Replacement: crwdns2935265:010crwdnd2935265:01crwdnd2935265:01crwdne2935265:0
    • Your hard drive is now free from the enclosure and is ready to be replaced.

crwdns2915888:0crwdne2915888:0

To reassemble your device, follow these instructions in reverse order.

crwdns2935229:08crwdne2935229:0

Ryan Bylard

crwdns2935283:001/20/10crwdne2935283:0

1,325 crwdns2915208:0crwdne2915208:0

crwdns2935297:05crwdne2935297:0

crwdns2915084:0crwdne2915084:0

Cal Poly, Team 14-41, Regan Winter 2010 crwdns2935289:0Cal Poly, Team 14-41, Regan Winter 2010crwdne2935289:0

CPSU-REGAN-W10S14G41

crwdns2931471:04crwdne2931471:0

crwdns2935297:017crwdne2935297:0

crwdns2944067:00crwdne2944067:0

crwdns2917038:0crwdne2917038:0

crwdns2936625:0crwdne2936625:0:

crwdns2936751:024crwdne2936751:0 0

crwdns2936753:07crwdne2936753:0 3

crwdns2936753:030crwdne2936753:0 28

crwdns2942667:0crwdne2942667:0 15,218