crwdns2933423:0crwdne2933423:0

Polk Omni S2 Front Three Buttons Replacement

crwdns2942213:0crwdne2942213:0

  1. Polk Omni S2 Front Three Buttons Replacement, Front Cover: crwdns2935265:01crwdnd2935265:01crwdnd2935265:01crwdne2935265:0
    • Pry off the grille by pulling on the top middle part of it.

    • Remove the grille carefully, but note that it takes a large amount of force to remove. If it seems like you're bending the grille too much, try pulling on it from the bottom instead.

  2. Polk Omni S2 Front Three Buttons Replacement: crwdns2935265:02crwdnd2935265:01crwdnd2935265:03crwdne2935265:0 Polk Omni S2 Front Three Buttons Replacement: crwdns2935265:02crwdnd2935265:02crwdnd2935265:03crwdne2935265:0 Polk Omni S2 Front Three Buttons Replacement: crwdns2935265:02crwdnd2935265:03crwdnd2935265:03crwdne2935265:0
    • Remove the eight 12 mm screws securing the front cover using a Phillips #1 screwdriver.

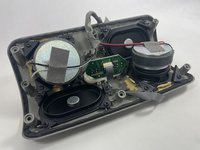
    • Like the grille, pull from the top middle of the gray cover and slowly remove it from the speaker, like separating a sub roll.

    • Be careful of the wires between the cover and the motherboard. If you pull the cover apart too far, you might damage these wires.

  3. Polk Omni S2 Front Three Buttons Replacement: crwdns2935265:03crwdnd2935265:01crwdnd2935265:03crwdne2935265:0 Polk Omni S2 Front Three Buttons Replacement: crwdns2935265:03crwdnd2935265:02crwdnd2935265:03crwdne2935265:0 Polk Omni S2 Front Three Buttons Replacement: crwdns2935265:03crwdnd2935265:03crwdnd2935265:03crwdne2935265:0
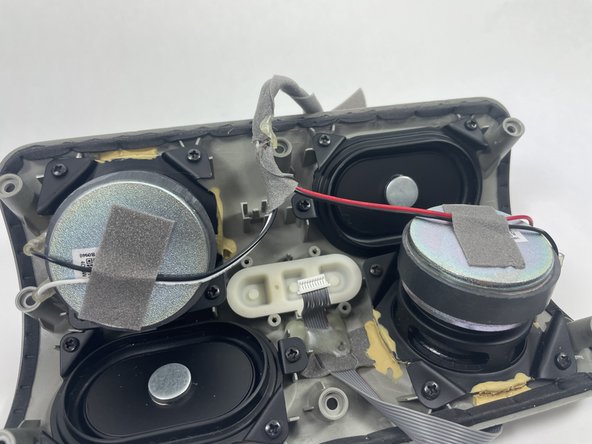
    • Remove the two square cotton pieces.

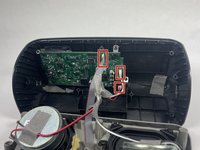
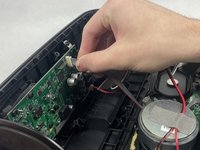
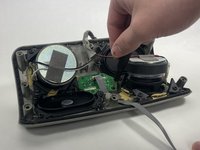
    • Unplug these three wires plugged into the motherboard by gently pulling and wiggling the wires until they're unplugged. Grip the wires close to the end to avoid damaging them.

  4. Polk Omni S2 Front Three Buttons Replacement, Front Three Buttons: crwdns2935265:04crwdnd2935265:01crwdnd2935265:03crwdne2935265:0 Polk Omni S2 Front Three Buttons Replacement, Front Three Buttons: crwdns2935265:04crwdnd2935265:02crwdnd2935265:03crwdne2935265:0 Polk Omni S2 Front Three Buttons Replacement, Front Three Buttons: crwdns2935265:04crwdnd2935265:03crwdnd2935265:03crwdne2935265:0
    • Remove the four 9.5 mm screws securing the button daughterboard to the front cover using a Phillips #1 screwdriver.

    • The drivers are magnetic, and will attract your screwdriver and screws. Unscrewing requires a bit of extra caution.

  5. Polk Omni S2 Front Three Buttons Replacement: crwdns2935265:05crwdnd2935265:01crwdnd2935265:02crwdne2935265:0 Polk Omni S2 Front Three Buttons Replacement: crwdns2935265:05crwdnd2935265:02crwdnd2935265:02crwdne2935265:0
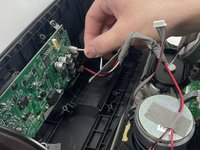
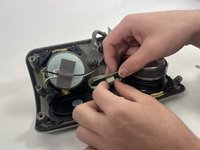
    • Grab the gray ribbon cable as close to the connector as possible and gently wiggle and pull until it's unplugged from the button daughterboard.

    • The gray ribbon cable does not need to be removed. Leave it secured to the front cover.

  6. Polk Omni S2 Front Three Buttons Replacement: crwdns2935265:06crwdnd2935265:01crwdnd2935265:01crwdne2935265:0
    • Remove the rubber cover.

    • The plastic pieces can be removed as needed by pushing them out from the front.

crwdns2915888:0crwdne2915888:0

To reassemble your device, follow these instructions in reverse order.

PaulSM

crwdns2935283:010/16/24crwdne2935283:0

258 crwdns2915208:0crwdne2915208:0

crwdns2935297:02crwdne2935297:0

crwdns2915084:0crwdne2915084:0

UMass Dartmouth, Team 1-4, Konn Fall 2024 crwdns2935289:0UMass Dartmouth, Team 1-4, Konn Fall 2024crwdne2935289:0

UMASSD-KONN-F24S1G4

crwdns2931471:04crwdne2931471:0

crwdns2935297:07crwdne2935297:0

crwdns2947412:00crwdne2947412:0

crwdns2917038:0crwdne2917038:0

crwdns2936625:0crwdne2936625:0:

crwdns2936751:024crwdne2936751:0 1

crwdns2936753:07crwdne2936753:0 1

crwdns2936753:030crwdne2936753:0 10

crwdns2942667:0crwdne2942667:0 54