crwdns2915892:0crwdne2915892:0
Consoles such as the PlayStation 4 Slim over time start to overheat from all the excessive dust accumulating. It causes the thermal paste to thin out and the speed drastically reduces. The overheating can produce a lot of fan noise. This guide shows how to clean the PlayStation 4 Slim, replace the thermal paste, and restore the console to fantastic working conditions!
crwdns2942213:0crwdne2942213:0
crwdns2936621:0crwdne2936621:0
-
-
Remove the panel next to the ports by sliding it to the right.
-
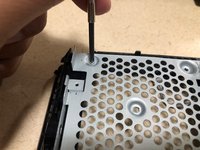
Use a Philips PH1 screwdriver to remove the screw.
-
-
-
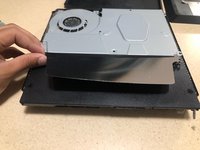
Pull the black ribbon on the side of the PS4 to remove the hard drive.
-
-
-
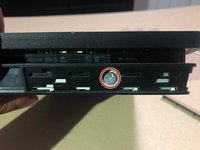
Locate the plastic warranty sticker next to the three ports on the side of the console.
-
Peel off the plastic warranty sticker next to the three ports on the side of the console.
-
Use a T8 Torx security screwdriver to remove the screw.
-
-
-
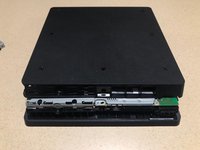
Flip the PS4 with the bottom side facing upwards and the side of the screw you just removed facing you.
-
Remove the cover by prying the two corners and then sliding it back.
-
-
-
Use a Phillips #0 screwdriver to remove this screw.
-
-
-
Remove the cover by prying the two corners and then sliding it back.
-
Remove the three T8 Torx security screws.
-
Use a Phillips #1 screwdriver to remove the two screws.
-
Lift and remove the metal panel after unscrewing.
-
-
-
-
Remove the power supply completely by disconnecting the wire.
-
-
-
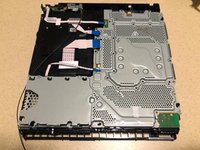
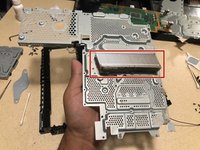
Flip the PS4 to view the metal paneling.
-
Lift the black clip on the largest connection to remove it.
-
Disconnect the wire by pulling it back with a little bit of force.
-
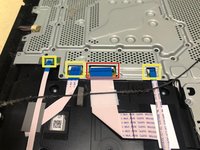
By pulling on the blue tabs gently you are able to remove the connections.
-
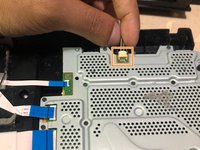
Gently lift the black wire to disconnect from the motherboard.
-
-
-
Use a Phillips #0 screwdriver to remove all screws.
-
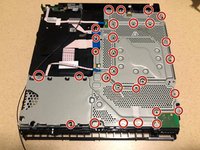
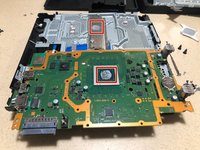
After unscrewing, remove the metal panel to access the motherboard.
Note that there are different screws that hold it all together. Mostly black screws and then some silver
can some smart guy post a scheme of the right screw spots for those who mess up with the order?
This step forgot to point out a 2nd screw inside the HDD area. It's all the way towards the opening of the HDD tray
-
-
-
Use a Phillips #0 screwdriver to remove two screws.
-
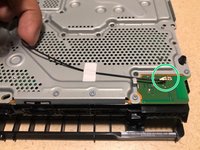
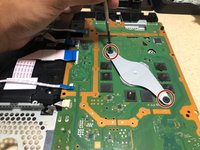
Unplug the wire by pulling firmly.
-
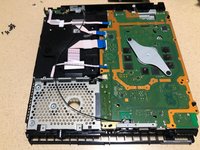
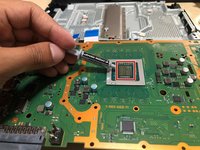
Lift the metal brace with your fingers to expose the motherboard.
Los cuadros pequeños que están en los chip son remplazables?
Arnold Andrés Rubio Galeano - crwdns2934203:0crwdne2934203:0
-
-
-
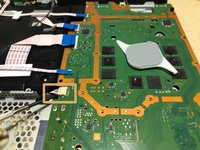
Apply 2-3 droplets of thermal material remover on Q-tips to remove the old thermal paste and then wipe it down with a micro fiber cloth until no residue of old paste is left.
-
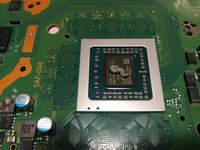
Apply 2-3 droplets of thermal surface purifier on a new Q-tip and go over the area cleaned.
thank you as always for the pictures but there should be a warning or notice added in there is a very small bracket on the heatsink itself it fell off when i removed the heatsink i could not find out where it belonged until i saw these pictures it look like a u shape with a small screw hole in the middle.
Buen tutorial, pero una duda : la ps4 no trae thermal pads, o ese paso se ha saltado?
-
-
-
Squeeze about 3/4 of an inch of Arctic Silver 5 thermal paste onto the prepared surface.
-
-
-
Use a Phillips #0 screwdriver to remove the two screws.
-
-
-
Flip the console.
-
Use a Phillips #0 screwdriver to remove the screw.
-
-
-
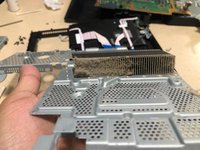
Lift up the metal panel and on the back the radiator is located.
-
Clean the radiator by using a brush and a compressed air can.
-
-
-
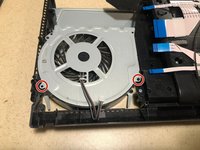
Use a Phillips #0 screwdriver to remove the two screws.
-
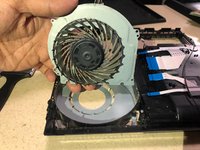
Clean the fan by using a brush and a compressed air can.
Tuto qui m'a été très utile pour la PS4 de mon fils c'était une turbine 😜👍
How do I get it back the way it was?
-


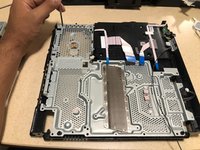


To reassemble your device, follow these instructions in reverse order.
To reassemble your device, follow these instructions in reverse order.
crwdns2935221:0crwdne2935221:0
crwdns2935229:099crwdne2935229:0
crwdns2915084:0crwdne2915084:0

York University, Team S1-G7, Allen Summer 2020 crwdns2935289:0York University, Team S1-G7, Allen Summer 2020crwdne2935289:0
YORK-ALLEN-SU20S1G7
crwdns2934841:01crwdne2934841:0
crwdns2935297:07crwdne2935297:0
crwdns2947412:014crwdne2947412:0
Hey, can I use this for a original “fat” ps4?
thanks
the original fat ps4 uses a different design than the slim one
Any advice on a good way to clean the fan blades? Thanks for all the other tips!
Use a brush at the same time with a vacuum cleaner to remove the dust, then, a slightly damp cloth to clean the blades.
Thanks for the instructions, they helped me a lot!!! If there's one thing Sony didn't save on this console, it was screws 😂😂😂
La guía es muy fácil de seguir y los resultados superaron mis expectativas, la falla de recalentamiento ya no aparece más. Gracias!!
This guy helped me take apart my PS4 slim and put it together!! Super happy for being able to do this without much experience as well as anxiety lol. One thing to note is that I had way more screws than what this guide showed. I also had an extra connecting piece alongside Step 8 where it tells you to "Gently lift the black wire to disconnect from the motherboard." Don't know what that piece does and I don't care as long as it works! All in all, great guide. My PS4 still works, cleaned up and able to be used for a few more years before I switch to a PS5 :)
good work but be aware that there are different models of ps4 slim which have slight alterations in its design which make somewhat difficult to follow the instructions to its nail. this was for me the thing that i opened it up and under the hood there were slight differences which confused me. XD
Mon ps4 ne ralime pas je sais pas pour quoi la je besoin de votre aide
I try to clean but i got 2 extra screw
Idk why but still working 👍🤷♂️
yoo
How do I get it back the way it was?
E quando o gato urina no seu vídeo game e ele não liga mais o que devemos fazer?
Thank you for this information ******
That’s clearly a Phillips screw… not Torx.
Andrew Sauk - crwdns2934203:0crwdne2934203:0