crwdns2915892:0crwdne2915892:0
Use this guide to remove or replace your PlayStation 4 Slim’s power supply.
crwdns2942213:0crwdne2942213:0
-
-
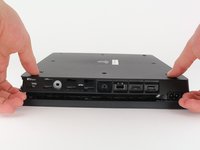
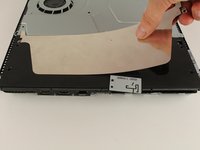
Locate the plastic warranty sticker next to the three ports on the side of the console.
-
Remove the warranty sticker by peeling it off with any kind of spudger.
-
-
-
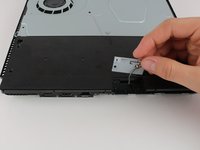
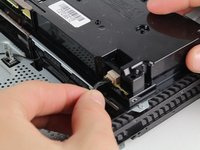
Unscrew and remove the now exposed 5.0mm screw using a TR8 security Torx screwdriver with a counter-clockwise motion.
Are you SURE that it’s counter-clockwise?
Try T9. Fits better.
T8 fits like a glove for me
Is there anything else you can use
A small flathead screwdriver will work
There is a small metal rod in the middle of the screw that isn’t allowing my t8 inside. Any insight on this?
gavinstoutconner@icloud.com - crwdns2934203:0crwdne2934203:0
Some T8 bits have a hole in the middle that will allow that rod to go through; some do not. If you have a set of multiple bits, check if there are any others labeled T8 or TR8 with that hole in the middle.
Nicholas -
There is a metal thing inside of the screw slot any insite on this?
-
-
-
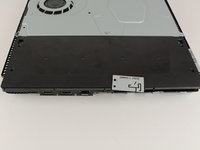
Place the Playstation 4 Slim upside down with the side of the screw you just removed facing you.
-
Pry up on the two corners that are facing you with your fingers.
-
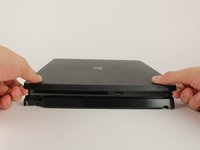
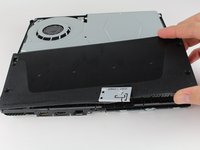
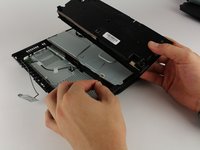
Remove the bottom cover by sliding it towards the back corners and lifting up.
It says to place it upside down, but didn't you do so in the previous step? I've been trying to unscrew the screw with my screwdriver that I got from here and if I had to had the system right side up, I'm afraid I might've stripped the screw from all the force I tried to use to get the screw out that will NOT budge. It didn't even move the slightest after removing the warranty sticker.
There is a single clip on the left side about 5cms in, and another clip on the right side equidistant to the one on the other side. Jamming a spudger in there first, and lifting those clips helped, and then I had to slide down to lift a total of 4 clips on each side (each about 4cms apart). Then push the cover away from you, if that makes more sense than “sliding it towards the back corners”, since the back corners are technically facing you.
It would be easier if you just lifted the top cover of the PS4.
The earlier comment by Emil Fisk is spot-on. I found it impossible to remove the cover without first using a spudger to release the four clips on each side.
I saw many video and tried it my self, you have to remove the hard disc before removing any cover.
-
-
-
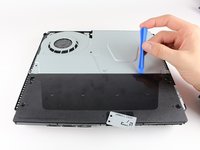
Place the Playstation 4 Slim right side up, with the PS logo on top and the side with the words "SONY" and "PS4" facing you.
-
Pry up on the two corners that are facing you with your fingers.
-
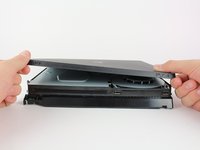
Remove the top cover by sliding it towards the back corners and lifting up.
Undo 4 clips on each side by using a spudger. And then lift the front corners up and pull towards you to undo them.
-
-
-
-
Unscrew and remove the two screws (left one 31.0mm and right one 24.0mm) using a T8 screwdriver with a counter-clockwise motion.
-
Unscrew and remove the 3.0mm screw using a Phillips #1 screwdriver with a counter-clockwise motion.
UK model seems to be different here. There's no Philips screw where there is on your image.
This regards EU models in general, i think. My danish version is the same.
The screw on the left was 31mm, and the one on my right side was only 19mm.
CUH-2215B doesn't seem to have the top antenna screw
-
-
-
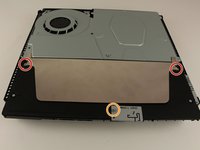
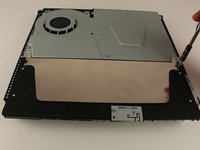
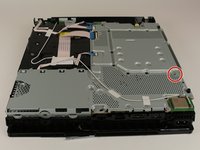
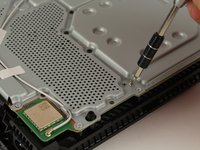
Remove the four 16mm Philips screws holding the power supply in place.
Es gibt diese Schrauben bei meiner Ps4 Cuh 2116A nicht und ich bekomme das Teil so nicht raus. Kann mir jmd helfen?
Only 2 Phillips actress here on my UK
Only 2 phillips screws on the US one as well.
I also only have two screws here in the US.
CUH-2215B has two T9 Security Torx screws on metal shield and two Phillips screws
-
-
-
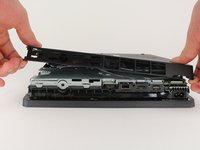
Remove the metal sheet from the top of the power supply by grabbing and lifting up with your hands.
Is this metal sheet required for the unit to power on?
I think the metal sheet protects the rest of the console or something from heating too much.
Kann man diesen Metallblech einzeln kaufen? Finde im Internet nichts
A quoi sert la tôle métallique qui recouvre le ventilateur et l’alimentation svp
Que puedo hacer si uno de los tornillos que sujetan esa lamina está barrido y no los puedo quitar?
-
-
-
Remove the antenna from the top of the power supply by guiding the wire with your fingers through the groves underneath the metal panel.
What does this mean for part do? This part is not present in my console nor is the space where it's supposed to reside as shown in the picture above.
Me neither, guess they are different models.
There was a longer clip 8mm long on the left side which had to be pulled straight out. However, be careful when pulling out the antenna. My cable was soldered to the metal plate.
It is easier to wiggle the cable out from the plastic power supply housing in step 10.
The model shown in this tutorial is the PS4 Slim CUH-2115, because it has the WiFi Bluetooth antenna attached to the PSU.
-
-
-
Flip the Playstation 4 Slim onto its back.
-
Unscrew and remove the 4.0mm screw using a Phillips #1 screwdriver with a counter-clockwise motion.
Forgot to mention to remove the hard drive.
it's usually pretty straightforward to remove the HDD first on any Playstation System
How do you get it when the screw is stripped
-
-
-
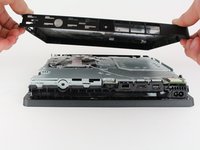
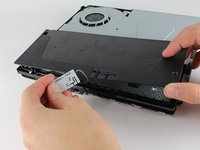
Use a plastic opening tool to make space between the power supply and console by wedging and wiggling it in-between the two.
-
Lift the power supply up and onto its back on the metal sheet using your hands.
-
-
crwdns2935267:0crwdne2935267:0Tweezers$4.99
-
Disconnect the wire connection from the power supply by firmly gripping it with your fingers or tweezers and pulling out.
-
Remove the power supply completely by grabbing and lifting up with your hands.
Your guide is good but detail. Could be alot better for a start you forgot to mention the screw on the other side that must also be removed to let the power supply out of ps4 slim
Could you replace a ps4 slim model CUH-211B with a N16-160P1A power supply
Just because I feel like this needs to be stated clearly, “Do no attempt to pull the plug out by the wires!”
Pull from the plastic, male end of the plug or you’re going to end up have a very bad day.
Literally no way I can do it by the plastic, the only way is wires. Gotta risk it I guess
Misha FV -
You are right, pulling the wires is entirely wrong. I used the small rectangular, thin blue plastic to push the cable back from the socket. It was too tight. From my experience of repairing, never pull wires. The consequences of damaging it are not worth it.
This cable is very hard to remove from the connector. It's much easier to unplug this cable from the motherboard side (in step 20) because you can push the connector out from behind. (This might only be true for some motherboard revisions.)
You can leave the power supply propped up on top of the console, like shown in the first picture. After you've unplugged the two cables in step 13, you can put the power supply back where it was to make flipping the console over easier.
This is about where I'd give up
-


To reassemble your device, follow these instructions in reverse order.
To reassemble your device, follow these instructions in reverse order.
crwdns2935221:0crwdne2935221:0
crwdns2935229:084crwdne2935229:0
crwdns2947412:08crwdne2947412:0
Can the N15-160P1A power supply work on a PS4 system that originally came with N17-160P1A?
My PS4 not turning on
Mine too.....
This was awesome. Thanks for the assist
I need help figuring out what I did to my ps4 and what needs replacement I had the new nba 2k 22 in the disc drive and the game was partly finished downloading so as it was doing that I brought shinobi striker which I previously had to use someone’s account to play it so the game popped up as light so I deleted it the first time and redownloaded it and it still said lite so then I deleted again but this time I double tapped the PlayStation button and it went to Home Screen slowed down then froze so I unplugged it plugged it back up and it wouldn’t turn on
It must be SIE. you need to change it
My PS4 runs for 10 minutes and turns off again and again
I really appreciate this help hopefully this doesn't damage my PS4
Remove the screw directly to the left of that one in the picture as well. Should be silver.
Elizabeth Johnson - crwdns2934203:0crwdne2934203:0
ihr seid so ein scheiß haufen das stimmt über haubt nix
Toaster 95 - crwdns2934203:0crwdne2934203:0
einfach alles stimmt nicht
Toaster 95 - crwdns2934203:0crwdne2934203:0
Quitar la pegatina anula la garantía en España al menos
Ana y Francisco - crwdns2934203:0crwdne2934203:0
So becore you start on this guide if you read the comments at the last step, this guide is geared more towards repairing of the disc drive not replacing the entire optical disc drive, i have done mine already and the guide does help get you halfway there but you are gunna need a bit more to pull the entire disc drive out, i will post another comment on the last step so you can follow these steps and then mine to further reference from that point on. See ya on the last step of the guide 🤘
Walter Gamboa - crwdns2934203:0crwdne2934203:0