crwdns2915892:0crwdne2915892:0
This guide will show the steps needed to remove the motherboard in the PlayStation 4 Pro. The motherboard has many small components that are rather delicate, careful handling is necessary.
crwdns2942213:0crwdne2942213:0
-
-
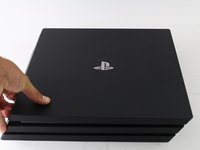
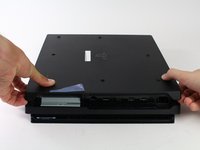
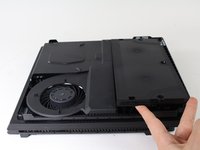
Flip the console upside down.
-
Use your finger to pull and snap off the plastic cover over the hard drive.
-
-
-
Use a Phillips #1 Screwdriver to remove the single screw securing the hard drive caddy.
-
Pull the hard drive caddy straight out.
-
-
-
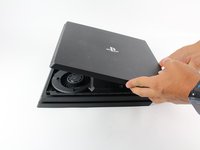
Flip the console right side up.
-
Grip the two corners located at the front of the device.
-
Pull upwards until a loud click is heard.
-
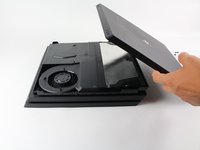
After both corners detach, slide the cover backwards and lift off.
%#*@. I thought I was gonna break the thing. You really do have to give it some elbow grease.
there were also some screws that needed to come out before popping it off. Might have been a different version im working on. there were three screws attached to the console that I had to remove before popping off the top.
Same here. There were 3x T8 Torx Security screws on the back side of mine. (PS4 Pro with C14 power socket - same socket PC power supplies have).
They were all on the rear:
1) between drive caddy and LAN port
2) between USB port and optical audio out port
3) between HDMI port and power socket
TheWolf -
The 7215B has one TR8 security Torx behind the center “void” sticker.
This cover is really on there. It sounds like your breaking plastic when you pop it open. I ended up using a metal tablespoon in the corners where you should pull up to pop the cover up the first bit, worked well.
-
-
-
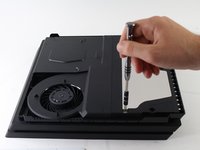
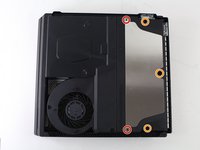
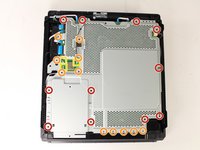
Use a T8 Torx Security screwdriver to remove five screws from the rear of the device.
-
Two 31mm screws.
-
Three 10mm screws for the 7000 models; Two gray 10mm screws (upper and lower screws on the illustration) if the PS4 Pro is a 7100-series model.
-
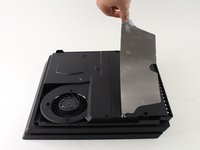
Remove the metal plate by pulling it up.
I copy the comment written by Jason at the end of this guide, because it’s better to have it here:
This guide is for the initial release CUH-7000 models. Of note is the changes to the CUH-7100 series that do make this guide an issue. Steps 4 and 5 have a different items to note. You can damage it following this guide if you don’t adjust. There no longer 3 security screws for the case, but just one. This single screw is still covered by a warranty sticker, but the second one is a blank sticker and no screw behind it. There is also no 10mm screw in the center power supply in Step 4, it’s a support post. You still remove the 4 other screws, but you must then flip the console over and remove a T8 screw to the right on the HDD cage and another closer to the right side. You can then flip the console over again to remove the battery and plug it. Just remove all the metal plate screws to be sure, but make sure you hold the board when you flip it again or you will bend the battery prongs like I found out the hard way.
Oh! That explains why I stripped the middle screw. What’s a support post?
Had to use TR8 instead of 10mm here.
After I popped the top off, I got 4 out of 5 screws out. The 5 th screw for some reason, was a little bit bigger, therefore, I could not take out that screw so I could clean the heatsink and fan.
Me too it’s not like another screw it’s have black and I can’t remove if you know pls tell me how i do bro ???
I stripped the %#*@ screw in the middle. (orange highlighting) It’s a black head and the T8 Torx Security head doesn’t work! I have a CUH-7115B. I think it’s a regular T8 or some kind of Hex head. ? I don’t know what to do now!! :(
As mentioned above, this guide is for the old models. 7215B: There 4 TR8 screws (2 long, 2 short) holding the plate. The middle is a support post.
-
-
-
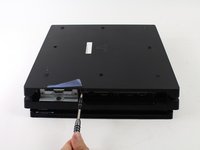
Flip the console over so the bottom is facing up.
-
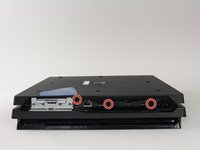
Use a T8 Torx Security screwdriver to remove the three black 7mm screws in the back panel. (7000-series models only); or one 7mm screw (the middle one) with 7100-series models and the warranty sticker to the left.
-
Remove the bottom cover in the same way as the top cover. Grip the cover on both sides and pull up until it clicks. Then slide the cover off; With 7100-series models, pay attention to the two clips that replace the corresponding screws.
Adding to this, the screws are not visible unless you remove the warranty stickers!
Also, the plastic on the back of the cover is prone to cracking. Be careful and undo snaps across the whole back of the panel gently!
Vielen vielen Dank. Endlich ist der jumbojet gelandet #fan
7215B has 1 TR8 screw beneath a sticker between the optical and USB ports, and two clips (1 next to the HDD slot and 1 beneath a sticker near the power port.)
-
-
-
-
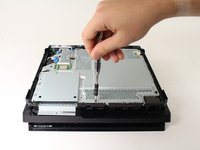
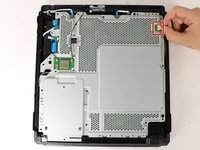
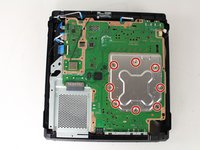
Use a T8 Torx security screwdriver to remove the eleven 10mm silver screws from the metal plate.
-
Use a Phillips #1 screwdriver to remove the eleven 4mm black screws from the metal plate.
-
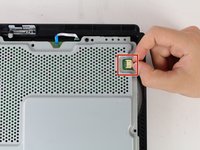
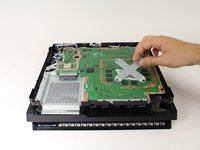
Use a spudger to disconnect the three antenna cables (two black and one white) by prying them straight up from their sockets.
Noted during my replacement that the PS4 Pro appears to have additional #0 Phillips Head screws in Step 6 required to remove the metal plate from the motherboard and that the metal “X” plate in Step 11 appears to be included now in this overall metal cover for the motherboard, no longer separate, which accounts for the additional screws.
Original pro here. Had 12 torx
cuh0-7216b have more philips #1 screws on metal plate on right, +13 screws :)
(PS4 Pro) Bei mir ebenfalls 11 T8 Torx, von denen 3 Sicherheitstorx waren.
My PS4 Pro 7115 has additional sets of #0 Phillips screws on the plate. 10x in the primary processor space (blank plate area of the graphic here), 2x over the fan, and 1x on the outside edge to clamp down on the primary processor area. Model CUH-7115B
What are the 3 different antennas identifications or functionality ?
-
-
-
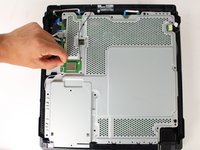
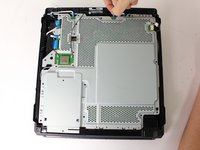
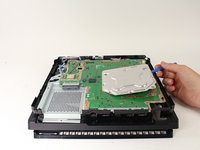
Pull the white fan connector straight out of the yellow mount on the motherboard.
-
-
-
Pull out the five small, blue low profile cables connected to the metal plate.
-
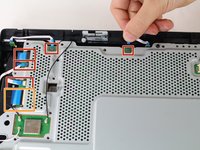
Lift the retaining flap on the ZIF connector of the large ribbon cable.
-
Pull the large ribbon cable from its socket.
What the cable in the up left corner is for? I broke it and i’d like to know at what is it connected?
Thanks
The blue ribbon cables aren’t connected to the metal plate. The plate can be safely removed beforehand. The only thing one should do prior to its removal is de route the antenna cables for the WNIC.
Was ist das 2. Kabel oben links, welches in einen grauen Anschluss gesteckt wird ? Ich dachte, ich muss dies ebenfalls wie bei dem breiten Flachbandkabel "nach oben klappen" aber dadurch hab ich die Halterung des Kabels beschädigt. Ich bekomme das Kabel nicht mehr in den dafür vorgesehenen Anschluss. Wäre cool zu wissen, was das für ein Kabel ist.
-
-
-
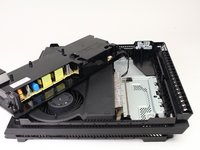
Flip the console over to continue working on the top side.
-
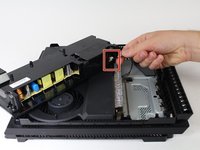
Pull up on the power supply unit and set it on the console.
-
Grip the connector behind the power supply and pull straight out.
Why do I have to remove the PSU here? I do not see the necessity judging by the following steps.
This comes in handy when removing the entire motherboard which is necessary when cleaning the heat sink.
Bonjour, Que se soit le connecteur du bloc comme celui sur la partie ps4 , il est difficile à retirer ce câblage… peut-on tirer sans risque réellement ?
IMPORTANT: The connector on the motherboard is very sensitive. I’d recommend using pliers to put pressure down on the connector while slowly jerking the cable out of the socket to avoid serious damage to the connector and/or motherboard that could render the PSU connection useless and require advanced soldering / rewiring.
This!
Connector was quite tight in PSU side and I ended pulling connector from motherboard resulting me getting PS5 for Christmas.
tero -
Also der stecke lässt sich nicht entfernen
Der Stecker am Netzteil (letzter Schritt) erscheint mir ungewöhnlich fest, und lässt sich ohne weiteres nicht entfernen. Besteht die Möglichkeit, dass dieser neuerdings verklebt ist oder dergleichen? :-/
Das würde mich auch interessieren. Ich habe den Stecker weder vom Mainboartd noch von der PSU abbekommen. Leider habe ich den Stecker dann abgerissen - aber er hat sich auf keiner Seite abziehen lassen.
Bei dieser Stecker-Buchse Verbindung handelt es sich um einen Molex-Stecker, der verriegelt ist. An der Seite befindet sie ein kleiner Hebel, den man nach innen drücken muss, damit sich der Stecker löst.
Danke für die Info!
An meinem Stecker war kein Hebel zu erkennen. Ich habe auch nicht den Stecker am Netzteil, sondern den am Mainboard gelöst, da dieser besser zugänglich ist. Dabei mit dem Fingernagel die Buchse am Mainboard heruntergedrückt und ganz vorsichtig mit einem kleinen Flachschraubendreher an der rechten Seite den Stecker minimal rausgehebelt. Dann das Ganze auf der anderen Seite wiederholt. Danach durch Hin- und Herwackeln bei gleichzeitigem Ziehen des Steckers diesen langsam gelockert, dabei immer mit dem Fingernagel die Buchse Richtung Mainboard gedrückt. Man braucht wirklich viel Geduld und Fingerspritzengefühl für die richtige Kraft die man gegen Buchse und Stecker anwendet. Nachdem der Stecker endlich raus war, habe ich diesen mit einer Nagelfeile etwas zurechtgeschliffen, damit der sich nicht mehr so derartig festsetzen kann.
Ich habe den Stecker am Netzteil rausgezogen.... und bekomme ihn nicht mehr drauf. Habt ihr nen Tipp bevor ich einen der vier Kontakte abbreche? Lieben dank
-
-
-
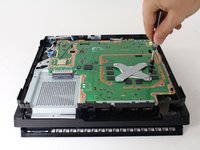
Carefully flip the console over so the bottom is facing up.
-
Use a Phillips #1 screwdriver to remove the eight 4mm screws on the metal plate with the X-like symbol.
-
Use a plastic opening tool to remove the metal plate with the X-like shape.
My PS4 Pro 7115, this and more is integrated with the main plate, as noted above, plus there are 10 in this area (not 8), along with 2 over the fan and 1 to the edge of this area. Model CUH-7115B
-
-
-
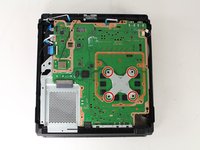
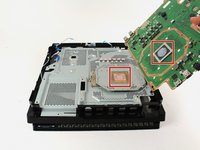
Use a Phillips #1 screwdriver to remove the four 13mm screws on the X-shaped metal plate underneath.
-
Grip the X-shaped retaining bracket and lift straight up.
Mine had an S shape with two screws.
Depending on the series it will have either a S or X shape bracket
My PS4 Pro 7115 has an S-shaped bracket with 2 screws. Model CUH-7115B
I have heatsink issue 7016 (x-shaped). However I am only able to find S shaped heatsink plate (71xx model) in my country. Does anyone know how the heatpipes travel within the heatsink? I basically need to drill 2 more holes and thread it to put the x clamp. Also the hole and thread size would be helpful.
-
-
-
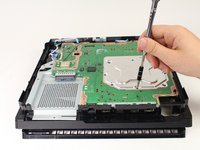
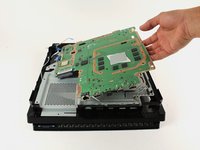
Grip the edge of the motherboard and slowly lift upwards to remove it from the device.
Does anybody know the name of the white detail from the first screenshot step #13? (Plastic with square metal inside). I broke it by accident during dissembling and want to find replacement for it, but can’t find it anywhere.
I can read F2-4 >POM< on the plastic piece but i guess thisis a radiator/thermal dissipator support. HTH
Won't you also need a paired optical drive to replace the motherboard? My ps4 got broken some weeks ago and I've found out that I need to replace the motherboard for it to work again, but I keep seeing that you also need a paired optical drive. Is this true? My ps4 pro is a CUH-7216B if that helps
A warning should be before this step that this step detaches from the primary heat sync. The required tools should list the replacement thermal paste at the beginning, not after the step is already to have been completed.
tut euch selbst den gefallen und tauscht auch alle Wärmeleitpads. (ca 14 stück)
-


To reassemble your device, follow these instructions in reverse order.
To reassemble your device, follow these instructions in reverse order.
crwdns2935221:0crwdne2935221:0
crwdns2935229:063crwdne2935229:0
crwdns2915084:0crwdne2915084:0

Cal Poly, Team S21-G5, Livingston Spring 2017 crwdns2935289:0Cal Poly, Team S21-G5, Livingston Spring 2017crwdne2935289:0
CPSU-LIVINGSTON-S17S21G5
crwdns2931471:04crwdne2931471:0
crwdns2935297:049crwdne2935297:0
crwdns2947412:014crwdne2947412:0
This guide is for the initial release CUH-7000 models. Of note is the changes to the CUH-7100 series that do make this guide an issue. Steps 4 and 5 have a different items to note. You can damage it following this guide if you don’t adjust. There no longer 3 security screws for the case, but just one. This single screw is still covered by a warranty sticker, but the second one is a blank sticker and no screw behind it. There is also no 10mm screw in the center power supply in Step 4, it’s a support post. You still remove the 4 other screws, but you must then flip the console over and remove a T8 screw to the right on the HDD cage and another closer to the right side. You can then flip the console over again to remove the battery and plug it. Just remove all the metal plate screws to be sure, but make sure you hold the board when you flip it again or you will bend the battery prongs like I found out the hard way.
Hi, are these region/console/digitally signed? I have a dead board and was hopint to do a stragiht replacment for antother working board I will buy?
I'm asking the same question? Can you make it work with a board from another console? And do you need to replace the optical drive too?
hi. does anyone knows the dimentions of the motherboard? I want to buy one but I need to make sure that it will fit in my project.
Thanks in advance
On the CUH-7115B model, On step 4, the power supply has 2 T8 10mm screws instead of 3. The center screw on the power supply is a plastic fake screw for structural support. This plastic screw does not come out. Don’t be worried if you strip this plastic screw.
Thank you! This comment was really helpful!
kautame -
hen I reached the final step to lift the motherboard, I kept trying to lift it WITH the metal chassis as they were so firm together. Getting a pry in between helped separate an over-abundance of thermal paste on my system.
hello where can i buy a new motherboard on ps4 pro model nvb_004 one thing broke i want to take the power out of the motherboard but the little thing came loose i wanted that weld but that didn't help so i want to buy a new one can you please me please help
I need a motherboard to buy Cuh-7115B
If I replace the motherboard with another, will everything on the HDD still be ok?
Hey guys,
Does anyone knows where I can find and buy ribbon flex cable with is going from power switch to motherboard? previous owner of my ps4 just threw it away and it's the most painful cable to find :/ it looks like AWM 2896 80C WV-1
Ausgezeichnete Arbeit! Danke :)
Bonjour j’aimerais savoir si c’est possible de changer la carte mère d’une ps4 pro édition limitée sans que la référence de la carte mère sois la même
Zrobiłem wszystko bez przewodnika i waszych śrubokrętów. Sam wszystko wyczyściłem i nałożyłem pastę oraz termo pady. NIC TRUDNEGO
DON’T FORGET TO HAVE THERMAL PASTE HANDY! It should be added to the “Tools Required” Section. You will NEED it!
Jaquell Chandler - crwdns2934203:0crwdne2934203:0
What if thermal paste is not applied again when remounting ? Will the playstation start and work anyway or not ?
Vincent Bee - crwdns2934203:0crwdne2934203:0
It will start and run normally until you put it under load. Then it will heat up and thermal throttle or it can overheat and destroy itself.
Jeremy Ivey -
I posted this down in another step too, but: if you have a very early North American PS4 Pro, with the exact optical drive shown here - the key way to tell is the very long data cable that’s folded a couple of times, see pictures in later steps - then the replacement drive iFixit offers WILL NOT WORK IN YOUR MACHINE. It has to be a very early model, apparently, but the model number isn’t enough to tell you.
Even if you swap the too-short cables in their replacement with the longer cables on your drive, it still will not work. At all. It’ll just sit there like the drive isn’t even getting power.
So if you do have this drive, what you probably need to do is get a replacement KES-496A Optical Pickup Assembly and replace that within your existing drive. That’s what I had to do after two different replacement drives sent by iFixit failed to work in my system. It worked immediately and I’m back online.
The optical pickup replacement is awfully fiddly, and adds a solid 20 minutes to the repair easily. But it does work.
Dara Korra'ti - crwdns2934203:0crwdne2934203:0
I had originally been told by several people that to properly repair the optical drive within the PS4 Pro (so that the PS4 actually works), you have to replace the Optical Pickup Assembly like you mentioned because the drive is paired with the motherboard. I was surprised to find that iFixit is pushing this repair tutorial when it has a low probability of success for many PS4 Pro models.
Instead, iFixit should be documenting replacement of the KES-496A Optical Pickup Assembly... when that repair has a near 100% chance of success, even though it's a fair bit more fiddly to complete and requires two different teardowns (one for the PS4 Pro and one for the optical drive... needed to install the replacement optical pickup assembly).
commorancy -
Follow-on note. I could be mixing up the original PS4's pairing with the PS4 Pro (which might or might not have device + motherboard pairing). Because I can't find a definitive source confirming if the drive is paired on the PS4 Pro, using a drive replacement might or might not work.
There are a number of commenters below who followed these instructions and found that the replacement drive didn't work after completing the repair. I think I'd still go with replacing the KES-496A Optical Pickup Assembly. That repair is more fiddly, but the optical assembly replacement part is a whole lot cheaper, costing less than $10 in some stores, than buying a full replacement drive at $70.
commorancy -