crwdns2933423:0crwdne2933423:0

PlayStation 3 Slim Top Shield Assembly Replacement

crwdns2862623:0crwdne2862623:0
crwdns2942641:0crwdne2942641:0

crwdns2942213:0crwdne2942213:0

  1. PlayStation 3 Slim Top Shield Assembly Replacement, Top Shield Assembly: crwdns2935265:01crwdnd2935265:01crwdnd2935265:01crwdne2935265:0
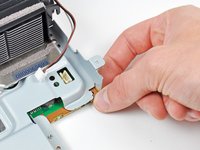
    • Disconnect the DC-In and Blu-ray power cables from the motherboard.

    • Pull the cables straight upward to lift the connectors up and out of their sockets on the motherboard.

  2. PlayStation 3 Slim Top Shield Assembly Replacement: crwdns2935265:02crwdnd2935265:01crwdnd2935265:01crwdne2935265:0
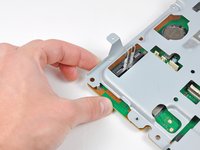
    • Pull the fan cables straight up to lift the fan connector up and out of its socket on the motherboard.

  3. PlayStation 3 Slim Top Shield Assembly Replacement: crwdns2935265:03crwdnd2935265:01crwdnd2935265:01crwdne2935265:0
    • Remove the following nine screws holding the motherboard assembly together:

    • Four 14.8 mm shouldered Phillips

    • Five 9.5 mm Phillips

  4. PlayStation 3 Slim Top Shield Assembly Replacement: crwdns2935265:04crwdnd2935265:01crwdnd2935265:01crwdne2935265:0
    • Remove the two heat sink clamps from the bottom of the motherboard assembly.

  5. PlayStation 3 Slim Top Shield Assembly Replacement: crwdns2935265:05crwdnd2935265:01crwdnd2935265:01crwdne2935265:0
    • If necessary, gently pry the motherboard off the top shield near the heat sink and its shroud.

  6. PlayStation 3 Slim Top Shield Assembly Replacement: crwdns2935265:06crwdnd2935265:01crwdnd2935265:02crwdne2935265:0 PlayStation 3 Slim Top Shield Assembly Replacement: crwdns2935265:06crwdnd2935265:02crwdnd2935265:02crwdne2935265:0
    • Gently press the board away from the top shield assembly near the fan connector and the corner of the board near the wireless sockets.

  7. PlayStation 3 Slim Top Shield Assembly Replacement: crwdns2935265:07crwdnd2935265:01crwdnd2935265:01crwdne2935265:0
    • Lift the top shield assembly off the motherboard from its front edge.

    • Be careful not to damage the sockets as you rotate the top shield assembly away from the motherboard.

crwdns2915888:0crwdne2915888:0

To reassemble your device, follow these instructions in reverse order.

crwdns2947412:00crwdne2947412:0

crwdns2917038:0crwdne2917038:0

crwdns2936625:0crwdne2936625:0:

crwdns2936751:024crwdne2936751:0 0

crwdns2936753:07crwdne2936753:0 0

crwdns2936753:030crwdne2936753:0 1

crwdns2942667:0crwdne2942667:0 1,777