crwdns2915892:0crwdne2915892:0
Use this guide to remove the plastic top cover.
crwdns2942213:0crwdne2942213:0
-
-
-
Turn the PS3 over and lay it on its backside.
-
Carefully peel the warranty sticker up off the lower case to reveal a hidden screw cover.
 crwdns2952109:0crwdne2952109:0
-
-
-
Use the flat end of a metal spudger to pry up the seven screw covers around the edge of the lower case.
-
-
-
-
Remove the seven 37 mm Phillips screws securing the top cover to the lower case.
-
-
-
Remove the four 13.3 mm T8 security Torx screws beneath the Blu-ray drive opening. (Some models may only have three screws)
-
-
-
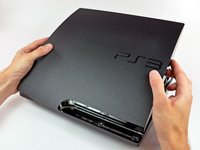
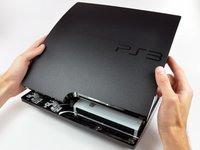
Lift the top cover from its rear edge and rotate it toward the front of the PS3.
-
Lift the top cover off the PS3.
-
-


To reassemble your device, follow these instructions in reverse order.
crwdns2935221:0crwdne2935221:0
crwdns2935229:0104crwdne2935229:0

crwdns2947412:03crwdne2947412:0
No good mine a Sony.
james register - crwdns2934203:0crwdne2934203:0 crwdns2950251:0crwdne2950251:0
Thank you this helped me so much!!!!
Megan Davis - crwdns2934203:0crwdne2934203:0 crwdns2950251:0crwdne2950251:0
Thx, worked well
Marians Superworld - crwdns2934203:0crwdne2934203:0 crwdns2950251:0crwdne2950251:0
