crwdns2915892:0crwdne2915892:0
Use this guide to replace your heat sink. It is essential to apply a new layer of thermal paste during reassembly.
crwdns2942213:0crwdne2942213:0
-
-
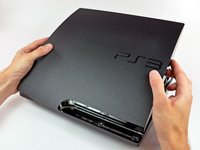
Turn the PS3 over and lay it on its backside.
-
Carefully peel the warranty sticker up off the lower case to reveal a hidden screw cover.
-
-
-
Use the flat end of a metal spudger to pry up the seven screw covers around the edge of the lower case.
-
-
-
Remove the seven 37 mm Phillips screws securing the top cover to the lower case.
-
-
-
Remove the four 13.3 mm T8 security Torx screws beneath the Blu-ray drive opening. (Some models may only have three screws)
-
-
-
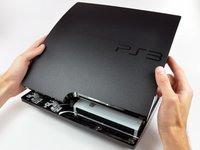
Lift the top cover from its rear edge and rotate it toward the front of the PS3.
-
Lift the top cover off the PS3.
-
-
-
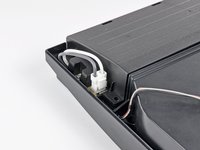
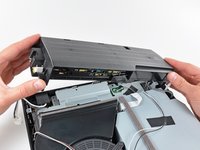
Squeeze the AC inlet connector's locking mechanism and pull straight up to disconnect it from the power supply.
-
-
-
Pull the DC-Out cables straight up to lift their connector up and out of its socket on the power supply.
-
-
-
Remove the two 7.6 mm Phillips screws securing the power supply to the lower case.
-
-
-
Lift the power supply upward from its left edge as viewed from the front of the PS3.
-
-
-
Continue to lift the left edge of the power supply until it lifts off the two metal posts shown in the second picture.
-
Remove the power supply from the PS3, minding any cables that may get caught.
-
-
-
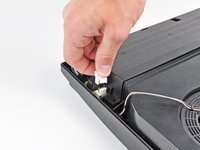
Use the flat end of a spudger or your fingernail to flip up the retaining flap on the Blu-ray ribbon cable socket.
-
-
-
-
Pull the Blu-ray ribbon cable straight up and out of its socket.
-
-
-
Pull the Blu-ray power cable straight up to lift its connector out of the socket on the Blu-ray drive.
-
-
-
Remove the single 9.5 mm Phillips screw securing the Blu-ray drive to the lower case.
-
-
-
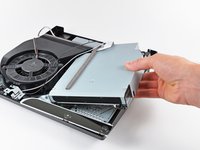
Lift the Blu-ray drive slightly by its right edge to dislodge the control board from its housing.
-
Remove the Blu-ray drive from the PS3.
-
-
-
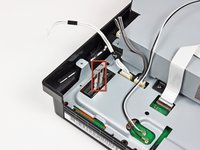
Pull the AC-In cables upward to remove the AC inlet from the lower case.
-
-
-
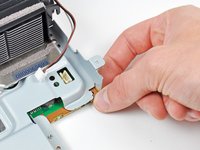
Use the flat end of a spudger to pry both antenna connectors up from their sockets on the motherboard.
-
-
-
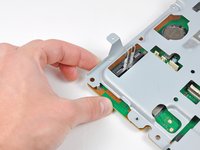
Pull the control board ribbon cable up and out of its socket on the motherboard.
-
Remove the control board.
-
-
-
Turn the PS3 over and lay it on its backside.
-
Use the flat edge of a metal spudger to pop up the small access door on the bottom cover near the front of the PS3.
-
Remove the blue Phillips screw hidden under the access door.
-
-
-
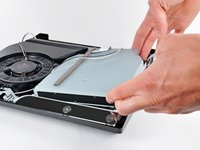
Slide the hard drive bay cover toward the right side of the lower case, then pull it away from the front edge to remove it from the PS3.
-
-
-
Using its attached metal handle, pull the hard drive out of its bay.
-
-
-
Remove the following five screws securing the motherboard assembly to the lower case:
-
Two silver 6 mm Phillips
-
Three black 8 mm Phillips
-
-
-
Lift the motherboard assembly from its front edge and remove it from the lower case, minding the antenna cable still attached to the lower case.
-
-
-
Disconnect the DC-In and Blu-ray power cables from the motherboard.
-
-
-
Pull the fan cables straight up to lift the fan connector up and out of its socket on the motherboard.
-
-
-
Remove the following nine screws holding the motherboard assembly together:
-
Four 14.8 mm shouldered Phillips
-
Five 9.5 mm Phillips
-
-
-
Remove the two heat sink clamps from the bottom of the motherboard assembly.
-
-
-
Gently press the board away from the top shield assembly near the fan connector and the corner of the board near the wireless sockets.
-
-
-
Lift the top shield assembly off the motherboard from its front edge.
-
-
-
Remove the two 9.5 mm Phillips screws securing the fan to the heat sink.
-
-
-
Remove the fan from the heat sink, minding the cables that may get caught on the fan shroud.
-
-
-
Remove the four 9.5 mm Phillips screws securing the heat sink to the top shield.
-
-
-
Lift the top shield off the heat sink.
-


To reassemble your device, follow these instructions in reverse order.
To reassemble your device, follow these instructions in reverse order.
crwdns2935221:0crwdne2935221:0
crwdns2935229:043crwdne2935229:0

crwdns2947412:08crwdne2947412:0
Hey good day to you. Can the thermal paste be applied with this tutorial?
This is a great guide, I followed it to the letter and my PS3 is now quiet as a mouse. I highly recommend you follow this, and please take your time. There’s no rush! :)
Thanks, can you extend this list by showing how thermal paste is properly applied? That is the predominate reason for my users who need to get to step 31 in your list.
Thanks
Thanks for this guide
Hi, is the heatsink that makes contact with the cpu die aluminium? I think I might have repasted it with liquid metal… Thanks!