crwdns2933423:0crwdne2933423:0

PlayStation 3 Slim Fan Replacement

crwdns2942213:0crwdne2942213:0

  1. PlayStation 3 Slim Fan Replacement, Top Cover: crwdns2935265:01crwdnd2935265:01crwdnd2935265:01crwdne2935265:0
    • Turn the PS3 over and lay it on its backside.

    • Carefully peel the warranty sticker up off the lower case to reveal a hidden screw cover.

    • To avoid activating the VOID that may come up, heat the sticker carefully to remove and replace it cleanly.

    Don’t even need to bother with the sticker anymore since SONY does not care what you do with them anymore.

    Travis Wheeler - crwdns2934203:0crwdne2934203:0

  2. PlayStation 3 Slim Fan Replacement: crwdns2935265:02crwdnd2935265:01crwdnd2935265:02crwdne2935265:0 PlayStation 3 Slim Fan Replacement: crwdns2935265:02crwdnd2935265:02crwdnd2935265:02crwdne2935265:0
    • Use the flat end of a metal spudger to pry up the seven screw covers around the edge of the lower case.

  3. PlayStation 3 Slim Fan Replacement: crwdns2935265:03crwdnd2935265:01crwdnd2935265:01crwdne2935265:0
    • Remove the seven 37 mm Phillips screws securing the top cover to the lower case.

  4. PlayStation 3 Slim Fan Replacement: crwdns2935265:04crwdnd2935265:01crwdnd2935265:01crwdne2935265:0
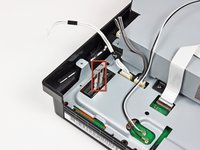
    • Remove the four 13.3 mm T8 security Torx screws beneath the Blu-ray drive opening. (Some models may only have three screws)

    Its 4 screws beneath the blu-ray

    Manuel - crwdns2934203:0crwdne2934203:0

    Remove the four 13.3 mm T8 security Torx screws beneath the Blu-ray drive opening.

    Daniel Tlapa - crwdns2934203:0crwdne2934203:0

    Can we edit this to say 4 screws?

    revanantwraith - crwdns2934203:0crwdne2934203:0

    I made the change from three to four screws, but you're able to edit the guides as well. If you want to edit something, you can click the Edit link on the right side of any guide step, or the Edit link at the top right of the page (sandwiched in-between View and History).

    Taylor Arnicar -

    Do you guys have a guide for the PS3 Slim Model 3001A. The fan is different than this model.

    emknight04 - crwdns2934203:0crwdne2934203:0

    3001a is basically same motherboard but cheaper plastic bd drive other than that its exactly the same until you get to the new slim line

    Robert -

    Anyone know an online retailer with a competitive price for the replacement fan?

    Jared - crwdns2934203:0crwdne2934203:0

    My PS3 had only three Torx screws. Having four in the diagram was initially confusing. Obviously they made a mid-stream change at some point (mine is several years old now).

    corygbooker - crwdns2934203:0crwdne2934203:0

    I've accidentally removed the ribbon cable from the blu-Ray drive and can not seem to figure out how to reconnect it. Can anyone help?

    OneIfByLand - crwdns2934203:0crwdne2934203:0

    Take the top off the drive, connect the ribbon to the motherboard then replace the drive sliding the ribbon through the slot on the bottom of the drive and reconnect to the laser.

    KcXbox Repair -

    pls help i have to tear down my ps3 slim but the 4 srews are very hard to take it out because there is a needle in the middle pls hep

    vbrabandt - crwdns2934203:0crwdne2934203:0

    If the screw has a pin in the center, that means it is a security Torx meant to prevent tampering. To remove this screw, follow the guide I have linked below...

    http://www.instructables.com/id/Removing...

    Telpack - crwdns2934203:0crwdne2934203:0

    How do u buy the screw driver for these screws

    mistergalacta hoggy - crwdns2934203:0crwdne2934203:0

    Online at the usual suspects?

    Or some hobby stores or places that sell tools will sometimes carry these.

    revanantwraith -

    Anyone else's screws for this step need the T7 bit instead of T8?

    Michael J Cotton - crwdns2934203:0crwdne2934203:0

    What is the name of this screwdriver

    Mohammad Shawa - crwdns2934203:0crwdne2934203:0

  5. PlayStation 3 Slim Fan Replacement: crwdns2935265:05crwdnd2935265:01crwdnd2935265:02crwdne2935265:0 PlayStation 3 Slim Fan Replacement: crwdns2935265:05crwdnd2935265:02crwdnd2935265:02crwdne2935265:0
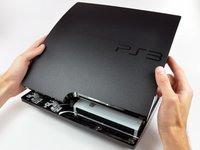
    • Lift the top cover from its rear edge and rotate it toward the front of the PS3.

    • Lift the top cover off the PS3.

    I just want to open the top cover to clean the fan. Do I need to unscrew the four security screws?

    Aryan - crwdns2934203:0crwdne2934203:0

  6. PlayStation 3 Slim Fan Replacement, Power Supply: crwdns2935265:06crwdnd2935265:01crwdnd2935265:02crwdne2935265:0 PlayStation 3 Slim Fan Replacement, Power Supply: crwdns2935265:06crwdnd2935265:02crwdnd2935265:02crwdne2935265:0
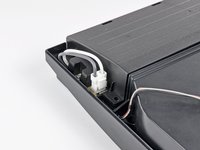
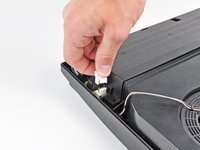
    • Squeeze the AC inlet connector's locking mechanism and pull straight up to disconnect it from the power supply.

  7. PlayStation 3 Slim Fan Replacement: crwdns2935265:07crwdnd2935265:01crwdnd2935265:01crwdne2935265:0
    • Pull the DC-Out cables straight up to lift their connector up and out of its socket on the power supply.

    Those two screws are tight down there what do you recommend I use?

    Megan bronner - crwdns2934203:0crwdne2934203:0

  8. PlayStation 3 Slim Fan Replacement: crwdns2935265:08crwdnd2935265:01crwdnd2935265:01crwdne2935265:0
    • Remove the two 7.6 mm Phillips screws securing the power supply to the lower case.

    Question: if a screw doesn't come out, what do you recommend, without potentially damaging the system, inside and out?

    kramiz2488 - crwdns2934203:0crwdne2934203:0

    It seems these can be quite tight, but they did come loose with someextra force in my case. They did that thing where it makes cracking sounds, but nothing really breaks. They're just really tight in there. - I just wouldn't recommend taking these out too often.

    Michael Hendriks - crwdns2934203:0crwdne2934203:0

    The screwdrivers on the guide didn't work mine just don't come out any tips model is slim CECH 2001A

    Step 8

    Jose Arrieta - crwdns2934203:0crwdne2934203:0

    These screws work as a ground pass through between the motherboard shields and the power supply. My cousin took his PS3 to a repair shop to replace the power supply, they didn’t put the screws back in after that and the PS was shutting down suddenly (no light green or red), put a couple of new screws and it’s being working fine since

    Mauricio González - crwdns2934203:0crwdne2934203:0

    Sometime ago i took apart my PS3 out of curiosity, When puting it back together, i messed it up, I stripped one of the PSU screws. Now, i can't take it apart for a paste replacement. Any ideas?

    Franco Iván Bello Rojas - crwdns2934203:0crwdne2934203:0

    The screws don't come out how do I fix this without breaking anything

    Suck dick - crwdns2934203:0crwdne2934203:0

    I had the same problem with very tight screws on PS3 power supply. I solved it by purchasing a Screw removal / extractor gripping pliers long nose style , with unique non-slip jaws for quickly extracting damaged / stuck screws. ENGINEER PZ-60 Neji-Saurus,Silver. ( bought mine on Amazon)

    These pliers have special grips on tapered end to hold and turn stripped or rusty screws. It took a lot of effort, but screws finally came out using these pliers. A bit of sewing machine oil and prising under the washers with a flat screwdrvers helps too. Failing that, take it to repair shop as they are VERY TIGHT screws on some models of PS3.

    hubert hanks - crwdns2934203:0crwdne2934203:0

    I need some advice I have taken apart my PS3 slim unit to clean it. I bought it second hand last year and it is filthy, I am having issues because the screws holding down the power supply are very tight, they are not stripped and I am using the right screwdriver. I don’t want to damage the screws, can anyone help?

    Sam - crwdns2934203:0crwdne2934203:0

  9. PlayStation 3 Slim Fan Replacement: crwdns2935265:09crwdnd2935265:01crwdnd2935265:01crwdne2935265:0
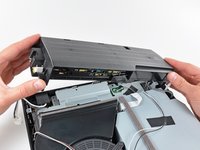
    • Lift the power supply upward from its left edge as viewed from the front of the PS3.

  10. PlayStation 3 Slim Fan Replacement: crwdns2935265:010crwdnd2935265:01crwdnd2935265:02crwdne2935265:0 PlayStation 3 Slim Fan Replacement: crwdns2935265:010crwdnd2935265:02crwdnd2935265:02crwdne2935265:0
    • Continue to lift the left edge of the power supply until it lifts off the two metal posts shown in the second picture.

    • Remove the power supply from the PS3, minding any cables that may get caught.

    It seems it kind of ends for me here. I can only lift the left side about an inch and then the right side stays down like it’s stuck to something underneath. It feels like I’m bending something. Could something have melted underneath?… It's really stuck, I can't get it to come loose. And I can't see much shining a light into it either. - Any tips?…

    Michael Hendriks - crwdns2934203:0crwdne2934203:0

    Did you undo the screws?

    Phoenix Jameson -

    I had the same issue but was able to get it off. The right side (as per the above picture) has two long column like sections that actually goes into the machine. Took me a bit of wiggling and some brute force.

    Ivan Amaro - crwdns2934203:0crwdne2934203:0

    You just lift the whole power supply up. There’s no need to start from the left? Is it possible to bend the two metal posts if lifting from the left?

    Ken - crwdns2934203:0crwdne2934203:0

    Needs medium flat screw driver as wedge to help to lift the power supply in the right side or exert more force in your right arm provided the front of PS3 is at your front.

    Dasol - crwdns2934203:0crwdne2934203:0

    Um, I translated the guide from French to English and the name of the guide was “Food” and the description said “This guide shows you how to replace your diet” The translation is incorrect just to let you know!

    Liam Kandell - crwdns2934203:0crwdne2934203:0

    Hi! Thanks for you attention! But no worries, the French word “alimentation” means power, food or diet depending the context.

    Claire Miesch -

  11. PlayStation 3 Slim Fan Replacement, Fan: crwdns2935265:011crwdnd2935265:01crwdnd2935265:01crwdne2935265:0
    • Pull the fan cables upward to lift the fan connector up and out of its socket on the motherboard.

  12. PlayStation 3 Slim Fan Replacement: crwdns2935265:012crwdnd2935265:01crwdnd2935265:01crwdne2935265:0
    • De-route the fan cables from under the plastic hook molded into the fan shroud.

  13. PlayStation 3 Slim Fan Replacement: crwdns2935265:013crwdnd2935265:01crwdnd2935265:01crwdne2935265:0
    • Remove the two 9.5 mm Phillips screws securing the fan to the heat sink.

    My PS3 doesn’t have the screws next to the fan.

    Savana - crwdns2934203:0crwdne2934203:0

    My PS3 is dusty on the inside should I clean it with something? What should I use to clean it? So far I’m just removing the dust bunnies with my hands, and wiping the dust off with my fingers.

    Savana - crwdns2934203:0crwdne2934203:0

  14. PlayStation 3 Slim Fan Replacement: crwdns2935265:014crwdnd2935265:01crwdnd2935265:01crwdne2935265:0
    • Lift the fan out of the heat sink, minding any cables that may get caught.

crwdns2915888:0crwdne2915888:0

To reassemble your device, follow these instructions in reverse order.

crwdns2935229:061crwdne2935229:0

crwdns2917034:0crwdne2917034:0

Andrew, excellent prestation.

Gary Dunn - crwdns2934203:0crwdne2934203:0

crwdns2917038:0crwdne2917038:0

crwdns2936625:0crwdne2936625:0:

crwdns2936751:024crwdne2936751:0 2

crwdns2936753:07crwdne2936753:0 61

crwdns2936753:030crwdne2936753:0 289

crwdns2942667:0crwdne2942667:0 72,880