crwdns2933423:0crwdne2933423:0

PlayStation 3 Slim Blu-ray Disc Drive Replacement

crwdns2942213:0crwdne2942213:0

  1. PlayStation 3 Slim Blu-ray Disc Drive Replacement, Top Cover: crwdns2935265:01crwdnd2935265:01crwdnd2935265:01crwdne2935265:0
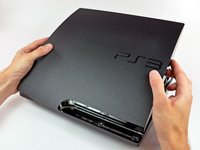
    • Turn the PS3 over and lay it on its backside.

    • Carefully peel the warranty sticker up off the lower case to reveal a hidden screw cover.

    • To avoid activating the VOID that may come up, heat the sticker carefully to remove and replace it cleanly.

  2. PlayStation 3 Slim Blu-ray Disc Drive Replacement: crwdns2935265:02crwdnd2935265:01crwdnd2935265:02crwdne2935265:0 PlayStation 3 Slim Blu-ray Disc Drive Replacement: crwdns2935265:02crwdnd2935265:02crwdnd2935265:02crwdne2935265:0
    • Use the flat end of a metal spudger to pry up the seven screw covers around the edge of the lower case.

  3. PlayStation 3 Slim Blu-ray Disc Drive Replacement: crwdns2935265:03crwdnd2935265:01crwdnd2935265:01crwdne2935265:0
    • Remove the seven 37 mm Phillips screws securing the top cover to the lower case.

  4. PlayStation 3 Slim Blu-ray Disc Drive Replacement: crwdns2935265:04crwdnd2935265:01crwdnd2935265:01crwdne2935265:0
    • Remove the four 13.3 mm T8 security Torx screws beneath the Blu-ray drive opening. (Some models may only have three screws)

  5. PlayStation 3 Slim Blu-ray Disc Drive Replacement: crwdns2935265:05crwdnd2935265:01crwdnd2935265:02crwdne2935265:0 PlayStation 3 Slim Blu-ray Disc Drive Replacement: crwdns2935265:05crwdnd2935265:02crwdnd2935265:02crwdne2935265:0
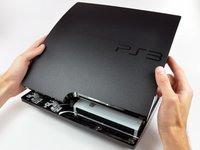
    • Lift the top cover from its rear edge and rotate it toward the front of the PS3.

    • Lift the top cover off the PS3.

  6. PlayStation 3 Slim Blu-ray Disc Drive Replacement, Power Supply: crwdns2935265:06crwdnd2935265:01crwdnd2935265:02crwdne2935265:0 PlayStation 3 Slim Blu-ray Disc Drive Replacement, Power Supply: crwdns2935265:06crwdnd2935265:02crwdnd2935265:02crwdne2935265:0
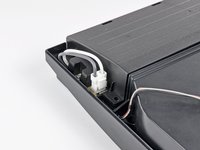
    • Squeeze the AC inlet connector's locking mechanism and pull straight up to disconnect it from the power supply.

  7. PlayStation 3 Slim Blu-ray Disc Drive Replacement: crwdns2935265:07crwdnd2935265:01crwdnd2935265:01crwdne2935265:0
    • Pull the DC-Out cables straight up to lift their connector up and out of its socket on the power supply.

  8. PlayStation 3 Slim Blu-ray Disc Drive Replacement: crwdns2935265:08crwdnd2935265:01crwdnd2935265:01crwdne2935265:0
    • Remove the two 7.6 mm Phillips screws securing the power supply to the lower case.

  9. PlayStation 3 Slim Blu-ray Disc Drive Replacement: crwdns2935265:09crwdnd2935265:01crwdnd2935265:01crwdne2935265:0
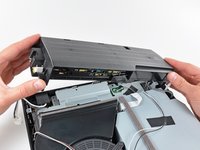
    • Lift the power supply upward from its left edge as viewed from the front of the PS3.

  10. PlayStation 3 Slim Blu-ray Disc Drive Replacement: crwdns2935265:010crwdnd2935265:01crwdnd2935265:02crwdne2935265:0 PlayStation 3 Slim Blu-ray Disc Drive Replacement: crwdns2935265:010crwdnd2935265:02crwdnd2935265:02crwdne2935265:0
    • Continue to lift the left edge of the power supply until it lifts off the two metal posts shown in the second picture.

    • Remove the power supply from the PS3, minding any cables that may get caught.

  11. PlayStation 3 Slim Blu-ray Disc Drive Replacement, Blu-ray Disc Drive: crwdns2935265:011crwdnd2935265:01crwdnd2935265:02crwdne2935265:0 PlayStation 3 Slim Blu-ray Disc Drive Replacement, Blu-ray Disc Drive: crwdns2935265:011crwdnd2935265:02crwdnd2935265:02crwdne2935265:0
    • If present, remove the pieces of tape securing the cables to the body of the Blu-ray drive.

  12. PlayStation 3 Slim Blu-ray Disc Drive Replacement: crwdns2935265:012crwdnd2935265:01crwdnd2935265:01crwdne2935265:0
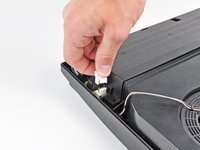
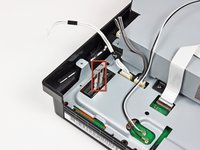
    • Use the flat end of a spudger or your fingernail to flip up the retaining flap on the Blu-ray ribbon cable socket.

    • Be sure you are prying up on the movable retaining flap, not the socket itself.

  13. PlayStation 3 Slim Blu-ray Disc Drive Replacement: crwdns2935265:013crwdnd2935265:01crwdnd2935265:01crwdne2935265:0
    • Pull the Blu-ray ribbon cable straight up and out of its socket.

  14. PlayStation 3 Slim Blu-ray Disc Drive Replacement: crwdns2935265:014crwdnd2935265:01crwdnd2935265:01crwdne2935265:0
    • Pull the Blu-ray power cable straight up to lift its connector out of the socket on the Blu-ray drive.

  15. PlayStation 3 Slim Blu-ray Disc Drive Replacement: crwdns2935265:015crwdnd2935265:01crwdnd2935265:01crwdne2935265:0
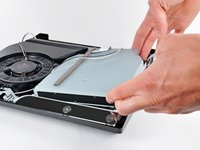
    • Remove the single 9.5 mm Phillips screw securing the Blu-ray drive to the lower case.

  16. PlayStation 3 Slim Blu-ray Disc Drive Replacement: crwdns2935265:016crwdnd2935265:01crwdnd2935265:02crwdne2935265:0 PlayStation 3 Slim Blu-ray Disc Drive Replacement: crwdns2935265:016crwdnd2935265:02crwdnd2935265:02crwdne2935265:0
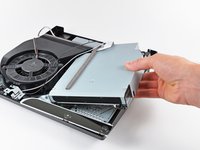
    • Lift the Blu-ray drive slightly by its right edge to dislodge the control board from its housing.

    • Remove the Blu-ray drive from the PS3.

    • After you reinstall the Blu-ray drive, be sure the control board is firmly seated in the lower case before proceeding.

    • If replacing the Blu-ray drive with a new drive, swap the circuit board from your old drive into the new drive.

crwdns2915888:0crwdne2915888:0

To reassemble your device, follow these instructions in reverse order.

crwdns2935229:0178crwdne2935229:0

crwdns2944067:022crwdne2944067:0

great work guys and ladies.......haha went without a snag!

Jesse Waterhouse - crwdns2934203:0crwdne2934203:0

I have a question I have followed your guide properly and removed my drive and found that the laser and disc loader are both need replaced. My question is when I go online and look for the replacement it sometimes shows just the laser then others shows the driver. I want the entire component as seen in this guide above. Do these come intact with everything in it when I buy it online. Can you please help.

Thank you,

Thomas Martinez

Tomlvgmartinez@yahoo.com

Thomas Martinez - crwdns2934203:0crwdne2934203:0

Ive been able to remove the drive and I think it's fixed. To get it back together how do you get that ribbon underneath to go back into the slot? Is there a trick? I can get it lined up, but it won't go in.

Thanks for the help

ken - crwdns2934203:0crwdne2934203:0

Ken,

Don' t know if this helps you now after all this time, but maybe it will help others with the same issue.

a) On the slot where the ribbon is to be inserted, is a lock clip. You pull up on that (gently).

b) Slide the ribbon in now with the clip lifted.

c) While securing the ribbon down in the slot, push the clip down, it will lock the ribbon in the slot.

Hopefully this helps, I didn't realize the clip could be lifted. While it's down, it is impossible to set the ribbon in.

ShuriKen

ShuriKen -

crwdns2917038:0crwdne2917038:0

crwdns2936625:0crwdne2936625:0:

crwdns2936751:024crwdne2936751:0 22

crwdns2936753:07crwdne2936753:0 334

crwdns2936753:030crwdne2936753:0 1,437

crwdns2942667:0crwdne2942667:0 290,711