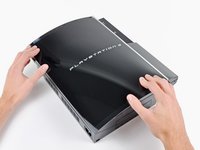
crwdns2915892:0crwdne2915892:0
Use this guide to replace a broken power supply.
crwdns2942213:0crwdne2942213:0
-
-
Use the tip of a spudger to remove the black rubber screw cover from the side of the PS3.
-
-
-
Remove the single 8.5 mm T10 Security Torx screw from the smart plate.
-
-
-
Pull the smart plate toward the hard drive bay, then lift it off the body of the PS3.
-
-
-
Remove the following seven screws:
-
Six 52 mm Phillips screws
-
One 30 mm Phillips screw
-
-
-
-
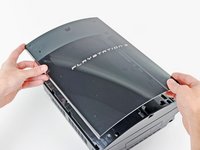
Lift the top cover from its rear edge and rotate it toward the front of the PS3.
-
Remove the top cover.
-
There is a plastic hook located in a hole on the top back right hand side corner. Carefully push the plastic hook a bit from the rear of the machine with a spudger to release the rear right of the casing.
-
-
-
Remove the two 9 mm Phillips screws securing the memory card reader to the chassis.
-
-
-
Lift the memory card reader out of the PS3 enough to access its cable.
-
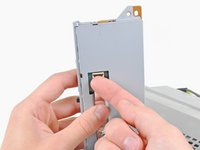
Flip up the retaining flap on the memory card reader ribbon cable socket.
-
Pull the ribbon cable out of its socket.
-
Remove the memory card reader from the PS3.
-
-
-
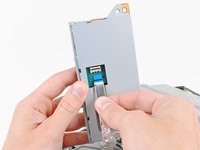
Pull the DC-In cables toward the front of the PS3 to disconnect them from the power supply.
-
-
-
Lift the AC-In cables slightly away from the rear cover for clearance to access the AC-In connector.
-
-
-
While depressing its locking mechanism, pull the AC-In connector out of its socket on the power supply.
-
-
-
Remove the five 9 mm Phillips screws securing the power supply to the chassis.
-
-
-
Lift the power supply upward from its front edge to disconnect it from the posts attached to the logic board.
-
Remove the power supply.
-


To reassemble your device, follow these instructions in reverse order.
To reassemble your device, follow these instructions in reverse order.
crwdns2935221:0crwdne2935221:0
crwdns2935229:048crwdne2935229:0

crwdns2947412:06crwdne2947412:0
This is for the 60gb version. As there is no card reader in the 80gb i replaced the power supply in and some of the psu screws were in a slightly different place. But a very good guide.
I have a Ps3 that was bought in America. The power supply is different to ours here in South Africa (Cape Town). A friend who gave me the Ps3 also had an external power supply built so that it can be used here. It's been working for years but now I have that green light thingy going. I've removed the disc that was in it and thought it may have been inserted incorrectly. Now that I have seen your tutorial I will definitely check if it's the power supply or mother board. Thank you.
CAN I HAVE THE MANUAL MY RED LIGHT IS ON ALSO DIRECT ME TO A GOOD PLACE FOR REPAIRS IN ACCRA GHANA EMAIL honmante54@yahoo.com thank you
why do your consoles have this red light on why do something about it
Hi I need a good fix store in Greece for ps3 in order to replace my power supply