crwdns2933423:0crwdne2933423:0

PlayStation 2 Slimline SCPH-900xx Lower Smart Plate Replacement

crwdns2942213:0crwdne2942213:0

  1. PlayStation 2 Slimline SCPH-900xx Lower Smart Plate Replacement, Lower Smart Plate: crwdns2935265:01crwdnd2935265:01crwdnd2935265:01crwdne2935265:0
    • Turn off your PlayStation 2 and remove the disc and Memory Card.

    • Turn over the PlayStation 2 and put it on a soft surface (e.g. a towel).

  2. PlayStation 2 Slimline SCPH-900xx Lower Smart Plate Replacement: crwdns2935265:02crwdnd2935265:01crwdnd2935265:01crwdne2935265:0
    • Locate the six covers.

    • Two are located underneath the feet.

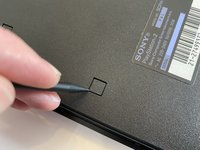
    • One cover is located underneath the Void sticker.

  3. PlayStation 2 Slimline SCPH-900xx Lower Smart Plate Replacement: crwdns2935265:03crwdnd2935265:01crwdnd2935265:01crwdne2935265:0
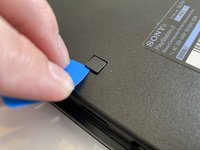
    • Remove the Void sticker with a Spudger and some cleaning alcohol

    • Removing the Void sticker will void the warranty of your device!

    • Some versions of that console maybe don’t have the sticker or it’s relocated.

  4. PlayStation 2 Slimline SCPH-900xx Lower Smart Plate Replacement: crwdns2935265:04crwdnd2935265:01crwdnd2935265:02crwdne2935265:0 PlayStation 2 Slimline SCPH-900xx Lower Smart Plate Replacement: crwdns2935265:04crwdnd2935265:02crwdnd2935265:02crwdne2935265:0
    • Remove the covers by using either a Spudger, Opening Picks or your fingernail.

  5. PlayStation 2 Slimline SCPH-900xx Lower Smart Plate Replacement: crwdns2935265:05crwdnd2935265:01crwdnd2935265:01crwdne2935265:0
    • Remove the six Phillips #1 screws with a screwdriver.

    • The screws on the right are a bit deeper inside the shell as like the rest but are the same size.

  6. PlayStation 2 Slimline SCPH-900xx Lower Smart Plate Replacement: crwdns2935265:06crwdnd2935265:01crwdnd2935265:02crwdne2935265:0 PlayStation 2 Slimline SCPH-900xx Lower Smart Plate Replacement: crwdns2935265:06crwdnd2935265:02crwdnd2935265:02crwdne2935265:0
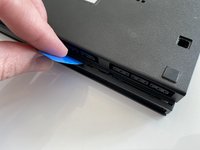
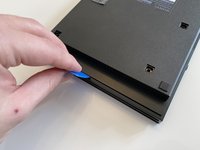
    • Separate the clips at the front and the overhanging side from their mounting using a Prying Tool.

    • Separate the two halves.

crwdns2915888:0crwdne2915888:0

To reassemble your device, follow these instructions in reverse order.

crwdns2935227:0crwdne2935227:0

crwdns2934873:0crwdne2934873:0

de en

100%

crwdns2934883:0MrJuliancrwdne2934883:0 crwdns2934875:0crwdne2934875:0
crwdns2934877:0crwdne2934877:0 ›

MrJulian

crwdns2935283:010/22/20crwdne2935283:0

1 543 crwdns2915208:0crwdne2915208:0

crwdns2935297:07crwdne2935297:0

crwdns2944067:00crwdne2944067:0

crwdns2917038:0crwdne2917038:0

crwdns2936625:0crwdne2936625:0:

crwdns2936751:024crwdne2936751:0 1

crwdns2936753:07crwdne2936753:0 7

crwdns2936753:030crwdne2936753:0 40

crwdns2942667:0crwdne2942667:0 1,701