crwdns2915892:0crwdne2915892:0
If the optical drive of your PlayStation 2 Slimline is broken, this guide will provide a step-by-step process on how to access and remove the old optical drive for repairs or replacement.
crwdns2942213:0crwdne2942213:0
-
-
Remove the rubber feet on two of the screw covers on the bottom of the console.
-
Remove the screw covers and the screws themselves.
-
-
-
-
Use a metal spunger to open the chassis
-
-
-
Slip the three cables out of the sockets.
-
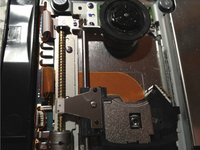
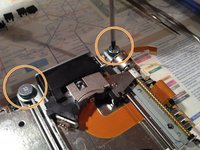
Use a PH01 screwdriver to remove the four screws securing the optical drive
-
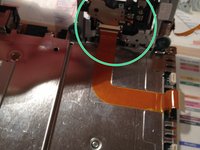
Lift up the optical drive and remove the duct tape under the flex cable.
-


To reassemble your device, follow these instructions in reverse order.
To reassemble your device, follow these instructions in reverse order.
crwdns2935221:0crwdne2935221:0
crwdns2935229:016crwdne2935229:0

crwdns2947412:03crwdne2947412:0
How is it that this guide says difficult and the other PS2 drive replacement on here says easy?
it really depends on your level of skill/experience.
How many different versions of drive is there for the slim model? When you go to replace it, do you just compare the model number on the laser?