crwdns2937539:0crwdnd2937539:0crwdne2937539:0
crwdns2915892:0crwdne2915892:0
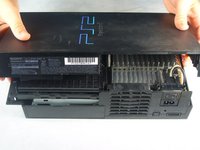
In the need that you need to replace the entire disc drive, here's what you need to do. You may need to do a little eBay perusing first, but when you find that replacement, these steps will show you how to remove your old one.
crwdns2942213:0crwdne2942213:0
crwdns2936621:0crwdne2936621:0
-
-
Use the flat edge of a metal spudger to pry the eight flat screw covers out.
-
Remove the following eight screws securing the top cover to the bottom case:
-
Four 55.4 mm Philips screws
-
Four 18.0 mm Phillips screws
-
-
-
Some models have a different number of screws and feet. Remove all the feet and screws in the bottom of the case.
-
The 10 screw model has 6 screws in the bottom-most portion and 4 in the upper tray.
-
-
-
Peel the warranty sticker (located next to the main power switch) straight away from the case.
-
-
-
Lift the top cover off the bottom case.
-
Carefully remove the power cord that attaches the top and bottom halves by disconnecting the power cord assembly from the top case.
If you have a 5000x model, then the power and reset buttons are attached to the console, not the lid. Therefore there won’t be a cord
-
-
-
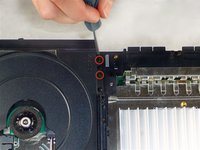
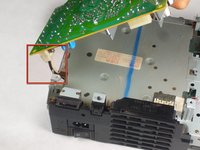
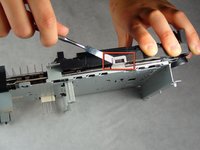
Remove the two 6.4 mm black Phillips screws securing the optical disc drive to the bottom case.
-
Lift and remove the optical disc drive straight up out of the bottom case.
-
-
-
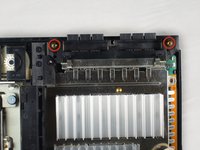
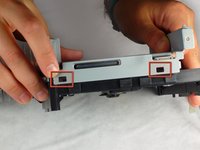
Remove the two 14.6 mm gold-headed Phillips securing the controller ports to the bottom case.
-
-
-
-
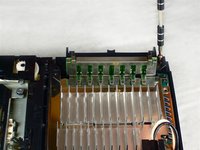
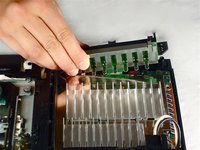
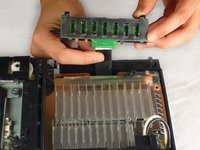
Gently lift the controller port board out of its recess within the bottom case.
-
Pull the controller port ribbon cable straight away from its socket on the controller port board.
-
Remove the controller port board out of the bottom case.
El conector del flex del modulo de conectores de los mando y las memory card no va a presión, para volver a colocarlo, hay que abrirlo.
Controller is detached can we fix it?
The clip which holds the controller is broken
-
-
-
Remove the two 14.6 mm gold Phillips screws securing the fan to the bottom case.
-
-
-
Pry and remove the expansion bay cover away from its posts on the bottom case.
If there is a harddrive in the system place switch on off position before removing and reinstalling because it may blow the fuse that runs the harddrive!
-
-
-
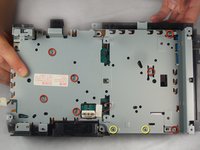
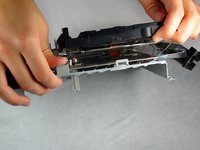
Lift the motherboard assembly from its front edge and remove it from the lower case.
-
-
-
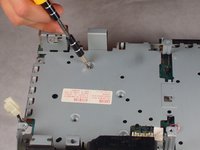
Remove the four 7.6 mm gold-head Phillips securing the power supply to the motherboard assembly.
If you have a 5000x model, then the power supply will be flipped upside down (or right side up). the screws are in the same positions
-
-
-
Lift the expansion bay cage up off the motherboard assembly.
-
-
-
Pull the power board connector straight to lift it out of its socket on the power board.
-
-
-
Underneath where the power supply once was is a transparent piece of plastic. This is the heat shield, and it can now be removed.
-
-
-
Remove the following screws securing the metal chassis to the logic board:
-
Seven 5.8 mm Phillips silver screws.
-
Two 7.4 mm Phillips gold screws.
-
-
-
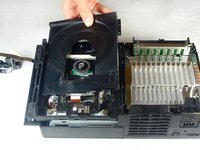
Carefully begin to lift out the disc drive.
-
-
-
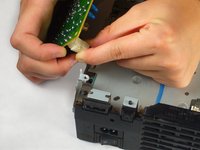
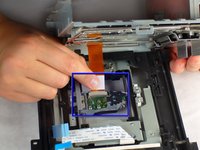
Remove the three blue ribbon cables and one orange ribbon cable by gently pulling on the blue plastic strips.
-
Carefully remove the orange ribbon cable from the laser by gently pulling on the white plastic strip.
-
Now the disc drive is free to be removed.
Hey, ich habe zwar 4 flachbandkabel auf dem laufwerk aber von iwo her habe ich noch eins und ich weiss nicht von wo und er ist sogar ganz ab, was kann ich tun, bitte helfen sie mir.
MfG David
-


To reassemble your device, follow these instructions in reverse order.
To reassemble your device, follow these instructions in reverse order.
crwdns2935221:0crwdne2935221:0
crwdns2935229:052crwdne2935229:0

crwdns2915084:0crwdne2915084:0

Cal Poly, Team 19-1, Maness Fall 2009 crwdns2935289:0Cal Poly, Team 19-1, Maness Fall 2009crwdne2935289:0
CPSU-MANESS-F09S19G1
crwdns2931471:04crwdne2931471:0
crwdns2935297:035crwdne2935297:0
crwdns2947412:04crwdne2947412:0
It helped out a lot I was able to fix my
What replacement drive would you recommend?
How do you know if the DVD drive is a 3 watt or 5 watt?
Are there any "New" DVD drives we could buy?
Before proceeding to step 2, Take a look at your PS2, some PS2's have 10 screws (and screw covers) instead of 8 (i found them underneath the optical drive), these instructions have mislead me and i ended up breaking my top cover for my PS2.
Tristan - crwdns2934203:0crwdne2934203:0
Ich möchte daraufhin weisen, daß es bei der SCPH-50004 zwei verschiedene Schraubabdeckungen gibt.
4x Kreuzförmig 4x rechteckig
Sowie eine silberne schraube die sich an der unterseite aufhöhe des Reset-Knopfes befindet.
Christian Lehnhardt - crwdns2934203:0crwdne2934203:0