crwdns2915892:0crwdne2915892:0
After around five years, the Pioneer UDP-LX500 seems to suffer a common fault whereby the tray does not eject. After a several presses of the Open/Close button, the tray will often eventually open.
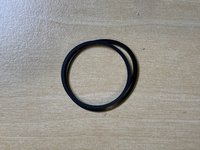
This problem is caused by a stretched belt on the tray eject motor which can be relatively easily be replaced, if a suitable replacement belt can be sourced. These appear to be available for around £5-6 (in 2024).
crwdns2942213:0crwdne2942213:0
-
-
Undo the six 2.5mm hex bolts on the sides of the cover; three on each side.
-
-
-
Remove the four gold screws from the rear panel holding the top cover on with a Phillips #2 screwdriver. Note that these look like many other screws on the rear panel but only these four need removing.
-
Remove the top cover. This needs to be slid back a short distance from the front panel and then lifted out. One of the sides will need to be pulled outwards slightly sideways to clear the rear panel.
-
-
-
Remove the four screws holding on the top of the transport dampening housing. A Phillips #0 screwdriver should be the right size.
-
Remove the housing cover by lifting it out vertically. It’s a close fit to securely hold the transport mechanism in place, but should slide easily.
-
Note that this is not the cover of the transport mechanism itself but a surrounding housing to silence and cushion the transport.
-
-
-
-
Remove the six small black Phillips screws on the top of the drive transport.
-
Remove the top cover of the transport. There are a couple of small gaps at the sides, slightly forward of the centre, where a screwdriver can be used to lift it out enough to grab it.
-
Be careful when opening this cover as it will expose the inner transport mechanism, including the laser.
-
-
-
Remove the two small Phillips screws holding the disc top stabiliser panel.
-
Note that the laser lens will likely be parked under the top edge of this panel. Be careful not to touch or scratch it with your fingers or the panel.
-
-
-
Pushing on the rear of the grey plastic tray, gently slide it out of the front of the player. It should slide easily, without resistance.
-
Support the tray as it comes out the front. It can be removed completely if the tray is lifted to clear the lugs at the back, but this isn’t necessary.
-
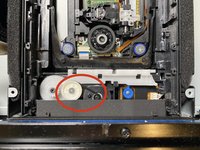
Note that the belt to be replaced can be seen through the gap in the centre of the tray, going under the left hand side.
-
While here, there may be small amounts of fluff or dust in the transport mechanism. These can be removed, although be careful not to get the laser lens dirty.
-
-
-
Remove the old belt from between the white wheel on the left and the small black motor spindle wheel towards the middle.
-
Clean the grooves in both wheels using some IPA or other cleaner. Make sure to remove any residue from the old belt. For the white wheel, a good way to do this is to insert a cotton bud or into the groove and slide the tray in and out gently, as this will spin the wheel quickly.
-
Leave the wheels to dry, using a cloth if necessary.
-
-
-
Before fitting the new belt, check it is clean and dry.
-
Fit the replacement belt across the white wheel and the black motor spindle.
-
Confirm the belt moves nicely by gently sliding the tray manually in and out a few times.
-
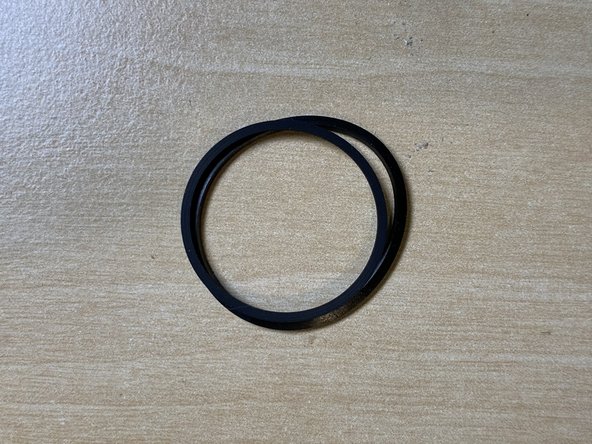
An old and new belt are shown on top of each other here, showing the old belt has stretched slightly, causing the slippage.
-
-
-
Reverse the dismantling instructions to reassemble the player.
-
The new belt can be tested once the disc stabilising panel is fitted. It is also strongly recommended to fit the transport cover, or lay it loosely across the top of the transport, to cover the laser.
-


To reassemble your device, follow these instructions in reverse order.
To reassemble your device, follow these instructions in reverse order.

crwdns2947412:04crwdne2947412:0
I bought a new belt with the attached link and tried this fix, but due to an unexpected problem it hasn't worked and I fear I may have caused further damage (see my comment above). Any advice would be welcome please. Thank you.
I follow your instructions to replace the belt and successfully correct the tray eject problem. Thanks for that. However, unfortunately the player cannot read the disc anymore. No matter which type of disc I put in, it displays "Unknown Disc". Any ideas?
It was the same for me as Peter - but I discovered there is a electrical "thing" initiating the sliding of the white mechanism close to the opening which lowers the laser-set when the tray goes out. Since power is off, there is a resistance with that.
I also have the eject problem. Removed the belt for cleaning and it appears to be working well provided you first power up and then press open. When I press the open/close button it automatically powers up but won't open although you hear it trying to do so.
What I however have noticed is that the sliding white mechanism has a design fault. The arm with the toothing is just too short so sometimes it doesn't grasp the the white wheel with the teeth. If the problem returns I will see if I can remove it and try to copy it with a 3D printer but with a slightly longer arm so that the white mechanism can always stay in contact with the parts that have to move it left to right or right to left.
Succes and hopefully we get to enjoy one of the last audiophile players out there for a considerable time.