crwdns2933423:0crwdne2933423:0

Philips Sonicare 9350 Battery Replacement

crwdns2942213:0crwdne2942213:0

  1. Philips Sonicare 9350 Battery Replacement, Head removal: crwdns2935265:01crwdnd2935265:01crwdnd2935265:02crwdne2935265:0 Philips Sonicare 9350 Battery Replacement, Head removal: crwdns2935265:01crwdnd2935265:02crwdnd2935265:02crwdne2935265:0
    • Remove the toothbrush head.

    • Use a screwdriver to pry gently around the bottom of the toothbrush.

    Best way to release the base and get to the locating lugs is to wrap the base of toothbrush in a towel and then use plumbers adjustable grips/pliers to sqeeze gently to deform slightly the handle. That will make prying the base out easier and a similar technique should be used to access and release the locating lugs (see explanation section below)

    Shreds - crwdns2934203:0crwdne2934203:0

  2. Philips Sonicare 9350 Battery Replacement, Remove the bottom: crwdns2935265:02crwdnd2935265:01crwdnd2935265:03crwdne2935265:0 Philips Sonicare 9350 Battery Replacement, Remove the bottom: crwdns2935265:02crwdnd2935265:02crwdnd2935265:03crwdne2935265:0 Philips Sonicare 9350 Battery Replacement, Remove the bottom: crwdns2935265:02crwdnd2935265:03crwdnd2935265:03crwdne2935265:0
    • After the bottom of the toothbrush is pried loose, remove it from the base of the brush.

  3. Philips Sonicare 9350 Battery Replacement: crwdns2935265:03crwdnd2935265:01crwdnd2935265:03crwdne2935265:0 Philips Sonicare 9350 Battery Replacement: crwdns2935265:03crwdnd2935265:02crwdnd2935265:03crwdne2935265:0 Philips Sonicare 9350 Battery Replacement: crwdns2935265:03crwdnd2935265:03crwdnd2935265:03crwdne2935265:0
    • Use a spudger to open the two clasps inside the toothbrush handle in a downward motion.

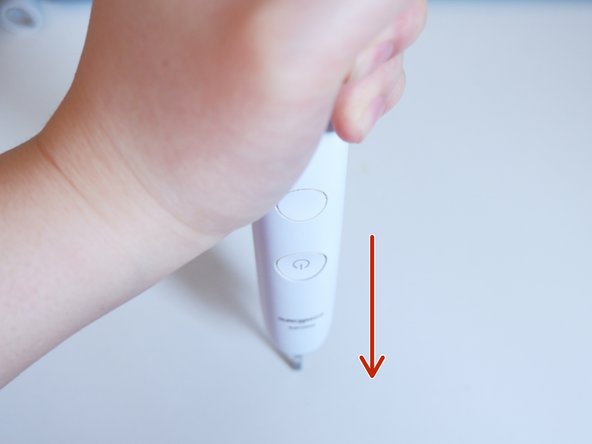
    • Turn the toothbrush upside down and push down on a hard surface—this will slide the toothbrush's internal body out.

    These are generally white tabs that will easily come loose with the pointy end of a spudger, small screwdriver in a pinch.

    Ron - crwdns2934203:0crwdne2934203:0

  4. Philips Sonicare 9350 Battery Replacement, Extract the internals: crwdns2935265:04crwdnd2935265:01crwdnd2935265:02crwdne2935265:0 Philips Sonicare 9350 Battery Replacement, Extract the internals: crwdns2935265:04crwdnd2935265:02crwdnd2935265:02crwdne2935265:0
    • Pull out the internals of the toothbrush.

  5. Philips Sonicare 9350 Battery Replacement, Access the battery: crwdns2935265:05crwdnd2935265:01crwdnd2935265:02crwdne2935265:0 Philips Sonicare 9350 Battery Replacement, Access the battery: crwdns2935265:05crwdnd2935265:02crwdnd2935265:02crwdne2935265:0
    • Open the protective cover of the battery.

    • Check the battery model.

    • In this case, the model is a Sony 680mhA lithium battery.

  6. Philips Sonicare 9350 Battery Replacement, Desolder both terminals: crwdns2935265:06crwdnd2935265:01crwdnd2935265:03crwdne2935265:0 Philips Sonicare 9350 Battery Replacement, Desolder both terminals: crwdns2935265:06crwdnd2935265:02crwdnd2935265:03crwdne2935265:0 Philips Sonicare 9350 Battery Replacement, Desolder both terminals: crwdns2935265:06crwdnd2935265:03crwdnd2935265:03crwdne2935265:0
    • Open the protection cover of the circuit board.

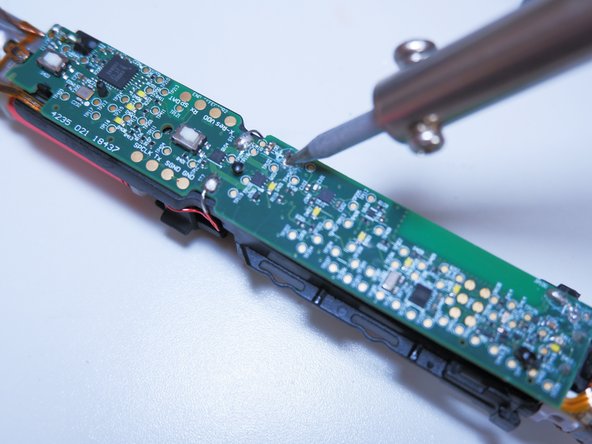
    • Find the welding points of the positive and negative electrodes of the battery and use the soldering iron to desolder.

    • The battery will fall off after desoldering as shown in the figure.

    • Be careful not to touch other parts of the circuit board when desoldering.

    A solder sucker makes this a lot easier.

    Ron - crwdns2934203:0crwdne2934203:0

  7. Philips Sonicare 9350 Battery Replacement, Install a new battery: crwdns2935265:07crwdnd2935265:01crwdnd2935265:03crwdne2935265:0 Philips Sonicare 9350 Battery Replacement, Install a new battery: crwdns2935265:07crwdnd2935265:02crwdnd2935265:03crwdne2935265:0 Philips Sonicare 9350 Battery Replacement, Install a new battery: crwdns2935265:07crwdnd2935265:03crwdnd2935265:03crwdne2935265:0
    • Use a spudger to pry the battery out at a 45 degree angle.

    • After successfully removing the battery, install the new battery using the reverse procedure.

    • Always use ESD safe tools when working on a circuit board or with batteries such as a nylon spudger.

crwdns2915888:0crwdne2915888:0

To reassemble your device, follow these instructions in reverse order.

crwdns2935229:05crwdne2935229:0

Dongyi Lin

crwdns2935283:005/10/21crwdne2935283:0

273 crwdns2915208:0crwdne2915208:0

crwdns2935295:0crwdne2935295:0

crwdns2915084:0crwdne2915084:0

York University, Team S1-G16, O'Regan Summer 2021 crwdns2935289:0York University, Team S1-G16, O'Regan Summer 2021crwdne2935289:0

YORK-O'REGAN-SU21S1G16

crwdns2934841:01crwdne2934841:0

crwdns2935297:03crwdne2935297:0

crwdns2947410:01crwdne2947410:0

All good advice and it works too. Ignore Philips advice that the battery is not replaceable. It is, with correct knowledge and understanding. Thanks for posting.

Shreds - crwdns2934203:0crwdne2934203:0

crwdns2917038:0crwdne2917038:0

crwdns2936625:0crwdne2936625:0:

crwdns2936751:024crwdne2936751:0 9

crwdns2936753:07crwdne2936753:0 46

crwdns2936753:030crwdne2936753:0 167

crwdns2942667:0crwdne2942667:0 11,581