crwdns2915892:0crwdne2915892:0
This guide will show you how to replace the circuit board for the Philips Sonicare 2 Series toothbrush. He is a link for a guide how to soldering which will be needed for this guide. How To Solder and Desolder Connections
crwdns2942213:0crwdne2942213:0
-
-
Pull upwards to remove the brush head from the top of the device.
-
-
-
Remove the 12 mm T8 Torx screw from the bottom of the toothbrush. After removing the screw, pry off the base with a plastic opening tool.
-
-
-
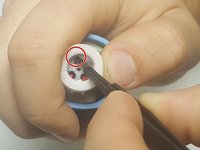
Remove the internal electronic mechanism from the housing by prying the red clips shown in the figure. This removes the charging port.
-
-
-
-
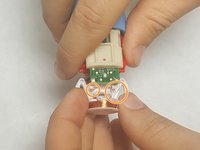
Next you will be able to remove the internal electronic mechanism as shown in the figure.
-
-
-
Remove the white battery cover as shown in the figure.
-
-
-
Remove the white circuit board cover as shown. This cover will require you to pry off the piece from the groves .
-
-
-
Pry away the battery using an opening tool from the battery housing. This will break the circuit and avoid electric shock.
-
-
-
Desolder the circuit board from the motor as shown.
-
-
-
Desolder the circuit board from the housing as shown to remove the board
-


To reassemble your device, follow these instructions in reverse order.
crwdns2935221:0crwdne2935221:0
crwdns2935229:02crwdne2935229:0
crwdns2935287:0crwdne2935287:0

IUPUI, Team S6-G2, Baechle Fall 2017 crwdns2935289:0IUPUI, Team S6-G2, Baechle Fall 2017crwdne2935289:0
IUPUI-BAECHLE-F17S6G2
crwdns2931471:03crwdne2931471:0
crwdns2935297:08crwdne2935297:0