crwdns2933423:0crwdne2933423:0

Philips Senseo II 7810 Coffee Maker - Removing the Back Cover

crwdns2862623:0crwdne2862623:0
crwdns2942641:0crwdne2942641:0

crwdns2942213:0crwdne2942213:0

  1. Philips Senseo II 7810 Coffee Maker - Removing the Back Cover, Back Cover: crwdns2935265:01crwdnd2935265:01crwdnd2935265:03crwdne2935265:0 Philips Senseo II 7810 Coffee Maker - Removing the Back Cover, Back Cover: crwdns2935265:01crwdnd2935265:02crwdnd2935265:03crwdne2935265:0 Philips Senseo II 7810 Coffee Maker - Removing the Back Cover, Back Cover: crwdns2935265:01crwdnd2935265:03crwdnd2935265:03crwdne2935265:0
    • Remove the detachable components of the coffee maker:

    • unplug the product;

    • empty the water container and remove it from the coffee machine;

    • remove the cup tray and drip tray;

    • remove the pod holder and coffee outflow unit.

    • Placing parts in a sink is easiest when disassembling.

  2. Philips Senseo II 7810 Coffee Maker - Removing the Back Cover: crwdns2935265:02crwdnd2935265:01crwdnd2935265:01crwdne2935265:0
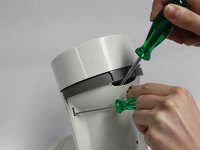
    • Remove outflow valve by putting a flathead screwdriver in the gaps and use this as a lever.

    • Pull gently while applying force.

  3. Philips Senseo II 7810 Coffee Maker - Removing the Back Cover: crwdns2935265:03crwdnd2935265:01crwdnd2935265:03crwdne2935265:0 Philips Senseo II 7810 Coffee Maker - Removing the Back Cover: crwdns2935265:03crwdnd2935265:02crwdnd2935265:03crwdne2935265:0 Philips Senseo II 7810 Coffee Maker - Removing the Back Cover: crwdns2935265:03crwdnd2935265:03crwdnd2935265:03crwdne2935265:0
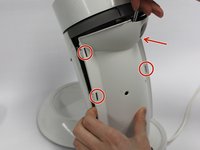
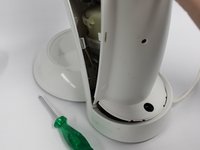
    • Remove back panel by:

    • inserting (flathead) screwdriver in the top and pressing this against the snap-fit;

    • pressing screwdriver on left side against the snap-fit simultaneously;

    • rotating back panel whilst pressing against the snap-fits to loosen the panel until it is no longer connected on that side;

    • pressing screwdriver on right side against the snap-fit and removing back panel altogether.

    • Expect difficulty with pulling, more hands may be required.

crwdns2915888:0crwdne2915888:0

To reassemble your device, follow these instructions in reverse order.

crwdns2935227:0crwdne2935227:0

BobJohnson

crwdns2935283:003/08/17crwdne2935283:0

499 crwdns2915208:0crwdne2915208:0

crwdns2935297:02crwdne2935297:0

crwdns2915084:0crwdne2915084:0

Delft University of Technology, Team S1-G12, Flipsen Spring 2017 crwdns2935289:0Delft University of Technology, Team S1-G12, Flipsen Spring 2017crwdne2935289:0

TUD-FLIPSEN-S17S1G12

crwdns2931471:03crwdne2931471:0

crwdns2935297:010crwdne2935297:0

crwdns2947412:00crwdne2947412:0

crwdns2917038:0crwdne2917038:0

crwdns2936625:0crwdne2936625:0:

crwdns2936751:024crwdne2936751:0 0

crwdns2936753:07crwdne2936753:0 0

crwdns2936753:030crwdne2936753:0 0

crwdns2942667:0crwdne2942667:0 48