crwdns2933423:0crwdne2933423:0

Philips Satinelle On/Off Switch Replacement

crwdns2942213:0crwdne2942213:0

  1. Philips Satinelle On/Off Switch Replacement, Plastic Cover: crwdns2935265:01crwdnd2935265:01crwdnd2935265:03crwdne2935265:0 Philips Satinelle On/Off Switch Replacement, Plastic Cover: crwdns2935265:01crwdnd2935265:02crwdnd2935265:03crwdne2935265:0 Philips Satinelle On/Off Switch Replacement, Plastic Cover: crwdns2935265:01crwdnd2935265:03crwdnd2935265:03crwdne2935265:0
    • Remove the head by pushing it to the right.

  2. Philips Satinelle On/Off Switch Replacement: crwdns2935265:02crwdnd2935265:01crwdnd2935265:02crwdne2935265:0 Philips Satinelle On/Off Switch Replacement: crwdns2935265:02crwdnd2935265:02crwdnd2935265:02crwdne2935265:0
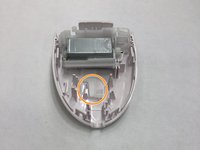
    • Use a metal spudger to pry open the casing.

    • Caution: The epilator's internal components could be damaged if you shove the spudger in too far.

  3. Philips Satinelle On/Off Switch Replacement: crwdns2935265:03crwdnd2935265:01crwdnd2935265:01crwdne2935265:0
    • Pull the plastic casing apart with your hands.

    • The plastic tab connecting the cover is likely going to break when you pull the device apart. This will not affect the operation of the epilator.

    That means once the epilator is opened, the same cover cannot be used to enclose the machine??

    Renu Singh - crwdns2934203:0crwdne2934203:0

  4. Philips Satinelle On/Off Switch Replacement, On/Off Switch: crwdns2935265:04crwdnd2935265:01crwdnd2935265:01crwdne2935265:0
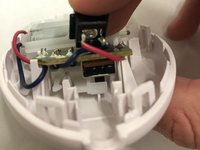
    • Remove the green board and the black socket.

  5. Philips Satinelle On/Off Switch Replacement: crwdns2935265:05crwdnd2935265:01crwdnd2935265:01crwdne2935265:0
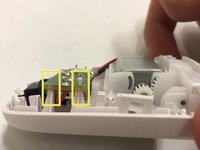
    • Slide the switch down toward the socket.

  6. Philips Satinelle On/Off Switch Replacement: crwdns2935265:06crwdnd2935265:01crwdnd2935265:03crwdne2935265:0 Philips Satinelle On/Off Switch Replacement: crwdns2935265:06crwdnd2935265:02crwdnd2935265:03crwdne2935265:0 Philips Satinelle On/Off Switch Replacement: crwdns2935265:06crwdnd2935265:03crwdnd2935265:03crwdne2935265:0
    • Put the components back into the frame

    • If the switch won't line up with the plastic square, make sure the large switch on the front of the operator is in the "off" position.

crwdns2915888:0crwdne2915888:0

To reassemble your device, follow these instructions in reverse order.

crwdns2935227:0crwdne2935227:0

Riannon Varney

crwdns2935283:010/08/18crwdne2935283:0

168 crwdns2915208:0crwdne2915208:0

crwdns2935295:0crwdne2935295:0

crwdns2915084:0crwdne2915084:0

Marist, Team S1-G1, Chaterdon Fall 2018 crwdns2935289:0Marist, Team S1-G1, Chaterdon Fall 2018crwdne2935289:0

MARS-CHATERDON-F18S1G1

crwdns2931471:03crwdne2931471:0

crwdns2935297:08crwdne2935297:0

crwdns2947410:01crwdne2947410:0

Very precise instructions, thanks!

carlos - crwdns2934203:0crwdne2934203:0

crwdns2917038:0crwdne2917038:0

crwdns2936625:0crwdne2936625:0:

crwdns2936751:024crwdne2936751:0 1

crwdns2936753:07crwdne2936753:0 2

crwdns2936753:030crwdne2936753:0 13

crwdns2942667:0crwdne2942667:0 1,706