crwdns2933423:0crwdne2933423:0

Petnet SmartFeeder SF10E Battery Replacement

crwdns2942213:0crwdne2942213:0

  1. Petnet SmartFeeder SF10E Battery Replacement, Battery: crwdns2935265:01crwdnd2935265:01crwdnd2935265:03crwdne2935265:0 Petnet SmartFeeder SF10E Battery Replacement, Battery: crwdns2935265:01crwdnd2935265:02crwdnd2935265:03crwdne2935265:0 Petnet SmartFeeder SF10E Battery Replacement, Battery: crwdns2935265:01crwdnd2935265:03crwdnd2935265:03crwdne2935265:0
    • Eject the SmartBowl by pressing the button located at the front of the SmartFeeder base.

    • Remove the metal tray by using both hands and pulling out the bowl towards you.

  2. Petnet SmartFeeder SF10E Battery Replacement: crwdns2935265:02crwdnd2935265:01crwdnd2935265:02crwdne2935265:0 Petnet SmartFeeder SF10E Battery Replacement: crwdns2935265:02crwdnd2935265:02crwdnd2935265:02crwdne2935265:0
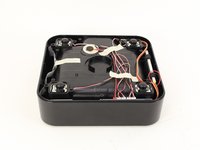
    • Turn the bowl tray side down by using both hands.

    • Remove seven 11 mm screws by using the Phillips #1 screwdriver.
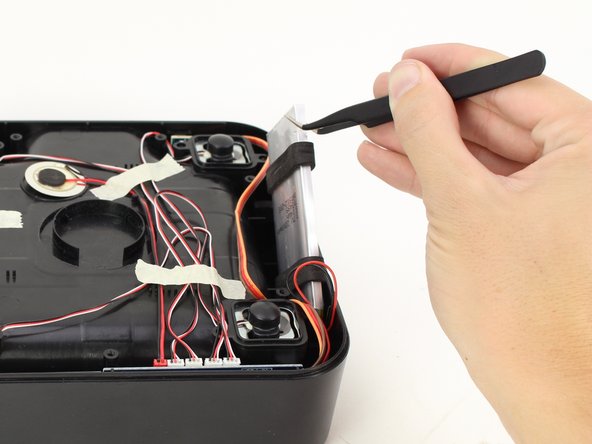
  3. Petnet SmartFeeder SF10E Battery Replacement: crwdns2935265:03crwdnd2935265:01crwdnd2935265:02crwdne2935265:0 Petnet SmartFeeder SF10E Battery Replacement: crwdns2935265:03crwdnd2935265:02crwdnd2935265:02crwdne2935265:0
    • Take the battery out of the SmartBowl with tweezers, avoid pulling on any wires.

    • Hold the SmartBowl down using one hand while using the other hand to remove the battery.

  4. Petnet SmartFeeder SF10E Battery Replacement: crwdns2935265:04crwdnd2935265:01crwdnd2935265:02crwdne2935265:0 Petnet SmartFeeder SF10E Battery Replacement: crwdns2935265:04crwdnd2935265:02crwdnd2935265:02crwdne2935265:0
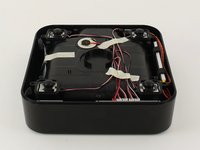
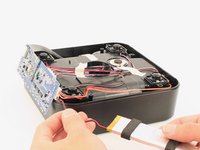
    • Remove the tape, closest to the four white connectors, with your hands.

    • Keep the wires attached to the tape for easy reassembly.

  5. Petnet SmartFeeder SF10E Battery Replacement: crwdns2935265:05crwdnd2935265:01crwdnd2935265:02crwdne2935265:0 Petnet SmartFeeder SF10E Battery Replacement: crwdns2935265:05crwdnd2935265:02crwdnd2935265:02crwdne2935265:0
    • Trace the wires with your hands from the battery to the motherboard.

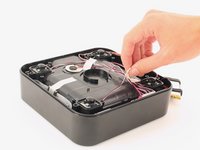
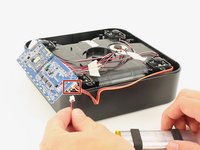
    • Detach the three-prong connector between the battery and the motherboard by pulling the white connectors with your hands.

    • Hold on to the sockets on the motherboard or you could accidentally pull off the entire assembly.

crwdns2915888:0crwdne2915888:0

To reassemble your device, follow these instructions in reverse order.

crwdns2935227:0crwdne2935227:0

Kristin Villanueva

crwdns2935283:010/08/18crwdne2935283:0

370 crwdns2915208:0crwdne2915208:0

crwdns2935297:02crwdne2935297:0

crwdns2915084:0crwdne2915084:0

Cal Poly, Team S13-G7, White Fall 2018 crwdns2935289:0Cal Poly, Team S13-G7, White Fall 2018crwdne2935289:0

CPSU-WHITE-F18S13G7

crwdns2931471:04crwdne2931471:0

crwdns2935297:05crwdne2935297:0

crwdns2944067:00crwdne2944067:0

crwdns2917038:0crwdne2917038:0

crwdns2936625:0crwdne2936625:0:

crwdns2936751:024crwdne2936751:0 1

crwdns2936753:07crwdne2936753:0 7

crwdns2936753:030crwdne2936753:0 9

crwdns2942667:0crwdne2942667:0 547