crwdns2933423:0crwdne2933423:0

Panasonic Lumix DMC-GX85 Main PCB Replacement

crwdns2942213:0crwdne2942213:0

  1. Panasonic Lumix DMC-GX85 Main PCB Replacement, Rear Cover: crwdns2935265:01crwdnd2935265:01crwdnd2935265:03crwdne2935265:0 Panasonic Lumix DMC-GX85 Main PCB Replacement, Rear Cover: crwdns2935265:01crwdnd2935265:02crwdnd2935265:03crwdne2935265:0 Panasonic Lumix DMC-GX85 Main PCB Replacement, Rear Cover: crwdns2935265:01crwdnd2935265:03crwdnd2935265:03crwdne2935265:0
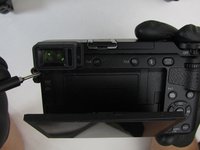
    • Remove the plastic hot shoe cover by sliding it towards the rear of the camera.

  2. Panasonic Lumix DMC-GX85 Main PCB Replacement: crwdns2935265:02crwdnd2935265:01crwdnd2935265:03crwdne2935265:0 Panasonic Lumix DMC-GX85 Main PCB Replacement: crwdns2935265:02crwdnd2935265:02crwdnd2935265:03crwdne2935265:0 Panasonic Lumix DMC-GX85 Main PCB Replacement: crwdns2935265:02crwdnd2935265:03crwdnd2935265:03crwdne2935265:0
    • Using a spudger, gently lift the forward end of the shoe spring to disengage its locking mechanism.

    • While holding the forward end of the shoe spring up, push from its lifted end to remove the shoe spring.

  3. Panasonic Lumix DMC-GX85 Main PCB Replacement: crwdns2935265:03crwdnd2935265:01crwdnd2935265:02crwdne2935265:0 Panasonic Lumix DMC-GX85 Main PCB Replacement: crwdns2935265:03crwdnd2935265:02crwdnd2935265:02crwdne2935265:0
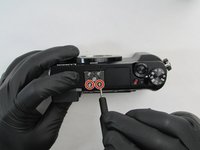
    • Remove the two 6.0mm silver Phillips #0 screws closest to the display screen.

    • Do not remove the two forward-most silver screws.

  4. Panasonic Lumix DMC-GX85 Main PCB Replacement: crwdns2935265:04crwdnd2935265:01crwdnd2935265:02crwdne2935265:0 Panasonic Lumix DMC-GX85 Main PCB Replacement: crwdns2935265:04crwdnd2935265:02crwdnd2935265:02crwdne2935265:0
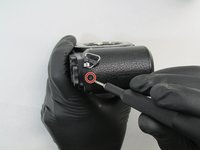
    • Turn the camera so the side with the jack cover is facing you.

    • Near the camera's top end, remove the 4.0mm black Phillips #0 screw on the bottom in this orientation.

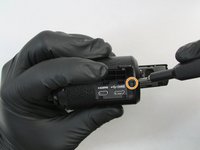
    • Open the jack cover and remove the 4.0mm black Phillips #0 screw inside.

  5. Panasonic Lumix DMC-GX85 Main PCB Replacement: crwdns2935265:05crwdnd2935265:01crwdnd2935265:02crwdne2935265:0 Panasonic Lumix DMC-GX85 Main PCB Replacement: crwdns2935265:05crwdnd2935265:02crwdnd2935265:02crwdne2935265:0
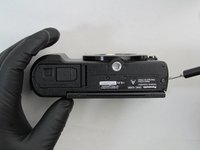
    • Flip the camera upside down so the bottom of the camera is facing you.

    • Remove the two center 2.5mm black Phillips #0 screws.

    • Remove the outer 4.5mm black Phillips #0 screw.

  6. Panasonic Lumix DMC-GX85 Main PCB Replacement: crwdns2935265:06crwdnd2935265:01crwdnd2935265:03crwdne2935265:0 Panasonic Lumix DMC-GX85 Main PCB Replacement: crwdns2935265:06crwdnd2935265:02crwdnd2935265:03crwdne2935265:0 Panasonic Lumix DMC-GX85 Main PCB Replacement: crwdns2935265:06crwdnd2935265:03crwdnd2935265:03crwdne2935265:0
    • Turn the camera so the display screen is facing you.

    • Rotate the top of the screen away from the camera body to access and remove the 4.5mm black Phillips #0 screw.

    • Remove the rear camera cover by gently pulling from the top side.

    • When removing the rear cover, pull apart slowly to prevent damaging the ribbon cable connecting the display screen and the Sub PCB.

  7. Panasonic Lumix DMC-GX85 Main PCB Replacement: crwdns2935265:07crwdnd2935265:01crwdnd2935265:03crwdne2935265:0 Panasonic Lumix DMC-GX85 Main PCB Replacement: crwdns2935265:07crwdnd2935265:02crwdnd2935265:03crwdne2935265:0 Panasonic Lumix DMC-GX85 Main PCB Replacement: crwdns2935265:07crwdnd2935265:03crwdnd2935265:03crwdne2935265:0
    • Turn the camera so the lens is facing down with the rear cover pulled back.

    • Disconnect the ribbon cable from the camera by pulling up on the black locking tab with an iFixit opening tool.

    • Pull the ribbon cable from the connector. The rear cover is now completely detached from the camera.

    • Do not bend the ribbon cable excessively and take care not to damage the ribbon cable.

  8. Panasonic Lumix DMC-GX85 Main PCB Replacement, Main PCB: crwdns2935265:08crwdnd2935265:01crwdnd2935265:02crwdne2935265:0 Panasonic Lumix DMC-GX85 Main PCB Replacement, Main PCB: crwdns2935265:08crwdnd2935265:02crwdnd2935265:02crwdne2935265:0
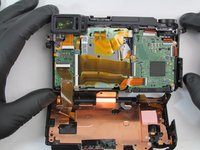
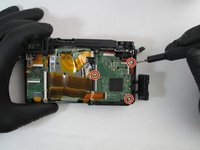
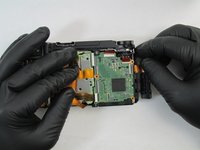
    • Remove the three 3.5mm silver Phillips #0 screws mounting the main PCB to the camera frame.

  9. Panasonic Lumix DMC-GX85 Main PCB Replacement: crwdns2935265:09crwdnd2935265:01crwdnd2935265:03crwdne2935265:0 Panasonic Lumix DMC-GX85 Main PCB Replacement: crwdns2935265:09crwdnd2935265:02crwdnd2935265:03crwdne2935265:0 Panasonic Lumix DMC-GX85 Main PCB Replacement: crwdns2935265:09crwdnd2935265:03crwdnd2935265:03crwdne2935265:0
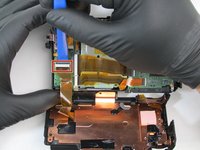
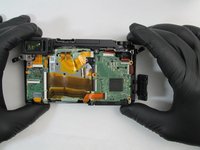
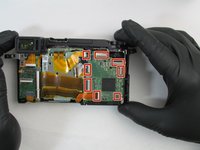
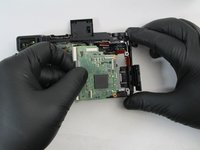
    • Disconnect the eight ribbon cables from the main PCB by pulling up on the black locking tabs with an iFixit opening tool.

    • Pull the ribbon cables from the connectors.

    • Do not bend the ribbon cable excessively and take care not to damage the ribbon cable.

  10. Panasonic Lumix DMC-GX85 Main PCB Replacement: crwdns2935265:010crwdnd2935265:01crwdnd2935265:03crwdne2935265:0 Panasonic Lumix DMC-GX85 Main PCB Replacement: crwdns2935265:010crwdnd2935265:02crwdnd2935265:03crwdne2935265:0 Panasonic Lumix DMC-GX85 Main PCB Replacement: crwdns2935265:010crwdnd2935265:03crwdnd2935265:03crwdne2935265:0
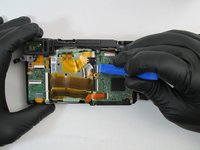
    • Gently lift the motherboard away from the camera body.

    • When removing the main PCB, take care not to lose the battery earth plate.

crwdns2915888:0crwdne2915888:0

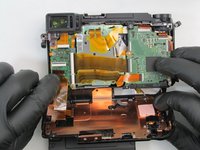
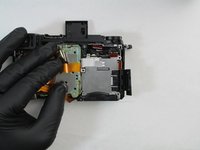
To reassemble your device, follow these instructions in reverse order.

crwdns2935229:04crwdne2935229:0

Hae Bom

crwdns2935283:009/17/19crwdne2935283:0

560 crwdns2915208:0crwdne2915208:0

crwdns2935297:03crwdne2935297:0

crwdns2915084:0crwdne2915084:0

Embry-Riddle Aeronautical University, Team S22-G2, Branham Fall 2019 crwdns2935289:0Embry-Riddle Aeronautical University, Team S22-G2, Branham Fall 2019crwdne2935289:0

ERAU-BRANHAM-F19S22G2

crwdns2931471:04crwdne2931471:0

crwdns2935297:07crwdne2935297:0

crwdns2944067:02crwdne2944067:0

Good day. How do I get the board both of the, the one on the right and one on d left

Tobas - crwdns2934203:0crwdne2934203:0

Where i can find this replacement ? DMC-GX85 Main PCB Replacement

vissente tapia cuevas - crwdns2934203:0crwdne2934203:0

crwdns2917038:0crwdne2917038:0

crwdns2936625:0crwdne2936625:0:

crwdns2936751:024crwdne2936751:0 2

crwdns2936753:07crwdne2936753:0 27

crwdns2936753:030crwdne2936753:0 95

crwdns2942667:0crwdne2942667:0 2,624