crwdns2915892:0crwdne2915892:0
In this long guide you will completely disassemble your FZ1000, excluding the lens which is manufactured by Leica, not Panasonic. You will need to unscrew many screws, detach numerous electronic ZIF connector ribbons, and pry open a few components in order to disassemble your camera. Be extra cautious when moving any electronic ribbons, since they tear very easily. See this technique on disconnecting ZIF connectors to better learn how to detach a ZIF connector ribbon.
In several steps of this guide, the state of the camera in the accompanying visual or visuals will not correspond to the state of your camera. The visuals differ from your camera in the following ways:
- Electronic ribbons will appear torn and taped. Your camera's electronic ribbons should not be torn.
- Black tape will appear crinkled due to prior removal. Your camera's black tape should not appear to have been previously removed.
- The MIC jack plug will appear snapped. Your plug should not be broken.
crwdns2942213:0crwdne2942213:0
-
-
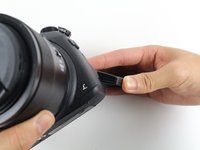
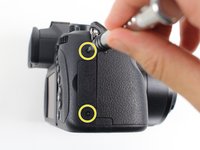
Slide the switch on the bottom of your camera from the right (LOCK) to the left (OPEN).
-
-
-
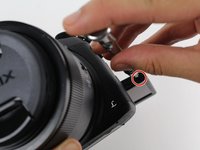
Pull down on the lever that holds the battery.
-
-
-
Swing out the screen on the back of your camera by 90 degrees.
-
Remove the two 2.2 mm Phillips #00 screws on the outside edge of the screen.
-
-
-
Rotate the screen clockwise by 90 degrees, so that the glass faces the viewfinder.
-
Remove the 4.1 mm Phillips #00 screw on the inside edge of the screen.
-
-
-
Rotate the screen clockwise by another 180 degrees, so that the glass faces the bottom of the camera.
-
Remove the second 4.1 mm Phillips #00 screw on the inside edge of the screen.
-
-
-
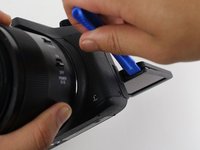
Use a plastic opening tool to pry open the plastic screen casing. It might be easiest to start prying near the screen mount, and then work your way around the casing.
-
Hold on to the side that houses the glass screen. Set down the side that says LUMIX.
-
-
-
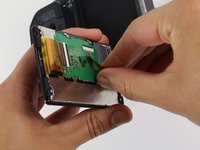
Pull to disconnect from the screen the ZIF connector ribbon attached to the screen axle.
-
Remove the screen and its casing from the screen axle.
-
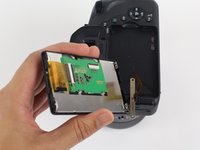
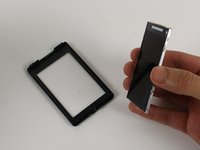
Pull out the screen from its plastic casing.
-
-
-
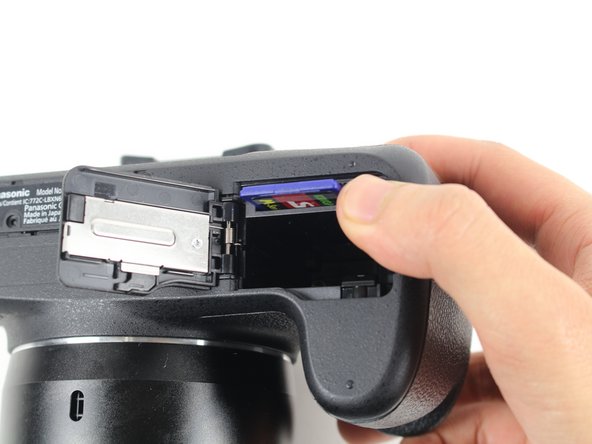
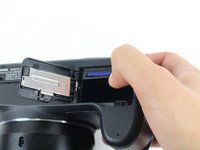
Push in on the SD card inside the battery housing.
-
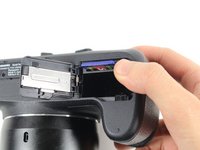
Pull out the SD card.
-
Close the battery housing door.
Il faut modifier “Étape 4 Carte mère” par “Étape 4 Carte mémoire”, mais je n’y arrive pas.
-
-
-
Remove the two 5.2 mm Phillips #00 screws that are 1) below the label and 2) above the tripod mount hole on the bottom of the camera.
-
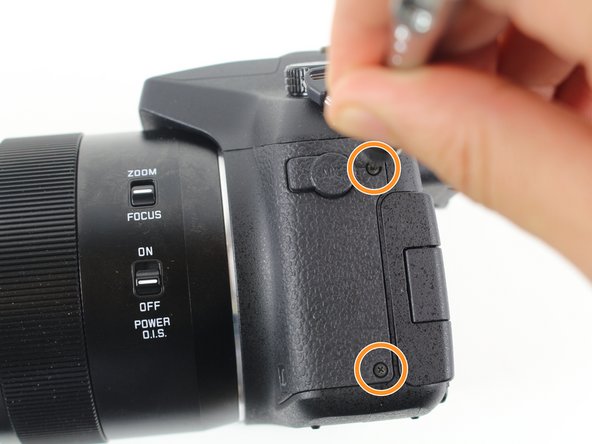
Remove the two 5.5 mm Phillips #00 screws on the side of the camera with the MIC jack.
-
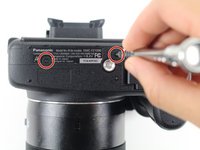
Remove the two 7.0 mm Phillips #00 screws that are 1) above and 2) below the HDMI panel.
Quitar también los Phillips #?? zona de abajo del visor, desmontar ,y , quitar otros 2 phillips #?? interiores.
-
-
-
There are two screws that hold the eye piece on to the main housing, just underneath. Remove these. Once these have been removed, gently pull and remove the eye piece and remove the now accessible top two screws.
-
-
-
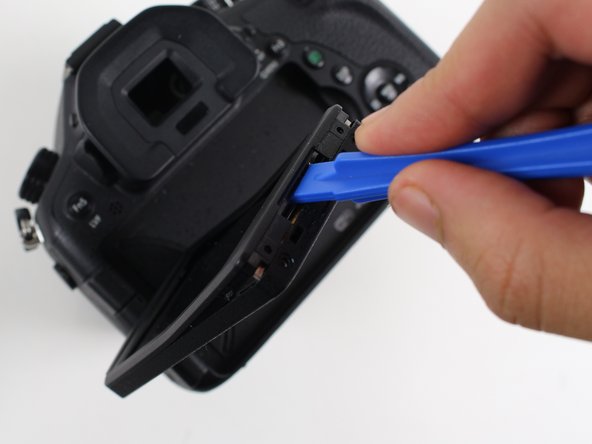
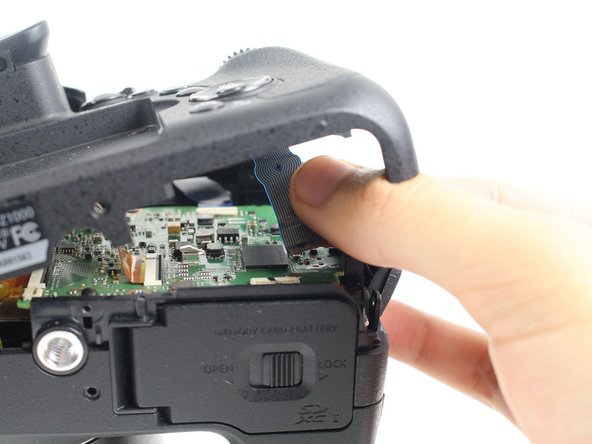
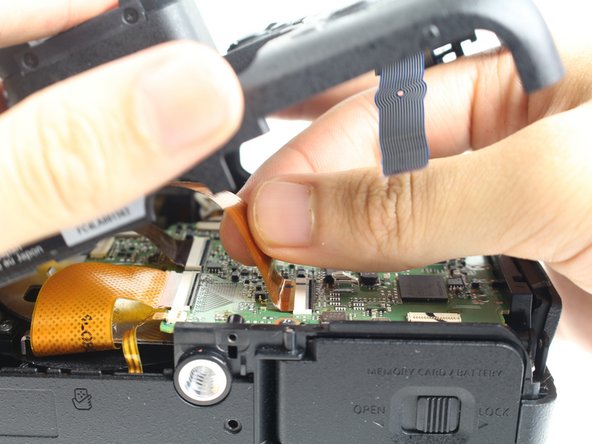
Gently lift up the back plate, being careful not to damage any ribbons.
-
Pull to disconnect from the motherboard the two ZIF connector ribbons attached to the back plate.
-
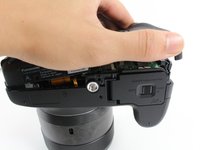
Set aside the back plate.
The eyepiece needs to be removed!
Remove the phillips screws from the bottom of the eyepiece, remove the eyepiece and remove the two screws at the top of the eyepiece
-
-
-
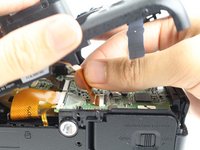
Pull to disconnect from the motherboard the seven ZIF connector ribbons.
Die Anleitung zum Öffnen von ZIF-Anschlüssen hilft leider nicht weiter. Die Plastikbügel zerbrechen beim Versuch sie nach Anleitung aufzuklappen. Diesen wesentlichen Arbeitsschritt mit Bildern zu versehen wäre vielleicht hilfreich gewesen...
-
-
-
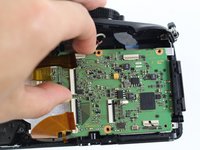
Remove the four 5.2 mm Phillips #00 screws at the corners of the motherboard.
-
-
-
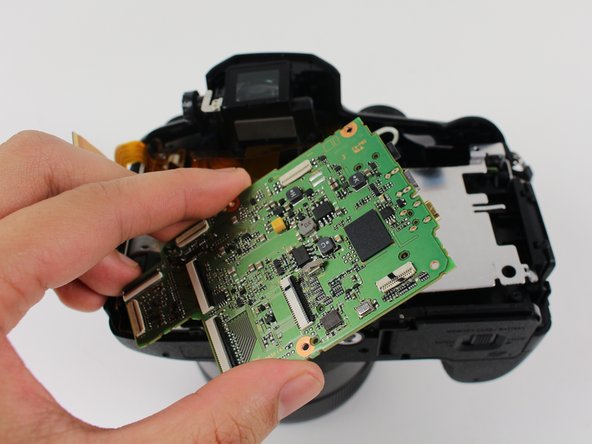
Firmly grasp the left side of the motherboard.
-
Pull out the motherboard.
FZ1000 MK2: I could not remove the motherboard by itself but it came off easily together with the metal plate.
-
-
-
-
Remove the two 7.0 mm Phillips #00 screws on the underside of the viewfinder.
-
Pull out the viewfinder.
-
-
-
Remove the four 9.0 mm Phillips #00 screws at the four corners of the lens.
-
Push up on the lens from the front/outside of the camera to remove it.
-
-
crwdns2935267:0crwdne2935267:0Tweezers$4.99
-
Very carefully use tweezers to peel off the black tape between the lens and the metal cylinder.
-
Very carefully use tweezers to peel off the black tape on the right side of the lens.
-
-
-
Using tweezers, very carefully pull to disconnect the ZIF connector ribbon between the lens and the metal cylinder.
-
Using tweezers, very carefully pull to disconnect the ZIF connector ribbon on the side of the lens.
-
-
-
Use tweezers to unhook from its three pegs the electronic ribbon between the lens and the metal cylinder.
-
-
-
Remove the two 5.0 mm Phillips #00 screws near the lens on top of the aperture motor.
-
-
-
Carefully unhook the aperture motor from its two pegs and slowly move it towards the opposite side of the lens.
-
You may need to remove the Phillips screw that holds a trapezoid-shaped piece of the electronic ribbon.
-
While holding on to the aperture motor, very carefully use tweezers to unclip the electronic ribbon on the side of the lens.
-
-
-
Remove the three 4.0 mm Torx T5 screws attaching the sensor to the lens.
-
Pull out the sensor.
-
Pull out the three springs on top of the lens.
Torx t4, Marcar posicón de tornillo antes de quitar, y montar con las mismas vueltas.
-
-
crwdns2935267:0crwdne2935267:0Tweezers$4.99
-
Using tweezers, very carefully pull to disconnect the three ZIF connector ribbons beside the MIC jack.
-
-
-
Remove the 6.0 mm Phillips #00 screw from the electronic ribbon beside the audio jack.
-
Pull out the electronic ribbon beside the audio jack.
-
-
-
Remove the 5.3 mm Phillips #00 screw at the bottom left corner of the the camera.
-
Remove the 7.0 mm Phillips #00 screw beside the audio jack.
-
Pull out the metal plate inside the camera near the audio jack.
-
-
-
Unplug the rubber audio jack cover from the audio jack.
-
Pull out the audio jack.
-
-
-
Unhook the rubber audio jack plug from its peg, which is inside the camera.
-
Set aside the rubber plug.
-
-
-
Pull off the leather material on the left side of the camera.
-
-
-
Remove the five 5.0 mm Phillips #00 screws around the lens hole.
-
Pull apart the camera body and the lens housing.
-
-
-
Remove the 5.0 mm Phillips screw from under the aperture mode selector.
-
-
-
Pop up the flash by pressing the flash OPEN switch on top of the camera.
-
Remove the two 5.0 mm Phillips #00 screws in the flash compartment.
-
-
-
Remove the 5.0 mm Phillips #00 screw from the remaining leather material on the camera's side.
-
-
-
Lift off the top panel of the camera.
-
Remove the 5.0 mm Phillips #00 screw from the plastic that holds the electric wires.
Any advice on how to open up the top panel? I think I got some sea water in here but I can't get past the plastic to find out. I think I need to separate the mode wheel somehow
-
-
-
Remove the 5.2 mm Phillips #00 screw below the tripod mount hole on the bottom of the camera.
-
Pull out the battery housing.
-
-
-
Remove the 5.0 mm Phillips #00 screw that was beneath the battery housing.
-
Pull off the leather material from the front of the camera.
-
-
-
Remove the four 5.0 mm Phillips #000 screws from central metal plate on the inside of the back plate of the camera.
-
Pull out the central metal plate.
-
-
-
Remove the six 5.0 mm Phillips #000 screws from the three metal plates to the left of the viewfinder hole.
-
Pull out the three metal plates.
-
-
-
Remove the two 3.0 mm Phillips #000 screws beside the viewfinder hole.
-
Scoop out the tiny metal washer.
-
Pull off the AF/AE LOCK dial from the outside of the back panel of the camera.
-
-
-
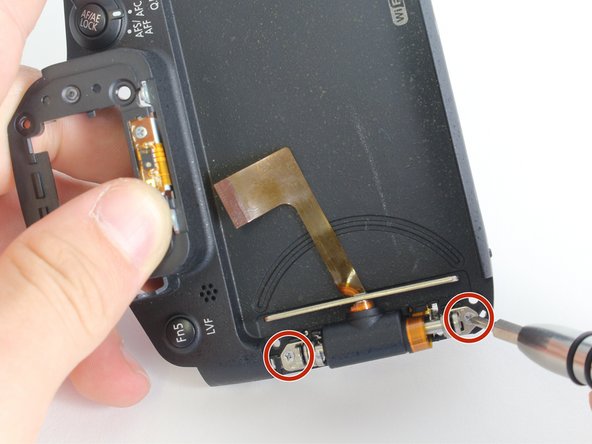
Remove the two 2.3 mm screws from the bottom of the viewfinder rubber on the outside of the back panel.
-
Pull off the viewfinder rubber.
-
-
-
Remove the two 10 mm Phillips #000 screws from the inside of the screen axle.
-
Pull off the plastic covering from the outside of the screen axle.
-
-
-
Remove the two 6.3 mm Phillips #000 screws from the outside of the screen axle.
-
Pull off the screen axle.
-
-
Hi, bei meiner Lumix funzt der Auslöser unzuverlässig. Zu dessen Reinigung möchte ich ungern die komplette Knipse zerlegen. Welche Schritte kann ich dabei überspringen?


To reassemble your device, follow these instructions in reverse order.
To reassemble your device, follow these instructions in reverse order.
crwdns2935221:0crwdne2935221:0
crwdns2935229:018crwdne2935229:0

crwdns2915084:0crwdne2915084:0

Cal Poly, Team 70-5, Forte Winter 2016 crwdns2935289:0Cal Poly, Team 70-5, Forte Winter 2016crwdne2935289:0
CPSU-FORTE-W16S70G5
crwdns2931471:04crwdne2931471:0
crwdns2935297:015crwdne2935297:0
crwdns2947412:026crwdne2947412:0
I need the ribbon cable that connects the hot shoe to the motherboard
Is there no capacitor for the flash to be concerned about in this camera?
My screen is full of vertical lines and pinkish screen what would the problem with the camera be? It started when I was in very humid place.I bought the camera from Amazon .com but it does not have a variant because it is an international model.
Do you know where to get it repaired?
Shame they didn't take a pic of the reverse side of the Motherboard to show the Venus engine.. The SK hynix chip is probably some kind of Ram.
My FZ1000 had the problem that the zoom lever was not returning to its middle position.
It is caused by a broken torsion spring inside the button. I replaced it by some spring I made myself starting from a spring of a pen :-)
For this repair it is not needed to remove the display from its housing, steps 19-25 can be skipped as well.
Good work. I had the same problem. If I read your comment earlier, I could save $ 40 for a spare part - SYK1278.
Jon.. i have the same problem now , with my fz1000. how excactly did you fixed it.i read that you didnt replaced the switch but fixed it yourself with a spring of a pen.does that mean that the spring is not in the switch but a external spring.and is it enough to only disassemble the tip or is other disassembling neccesary ? Thanks for replying .Greez Franck
Hi Jon DS, How did you get to the underside of the zoom lever.? I have removed all the screws you can see in step 36 but cannot remove it! It seems that the mode dial is holding it down? Any help much appreciated.
Hi Jon!My camera has the same problem. How were you able to remove the upper part?Do i need to start in which point? Thanks a lot!
Thanks a lot! Supprised why spring so weak.
Thank you guys! With the help of your video, I replaced the Panasonic FZ 1000 the SYK1278 Top Case Cover Switch Button. It was not easy. It is even more difficult to dismantle the flash and the external flash holder already without video help, but it all works. Without your help, I would not be able to complete the repair at all. But JIS standard screwdrivers are more useful for japan cameras.
Thank you for this FZ1000 dismantling guide.
It is a pity that is not covered here how the focus/zoom ring could be separated from the lenshousing for cleaning. This ring feels a bit grinding after several time and I don’t understand how this ring is mounted.
Hello, Thanks a lot for this detailed step by step disassembly procedure with high quality pictures
I need to replace the SYK1278 Top Case Cover Switch Button. What are the minimum steps to remove it ? For example, do I really need to remove the lens housing (27-32). Any advise to disassemble the flash unit ? Thanks for your reply, Emmanuel
Hello Jon DS,
Do you have to remove the Modus knob to get too the zoom knob parts? And if, how?
regards
I was able to remove the Modus knob by brute force, leveling witch two srew drivers, the knob is glued.
Then you get easy to the zoom knob, spring was broken [fatique, pre cracked]. But too difficult for me to repair it with the needed quality.
Da ich kein englisch kann, eine Frage was oder wo ist der Stützakku und wie kann er gewechselt werden und welche Bezugsmöglichkeiten gibt es
The part missing (for me) is how the LCD flex ribbon cable attaches (is soldered) to the axle. What is that component it’s soldered to and how does it attach to the axle? No info on this anywhere! If your flex cable breaks, you’re screwed.
I have two issue with my Lumix DMC-FZ1000
1. Zoom control is not working automatically - having read the comments I now know it is a broken torsion spring.
2. The main problem appears to be when I press the Menu button, it then starts to continuously scroll without stopping.
Has anyone else experienced the scrolling and what had to be done to repair it. I have followed the instructions on here and stripped the camera down to its parts with the Motherboard and other PCB’s out
I have both those issues. The menu scrolling stopped fortunately, but zoom broken torsion spring I need to fix. Any more advice?
My fz1000 loses time and date when stored without the battery, and I have to set it even on battery swap, any idea of why should it be happening? Or what to replace? I see there's no internal battery to replace. Otherwise the camera still works perfectly.
Great guide!
It really helped me fix my FZ1000 whose lens retracting mechanism got stuck with sand after a photoshoot in the dunes.
NOTE: I made an edit in step 23 including the removal of a Phillips screw that holds a piece of the electronic ribbon, the one in the picture is broken.
I needed to replace the motherboard on my FZ1000 and immediately ran into three issues:
1. I managed to destroy the ZIF ribbon connector on the The camera motherboard has three types of ZIF ribbon connectors, none of which the reference information provided adequate information. The one on the motherboard that connects just under the eyepiece has a black release bar 'On the Same Side' as the ribbon. The ribbon is folded and obscures the operation, so proceed with care. Tweezers are useful.
The two other types have release bars Opposite the ribbon. The black bar version seems stronger than the white. The white one also seems to get brittle with age. Proceed with care.
2. The screws are of two types: coarse thread and fine thread. Keep track of what goes where.
3. Lifting out the motherboard seemed to have a lot of resistance because of an adhesive patch on the backside and multipin insertion connector near the top edge and to the right of screw-hole.
Thank you for your help, with your help I was able to replace the door. I'm a complete amateur once again thank you
Thank You! Fz-10002 is very similiar, using this manual you can also dismount the newer version of the camera.
Hi, the shutter on my Lumix doesn't work reliably. I don't want to have to dismantle the entire camera to clean it. Which steps can I skip?
This guide still works largely for the FZ1000 II as well -- only notable change is that the viewfinder now has only one screw to fully remove it. I used this guide to fully remove the lens housing (not the lens assembly) so I could get the focus ring off to get some dust/sand out and relubricate the ring so it would stop making a terrible grinding sound when turning. Removing the focus ring REQUIRES taking the lens assembly out of the housing, then when you detach the housing with its 4 screws, the barrel slides back to reveal a single screw holding the optical sensors in place for the focus ring. De-latch the metal retention clip, pop the optical sensors out of their holes and then you can give the very front of the housing a turn to remove the retention ring like you would a lens hood. The focus ring can then slide forward and off. (Remember it's proper orientation when putting back on!)