crwdns2933423:0crwdne2933423:0

Panasonic Lumix DMC-FX9 Selector Buttons Replacement

crwdns2942213:0crwdne2942213:0

  1. Panasonic Lumix DMC-FX9 Selector Buttons Replacement, Selector Buttons: crwdns2935265:01crwdnd2935265:01crwdnd2935265:01crwdne2935265:0
    • Make sure the power is off by switching the power switch to the left.

  2. Panasonic Lumix DMC-FX9 Selector Buttons Replacement: crwdns2935265:02crwdnd2935265:01crwdnd2935265:02crwdne2935265:0 Panasonic Lumix DMC-FX9 Selector Buttons Replacement: crwdns2935265:02crwdnd2935265:02crwdnd2935265:02crwdne2935265:0
    • Use a Phillips #00 screwdriver to remove the screws on the left side of the camera.

  3. Panasonic Lumix DMC-FX9 Selector Buttons Replacement: crwdns2935265:03crwdnd2935265:01crwdnd2935265:01crwdne2935265:0
    • Remove the screws on the right side of the camera by using the Philips #00 screwdriver.

  4. Panasonic Lumix DMC-FX9 Selector Buttons Replacement: crwdns2935265:04crwdnd2935265:01crwdnd2935265:02crwdne2935265:0 Panasonic Lumix DMC-FX9 Selector Buttons Replacement: crwdns2935265:04crwdnd2935265:02crwdnd2935265:02crwdne2935265:0
    • Remove the screws on the bottom side of the camera using the Philips #00 Screwdriver.

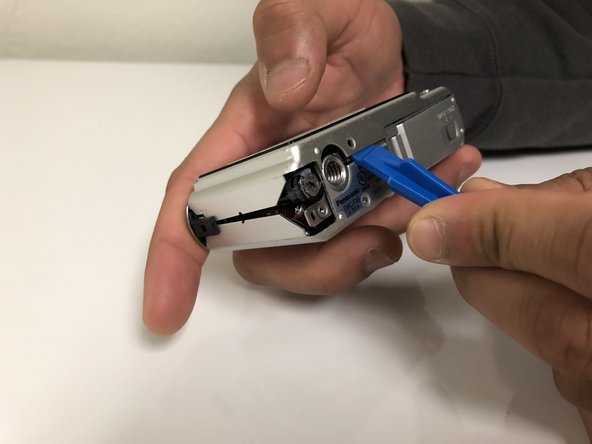
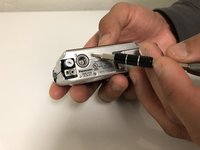
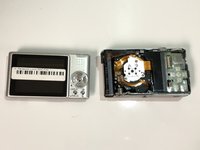
    • Separate the covers by gently applying force upwards, carefully placing the opening tool between the two covers.

  5. Panasonic Lumix DMC-FX9 Selector Buttons Replacement: crwdns2935265:05crwdnd2935265:01crwdnd2935265:02crwdne2935265:0 Panasonic Lumix DMC-FX9 Selector Buttons Replacement: crwdns2935265:05crwdnd2935265:02crwdnd2935265:02crwdne2935265:0
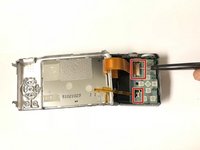
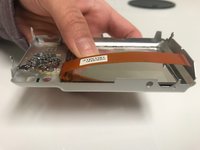
    • Lift the ZIF tabs up with the opening tool and carefully remove the digitizer ribbon cables.

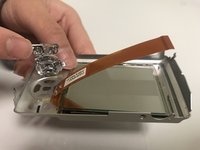
    • Remove the LCD Screen from the glass frame carefully with the opening tool.

  6. Panasonic Lumix DMC-FX9 Selector Buttons Replacement: crwdns2935265:06crwdnd2935265:01crwdnd2935265:02crwdne2935265:0 Panasonic Lumix DMC-FX9 Selector Buttons Replacement: crwdns2935265:06crwdnd2935265:02crwdnd2935265:02crwdne2935265:0
    • Push on the back panel buttons on the front side to remove the buttons.

    • Be cautious of the adhesive holding the button panels to the cover. Apply extra force if necessary.

crwdns2915888:0crwdne2915888:0

To reassemble your device, follow these instructions in reverse order.

Kriselle Tubongbanua

crwdns2935283:002/21/18crwdne2935283:0

133 crwdns2915208:0crwdne2915208:0

crwdns2935295:0crwdne2935295:0

crwdns2915084:0crwdne2915084:0

University of North Texas, Team S6-G1, Thomas Spring 2018 crwdns2935289:0University of North Texas, Team S6-G1, Thomas Spring 2018crwdne2935289:0

UNT-THOMAS-S18S6G1

crwdns2931471:04crwdne2931471:0

crwdns2935297:09crwdne2935297:0

crwdns2944067:00crwdne2944067:0

crwdns2917038:0crwdne2917038:0

crwdns2936625:0crwdne2936625:0:

crwdns2936751:024crwdne2936751:0 2

crwdns2936753:07crwdne2936753:0 5

crwdns2936753:030crwdne2936753:0 15

crwdns2942667:0crwdne2942667:0 267