crwdns2933423:0crwdne2933423:0

Panasonic Lumix DMC-FX01 Rear Casing Replacement

crwdns2942213:0crwdne2942213:0

  1. Panasonic Lumix DMC-FX01 Rear Casing Replacement, Battery: crwdns2935265:01crwdnd2935265:01crwdnd2935265:01crwdne2935265:0
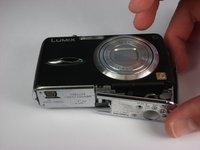
    • Locate the memory card and battery card latch on the bottom of the camera.

    • Slide the latch to the open position.

  2. Panasonic Lumix DMC-FX01 Rear Casing Replacement: crwdns2935265:02crwdnd2935265:01crwdnd2935265:01crwdne2935265:0
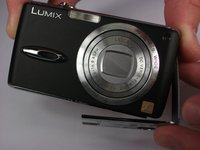
    • Open the battery latch, and slide the battery release lever to the right.

  3. Panasonic Lumix DMC-FX01 Rear Casing Replacement: crwdns2935265:03crwdnd2935265:01crwdnd2935265:01crwdne2935265:0
    • Remove the battery from the camera.

  4. Panasonic Lumix DMC-FX01 Rear Casing Replacement, Rear Casing: crwdns2935265:04crwdnd2935265:01crwdnd2935265:01crwdne2935265:0
    • Remove the three 4.6 mm screws on the bottom of the camera using a Phillips #00 screwdriver.

  5. Panasonic Lumix DMC-FX01 Rear Casing Replacement: crwdns2935265:05crwdnd2935265:01crwdnd2935265:01crwdne2935265:0
    • Remove the single 3.2 mm screw on the left side of the camera using a Phillips #00 screwdriver.

  6. Panasonic Lumix DMC-FX01 Rear Casing Replacement: crwdns2935265:06crwdnd2935265:01crwdnd2935265:02crwdne2935265:0 Panasonic Lumix DMC-FX01 Rear Casing Replacement: crwdns2935265:06crwdnd2935265:02crwdnd2935265:02crwdne2935265:0
    • Remove the left side casing.

  7. Panasonic Lumix DMC-FX01 Rear Casing Replacement: crwdns2935265:07crwdnd2935265:01crwdnd2935265:01crwdne2935265:0
    • Remove the two 3.2 mm screws on the right side of the camera using a Phillips #00 screwdriver.

  8. Panasonic Lumix DMC-FX01 Rear Casing Replacement: crwdns2935265:08crwdnd2935265:01crwdnd2935265:01crwdne2935265:0
    • Remove the bottom right panel.

  9. Panasonic Lumix DMC-FX01 Rear Casing Replacement: crwdns2935265:09crwdnd2935265:01crwdnd2935265:02crwdne2935265:0 Panasonic Lumix DMC-FX01 Rear Casing Replacement: crwdns2935265:09crwdnd2935265:02crwdnd2935265:02crwdne2935265:0
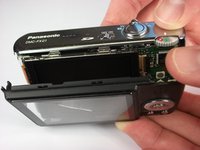
    • Gently remove the back casing.

    • Start at the bottom and carefully pry towards the top to get this piece free.

crwdns2915888:0crwdne2915888:0

To reassemble your device, follow these instructions in reverse order.

crwdns2935227:0crwdne2935227:0

Andrew

crwdns2935283:010/11/10crwdne2935283:0

396 crwdns2915208:0crwdne2915208:0

crwdns2935297:04crwdne2935297:0

crwdns2915084:0crwdne2915084:0

Cal Poly, Team 9-22, Regan Fall 2010 crwdns2935289:0Cal Poly, Team 9-22, Regan Fall 2010crwdne2935289:0

CPSU-REGAN-F10S9G22

crwdns2931471:04crwdne2931471:0

crwdns2935297:08crwdne2935297:0

crwdns2944067:00crwdne2944067:0

crwdns2917038:0crwdne2917038:0

crwdns2936625:0crwdne2936625:0:

crwdns2936751:024crwdne2936751:0 1

crwdns2936753:07crwdne2936753:0 9

crwdns2936753:030crwdne2936753:0 13

crwdns2942667:0crwdne2942667:0 3,338