crwdns2933423:0crwdne2933423:0

Panasonic LUMIX DMC-LX100 Motherboard Replacement

crwdns2942213:0crwdne2942213:0

  1. Panasonic LUMIX DMC-LX100 Motherboard Replacement, Battery: crwdns2935265:01crwdnd2935265:01crwdnd2935265:03crwdne2935265:0 Panasonic LUMIX DMC-LX100 Motherboard Replacement, Battery: crwdns2935265:01crwdnd2935265:02crwdnd2935265:03crwdne2935265:0 Panasonic LUMIX DMC-LX100 Motherboard Replacement, Battery: crwdns2935265:01crwdnd2935265:03crwdnd2935265:03crwdne2935265:0
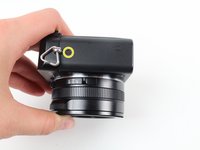
    • Looking at the bottom of the camera, slide the OPEN/LOCK switch to the left into the OPEN position.

    • The battery housing door should swing open.

  2. Panasonic LUMIX DMC-LX100 Motherboard Replacement: crwdns2935265:02crwdnd2935265:01crwdnd2935265:02crwdne2935265:0 Panasonic LUMIX DMC-LX100 Motherboard Replacement: crwdns2935265:02crwdnd2935265:02crwdnd2935265:02crwdne2935265:0
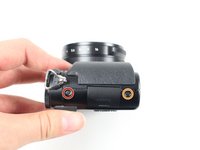
    • Flip the inside switch up to release the battery.

  3. Panasonic LUMIX DMC-LX100 Motherboard Replacement: crwdns2935265:03crwdnd2935265:01crwdnd2935265:01crwdne2935265:0
    • Grip the edge of the battery and pull it out.

    • Use a LUMIX Panasonic DMW-BLE9PP Battery Pack for replacement.

  4. Panasonic LUMIX DMC-LX100 Motherboard Replacement, LCD Screen: crwdns2935265:04crwdnd2935265:01crwdnd2935265:03crwdne2935265:0 Panasonic LUMIX DMC-LX100 Motherboard Replacement, LCD Screen: crwdns2935265:04crwdnd2935265:02crwdnd2935265:03crwdne2935265:0 Panasonic LUMIX DMC-LX100 Motherboard Replacement, LCD Screen: crwdns2935265:04crwdnd2935265:03crwdnd2935265:03crwdne2935265:0
    • Some of these screws may have adhesive to keep the camera from being taken apart so push hard with the screwdriver and turn slowly to avoid stripping screws.

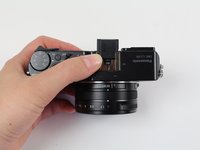
    • Use a Phillips #000 screwdriver to remove the five 4.5 mm screws located on the bottom of the camera and the top one on the left side, with the lens facing you.

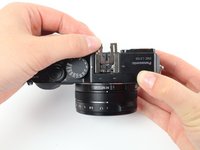
    • Use a Phillips #000 screwdriver to remove the two 3.5 mm screws, one below the lens and one on the left side.

    • Use a Phillips #000 screwdriver to remove the 7.1 mm screw from the right side of the camera.

  5. Panasonic LUMIX DMC-LX100 Motherboard Replacement: crwdns2935265:05crwdnd2935265:01crwdnd2935265:01crwdne2935265:0
    • The viewfinder in this picture is taken off of the camera to more easily see where the screw is located. It is not actually removed from the camera.

    • Use a Phillips #000 screwdriver to remove the 2.5 mm screw underneath the viewfinder.

    • Pull the black plastic piece off of the viewfinder.

  6. Panasonic LUMIX DMC-LX100 Motherboard Replacement: crwdns2935265:06crwdnd2935265:01crwdnd2935265:03crwdne2935265:0 Panasonic LUMIX DMC-LX100 Motherboard Replacement: crwdns2935265:06crwdnd2935265:02crwdnd2935265:03crwdne2935265:0 Panasonic LUMIX DMC-LX100 Motherboard Replacement: crwdns2935265:06crwdnd2935265:03crwdnd2935265:03crwdne2935265:0
    • Slide out the black plastic piece that acts as a placeholder for an attachable lens on the top of the camera.

    • Remove the small metal insert that rests beneath the black plastic piece by pulling outward, away from the lens side of the camera.

    • You may need a spudger or prying device to remove the metal piece by lifting the back end up.

  7. Panasonic LUMIX DMC-LX100 Motherboard Replacement: crwdns2935265:07crwdnd2935265:01crwdnd2935265:01crwdne2935265:0
    • Some of these screws may have adhesive to keep the camera from being taken apart so push hard with the screwdriver and turn slowly to avoid stripping screws.

    • Use a Phillips #000 screwdriver to remove all four of the 7.1mm screws that are under the metal piece.

  8. Panasonic LUMIX DMC-LX100 Motherboard Replacement: crwdns2935265:08crwdnd2935265:01crwdnd2935265:01crwdne2935265:0
    • There may be adhesive holding the back on, so pry carefully to not break any of the ribbon cables underneath.

    • Pry off the back of the camera using a spudger starting from the top right side of the LCD screen.

  9. Panasonic LUMIX DMC-LX100 Motherboard Replacement: crwdns2935265:09crwdnd2935265:01crwdnd2935265:01crwdne2935265:0
    • Use a Phillips #000 screwdriver to remove the 7.5mm screw on the top right of the back of the camera that holds the metal backing in place.

  10. Panasonic LUMIX DMC-LX100 Motherboard Replacement: crwdns2935265:010crwdnd2935265:01crwdnd2935265:03crwdne2935265:0 Panasonic LUMIX DMC-LX100 Motherboard Replacement: crwdns2935265:010crwdnd2935265:02crwdnd2935265:03crwdne2935265:0 Panasonic LUMIX DMC-LX100 Motherboard Replacement: crwdns2935265:010crwdnd2935265:03crwdnd2935265:03crwdne2935265:0
    • Lift the LCD screen away from the device.

    • Pry off the silver metal backing with a spudger.

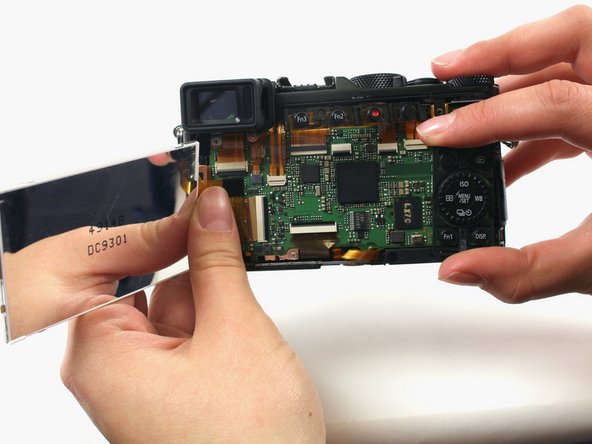
    • Pull out the ribbon cable that attaches the LCD screen to the motherboard.

    • If need be, use a plastic spudger to pry the ribbon cable out of its socket.

    • Remove the LCD screen.

  11. Panasonic LUMIX DMC-LX100 Motherboard Replacement, Motherboard: crwdns2935265:011crwdnd2935265:01crwdnd2935265:01crwdne2935265:0
    crwdns2935267:0crwdne2935267:0
    Tweezers
    $4.99
    crwdns2942207:0crwdne2942207:0
    • You may need to use tweezers and a spudger to disconnect some of the ribbon cables so they do not break.

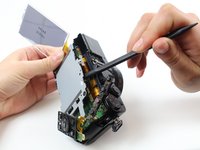
    • Disconnect the nine visible ribbon cables/ZIF connectors by flipping the black bars up and pulling the ribbon straight out of the connector.

    • Disconnect two more cables in the upper left corner of the board, hidden behind the visible cables.

    • Learn more about disconnecting ZIF connectors here.

  12. Panasonic LUMIX DMC-LX100 Motherboard Replacement: crwdns2935265:012crwdnd2935265:01crwdnd2935265:01crwdne2935265:0
    • Use a Phillips #000 screwdriver to remove the two 4.5 mm screws.

    • Use a Phillips #000 screwdriver to remove the 2.5 mm screw.

  13. Panasonic LUMIX DMC-LX100 Motherboard Replacement: crwdns2935265:013crwdnd2935265:01crwdnd2935265:02crwdne2935265:0 Panasonic LUMIX DMC-LX100 Motherboard Replacement: crwdns2935265:013crwdnd2935265:02crwdnd2935265:02crwdne2935265:0
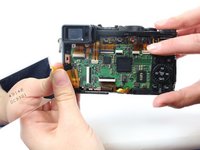
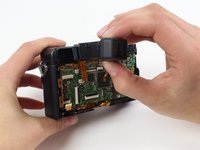
    • Use two fingers to gently pull the viewfinder toward you and out of its housing.

    • The black plastic piece is still on the viewfinder in this image, but should have been removed during LCD screen removal.

  14. Panasonic LUMIX DMC-LX100 Motherboard Replacement: crwdns2935265:014crwdnd2935265:01crwdnd2935265:02crwdne2935265:0 Panasonic LUMIX DMC-LX100 Motherboard Replacement: crwdns2935265:014crwdnd2935265:02crwdnd2935265:02crwdne2935265:0
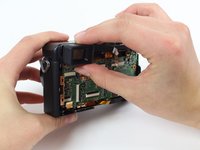
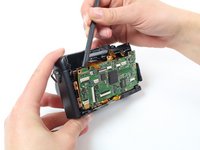
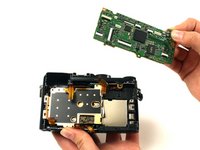
    • Start at the top of the camera and use the plastic spudger to pry the motherboard out of the camera.

crwdns2915888:0crwdne2915888:0

To reassemble your device, follow these instructions in reverse order.

crwdns2935229:03crwdne2935229:0

Sydney Dye

crwdns2935283:001/11/16crwdne2935283:0

1,206 crwdns2915208:0crwdne2915208:0

crwdns2935297:02crwdne2935297:0

crwdns2915084:0crwdne2915084:0

Cal Poly, Team 70-4, Forte Winter 2016 crwdns2935289:0Cal Poly, Team 70-4, Forte Winter 2016crwdne2935289:0

CPSU-FORTE-W16S70G4

crwdns2931471:04crwdne2931471:0

crwdns2935297:09crwdne2935297:0

crwdns2944067:02crwdne2944067:0

This camera is a true dust harvester.

Thanks to this guide I have dared to clean the sensor successfully.

I know that I will have to return to the task in a few months but now I am more sure of the process.

Thanks a lot

guillem garces - crwdns2934203:0crwdne2934203:0

Just a quick question! After replacing the motherboard, the camera works just fine or is it needed a software intervention?

Domenico Toscani - crwdns2934203:0crwdne2934203:0

crwdns2917038:0crwdne2917038:0

crwdns2936625:0crwdne2936625:0:

crwdns2936751:024crwdne2936751:0 1

crwdns2936753:07crwdne2936753:0 17

crwdns2936753:030crwdne2936753:0 54

crwdns2942667:0crwdne2942667:0 4,940