crwdns2933423:0crwdne2933423:0

Palm m 100 Display Screen Replacement

crwdns2942213:0crwdne2942213:0

  1. Palm m 100 Display Screen Replacement, Display Screen: crwdns2935265:01crwdnd2935265:01crwdnd2935265:01crwdne2935265:0
    • Remove the batteries.

  2. Palm m 100 Display Screen Replacement: crwdns2935265:02crwdnd2935265:01crwdnd2935265:01crwdne2935265:0
    • Using a Torx 5 screwdriver, remove the four screws located on the rear cover of the device by turning counterclockwise. Set aside screws.

  3. Palm m 100 Display Screen Replacement: crwdns2935265:03crwdnd2935265:01crwdnd2935265:01crwdne2935265:0
    • Remove rear cover by gently lifting it up from the bottom.

  4. Palm m 100 Display Screen Replacement: crwdns2935265:04crwdnd2935265:01crwdnd2935265:01crwdne2935265:0
    • Carefully lift up the circuit board, which will also lift up the screen. Do so carefully to prevent breaking the connectors.

    • Lift the left side of the circuit board and open it as though it were a book.

  5. Palm m 100 Display Screen Replacement: crwdns2935265:06crwdnd2935265:01crwdnd2935265:01crwdne2935265:0
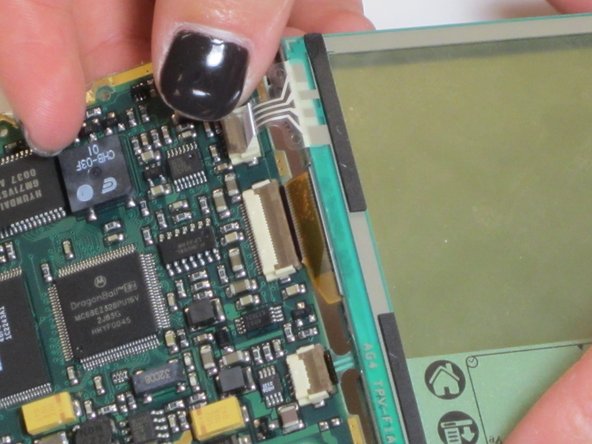
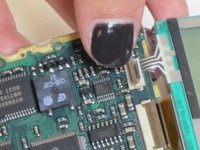
    • Unplug the three connectors located on the right side of the circuit board with great caution and care. Do not pull by the cable, and be sure to pull the connector itself gently.

    • After separating the screen from the board, set aside the old display screen.

    • Replace with a new display screen.

  6. Palm m 100 Display Screen Replacement: crwdns2935265:09crwdnd2935265:01crwdnd2935265:01crwdne2935265:0
    • Plug in the three connectors.

  7. Palm m 100 Display Screen Replacement: crwdns2935265:010crwdnd2935265:01crwdnd2935265:01crwdne2935265:0
    • Close again like a book, and lay it gently into the front panel, screen facing outwards of the front panel.

  8. Palm m 100 Display Screen Replacement: crwdns2935265:011crwdnd2935265:01crwdnd2935265:01crwdne2935265:0
    • Put the back cover on the device and screw the four screws, screwing in a clockwise direction. Take caution not to over-tighten the screws.

crwdns2915888:0crwdne2915888:0

To reassemble your device, follow these instructions in reverse order.

Lexi Gallucci

crwdns2935283:010/18/11crwdne2935283:0

11 crwdns2915208:0crwdne2915208:0

crwdns2935297:02crwdne2935297:0

crwdns2915084:0crwdne2915084:0

James Madison, Team 1-3, Allen Fall 2011 crwdns2935289:0James Madison, Team 1-3, Allen Fall 2011crwdne2935289:0

JMU-ALLEN-F11S1G3

crwdns2931471:05crwdne2931471:0

crwdns2935297:05crwdne2935297:0

crwdns2944067:00crwdne2944067:0

crwdns2917038:0crwdne2917038:0

crwdns2936625:0crwdne2936625:0:

crwdns2936751:024crwdne2936751:0 0

crwdns2936753:07crwdne2936753:0 0

crwdns2936753:030crwdne2936753:0 13

crwdns2942667:0crwdne2942667:0 697