crwdns2933423:0crwdne2933423:0

Palm Treo 700P Camera Replacement

crwdns2942213:0crwdne2942213:0

  1. Palm Treo 700P Camera Replacement, Battery: crwdns2935265:01crwdnd2935265:01crwdnd2935265:03crwdne2935265:0 Palm Treo 700P Camera Replacement, Battery: crwdns2935265:01crwdnd2935265:02crwdnd2935265:03crwdne2935265:0 Palm Treo 700P Camera Replacement, Battery: crwdns2935265:01crwdnd2935265:03crwdnd2935265:03crwdne2935265:0
    • Press the button located just above the Sprint™ logo and then slide the cover down.

  2. Palm Treo 700P Camera Replacement: crwdns2935265:02crwdnd2935265:01crwdnd2935265:02crwdne2935265:0 Palm Treo 700P Camera Replacement: crwdns2935265:02crwdnd2935265:02crwdnd2935265:02crwdne2935265:0
    • Use the small notch on the left hand side of the phone to remove the battery.

  3. Palm Treo 700P Camera Replacement, Back Case: crwdns2935265:03crwdnd2935265:01crwdnd2935265:01crwdne2935265:0
    • Remove the stylus from the phone.

  4. Palm Treo 700P Camera Replacement: crwdns2935265:04crwdnd2935265:01crwdnd2935265:01crwdne2935265:0
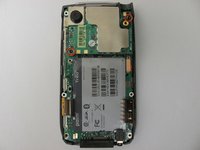
    • After removing the battery and stylus, unscrew the 5 Torx screws (using a T-5 Torx screw driver)

  5. Palm Treo 700P Camera Replacement: crwdns2935265:05crwdnd2935265:01crwdnd2935265:01crwdne2935265:0
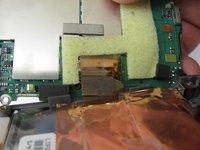
    • Using the spudger, remove the small rubberized patch under the antenna.

  6. Palm Treo 700P Camera Replacement: crwdns2935265:06crwdnd2935265:01crwdnd2935265:01crwdne2935265:0
    • Unscrew the last two screws using the previous screw driver.

  7. Palm Treo 700P Camera Replacement: crwdns2935265:07crwdnd2935265:01crwdnd2935265:02crwdne2935265:0 Palm Treo 700P Camera Replacement: crwdns2935265:07crwdnd2935265:02crwdnd2935265:02crwdne2935265:0
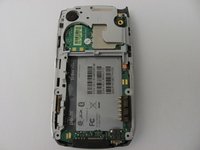
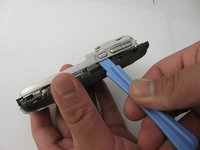
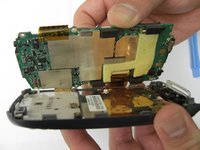
    • Using the plastic opening tool, gently separate the back case from the phone body.

  8. Palm Treo 700P Camera Replacement, Motherboard: crwdns2935265:08crwdnd2935265:01crwdnd2935265:03crwdne2935265:0 Palm Treo 700P Camera Replacement, Motherboard: crwdns2935265:08crwdnd2935265:02crwdnd2935265:03crwdne2935265:0 Palm Treo 700P Camera Replacement, Motherboard: crwdns2935265:08crwdnd2935265:03crwdnd2935265:03crwdne2935265:0
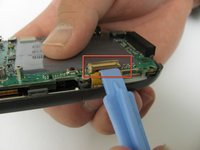
    • Using a plastic opening tool, gently edge your way between the back and border case (Picture 2) until they are completely separated (Picture 3).

  9. Palm Treo 700P Camera Replacement: crwdns2935265:09crwdnd2935265:01crwdnd2935265:03crwdne2935265:0 Palm Treo 700P Camera Replacement: crwdns2935265:09crwdnd2935265:02crwdnd2935265:03crwdne2935265:0 Palm Treo 700P Camera Replacement: crwdns2935265:09crwdnd2935265:03crwdnd2935265:03crwdne2935265:0
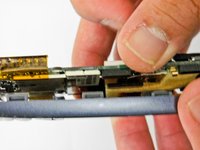
    • Remove the antenna chip by unscrewing the two screws with Torx T-5 screwdriver (Picture 1).

    • Once unscrewed, gently detach the antenna chip with your hands (Picture 2).

  10. Palm Treo 700P Camera Replacement: crwdns2935265:010crwdnd2935265:01crwdnd2935265:02crwdne2935265:0 Palm Treo 700P Camera Replacement: crwdns2935265:010crwdnd2935265:02crwdnd2935265:02crwdne2935265:0
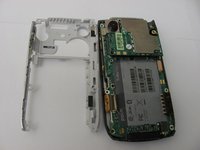
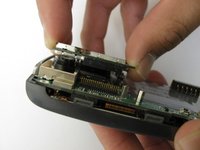
    • Use the plastic opening tool to unlock the tab holding the keyboard connection (Picture 1).

    • Once the keyboard connection is detached, use your hands to gently separate the motherboard from the back panel (Picture 2).

  11. Palm Treo 700P Camera Replacement: crwdns2935265:011crwdnd2935265:01crwdnd2935265:03crwdne2935265:0 Palm Treo 700P Camera Replacement: crwdns2935265:011crwdnd2935265:02crwdnd2935265:03crwdne2935265:0 Palm Treo 700P Camera Replacement: crwdns2935265:011crwdnd2935265:03crwdnd2935265:03crwdne2935265:0
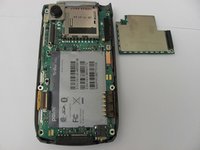
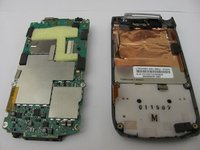
    • To completely detach the motherboard from the back panel, use the plastic opening tool to unlock the LCD connection from the motherboard (Picture 2).

    • Once the LCD connection is unlocked, the motherboard should now be completely detached from the back panel, keyboard, and LCD (Picture 3).

  12. Palm Treo 700P Camera Replacement, Camera: crwdns2935265:012crwdnd2935265:01crwdnd2935265:01crwdne2935265:0
    • Using the plastic opening tool, loosen the metal camera holder.

  13. Palm Treo 700P Camera Replacement: crwdns2935265:013crwdnd2935265:01crwdnd2935265:01crwdne2935265:0
    • Once the camera holder is loose, gently detach it from the camera.

crwdns2915888:0crwdne2915888:0

To reassemble your device, follow these instructions in reverse order.

John Rainier Solanzo

crwdns2935283:004/17/12crwdne2935283:0

7 crwdns2915208:0crwdne2915208:0

crwdns2935297:02crwdne2935297:0

crwdns2915084:0crwdne2915084:0

Cal Poly, Team 12-37, Regan Spring 2012 crwdns2935289:0Cal Poly, Team 12-37, Regan Spring 2012crwdne2935289:0

CPSU-REGAN-S12S12G37

crwdns2931471:04crwdne2931471:0

crwdns2935297:014crwdne2935297:0

crwdns2917034:0crwdne2917034:0

Does anyone know where or how to get a developers guide or geeks guide to tearing this phone down completely? I have a number of these, as well as old Galaxy Note phones, a broken S7 etc. And I would love to have the blueprint to know how to hack a LTE antenae, and S7 camera into my treo palm 700p..Wouldn't that be awesome? I still like it better than the modern smart phone, and just lost use of it when my carrier killed CDMA last week> :-(

peterveri - crwdns2934203:0crwdne2934203:0

crwdns2917038:0crwdne2917038:0

crwdns2936625:0crwdne2936625:0:

crwdns2936751:024crwdne2936751:0 0

crwdns2936753:07crwdne2936753:0 3

crwdns2936753:030crwdne2936753:0 13

crwdns2942667:0crwdne2942667:0 548