crwdns2933423:0crwdne2933423:0
crwdns2947577:0crwdnd2947577:0crwdne2947577:0

PSP 300x Trigger Buttons Replacement

crwdns2942213:0crwdne2942213:0

    1. PSP 300x Trigger Buttons Replacement, Battery: crwdns2935265:01crwdnd2935265:01crwdnd2935265:03crwdne2935265:0 PSP 300x Trigger Buttons Replacement, Battery: crwdns2935265:01crwdnd2935265:02crwdnd2935265:03crwdne2935265:0 PSP 300x Trigger Buttons Replacement, Battery: crwdns2935265:01crwdnd2935265:03crwdnd2935265:03crwdne2935265:0
      • Place the PSP face down and locate the battery cover on the left side of the device.

      • Lift and remove the battery cover to reveal the battery.

      • Remove the battery.

      crwdns2952109:0crwdne2952109:0

      crwdns2917038:0crwdne2917038:0

    1. PSP 300x Trigger Buttons Replacement, Front Casing: crwdns2935265:02crwdnd2935265:01crwdnd2935265:01crwdne2935265:0
      • Peel back the warranty sticker that is behind the battery with a spudger or your fingernail.

      crwdns2952109:0crwdne2952109:0

      crwdns2917038:0crwdne2917038:0

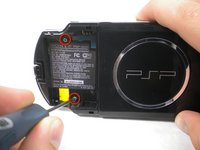
    2. PSP 300x Trigger Buttons Replacement: crwdns2935265:03crwdnd2935265:01crwdnd2935265:02crwdne2935265:0 PSP 300x Trigger Buttons Replacement: crwdns2935265:03crwdnd2935265:02crwdnd2935265:02crwdne2935265:0
      • Unscrew all four screws from the back of the PSP with the Phillips #00 Screwdriver.

      • Two are located behind the battery's warranty sticker.

      • Two are located on the right side of the PSP.

      crwdns2952109:0crwdne2952109:0

      crwdns2917038:0crwdne2917038:0

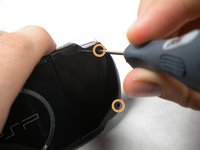
    3. PSP 300x Trigger Buttons Replacement: crwdns2935265:04crwdnd2935265:01crwdnd2935265:01crwdne2935265:0
      • Next, unscrew the two screws located at the top of the PSP.

      crwdns2952109:0crwdne2952109:0

      crwdns2917038:0crwdne2917038:0

    4. PSP 300x Trigger Buttons Replacement: crwdns2935265:05crwdnd2935265:01crwdnd2935265:01crwdne2935265:0
      • Then, remove the single screw from the bottom edge of the PSP (which is positioned next to the barcode).

      crwdns2952109:0crwdne2952109:0

      crwdns2917038:0crwdne2917038:0

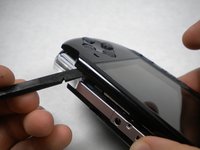
    5. PSP 300x Trigger Buttons Replacement: crwdns2935265:06crwdnd2935265:01crwdnd2935265:02crwdne2935265:0 PSP 300x Trigger Buttons Replacement: crwdns2935265:06crwdnd2935265:02crwdnd2935265:02crwdne2935265:0
      • Slide the spudger in between the outer casing of the PSP, beginning at the "R" shoulder button, and gently pry off the casing.


      • Remove the front casing completely.

      crwdns2952109:0crwdne2952109:0

      crwdns2917038:0crwdne2917038:0

    1. PSP 300x Trigger Buttons Replacement, LCD Screen: crwdns2935265:07crwdnd2935265:01crwdnd2935265:02crwdne2935265:0 PSP 300x Trigger Buttons Replacement, LCD Screen: crwdns2935265:07crwdnd2935265:02crwdnd2935265:02crwdne2935265:0
      • Push the homebar to the right to release the tab located on the right side of the LCD screen.

      • DO NOT completely remove the homebar, as it is still connected by ribbon cables.

      crwdns2952109:0crwdne2952109:0

      crwdns2917038:0crwdne2917038:0

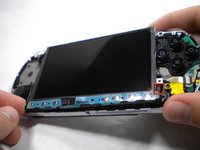
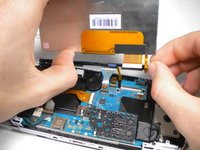
    2. PSP 300x Trigger Buttons Replacement: crwdns2935265:08crwdnd2935265:01crwdnd2935265:03crwdne2935265:0 PSP 300x Trigger Buttons Replacement: crwdns2935265:08crwdnd2935265:02crwdnd2935265:03crwdne2935265:0 PSP 300x Trigger Buttons Replacement: crwdns2935265:08crwdnd2935265:03crwdnd2935265:03crwdne2935265:0
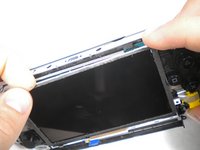
      • Slowly lift the LCD screen off the PSP starting at the top edge corner.

      • Again, the LCD screen is attached by ribbon cables, so do not remove it completely.

      • Orientation of PSP is flipped in photo.

      crwdns2952109:0crwdne2952109:0

      crwdns2917038:0crwdne2917038:0

    3. PSP 300x Trigger Buttons Replacement: crwdns2935265:09crwdnd2935265:01crwdnd2935265:02crwdne2935265:0 PSP 300x Trigger Buttons Replacement: crwdns2935265:09crwdnd2935265:02crwdnd2935265:02crwdne2935265:0
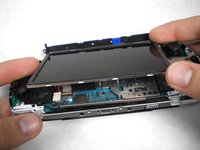
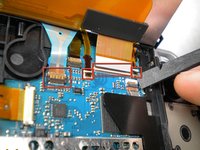
      • Flip the small brown locks on the four ribbon cable connectors up using a spudger or fingernail.

      • Pull all four ribbon cables out.

      • Now remove the LCD screen and homebar from the PSP.

      crwdns2952109:0crwdne2952109:0

      crwdns2917038:0crwdne2917038:0

    4. PSP 300x Trigger Buttons Replacement: crwdns2935265:010crwdnd2935265:01crwdnd2935265:01crwdne2935265:0
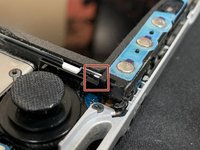
      • Remove the metal tab that lies above the LCD screen.

      • Upon reassembly, make note that the stamped lettering faces down, and the large tab fits just above the motherboard to the right hand side of the left trigger.

      crwdns2952109:0crwdne2952109:0

      crwdns2917038:0crwdne2917038:0

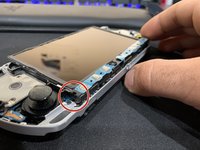
    1. PSP 300x Trigger Buttons Replacement, Trigger Buttons: crwdns2935265:011crwdnd2935265:01crwdnd2935265:01crwdne2935265:0
      • Remove the screw securing 'L' trigger to the PSP.

      crwdns2952109:0crwdne2952109:0

      crwdns2917038:0crwdne2917038:0

    2. PSP 300x Trigger Buttons Replacement: crwdns2935265:012crwdnd2935265:01crwdnd2935265:01crwdne2935265:0
      • Remove the white plastic piece that holds the 'L' trigger in place.

      crwdns2952109:0crwdne2952109:0

      crwdns2917038:0crwdne2917038:0

    3. PSP 300x Trigger Buttons Replacement: crwdns2935265:013crwdnd2935265:01crwdnd2935265:01crwdne2935265:0
      • Remove the 'L' trigger from the PSP.

      crwdns2952109:0crwdne2952109:0

      crwdns2917038:0crwdne2917038:0

    4. PSP 300x Trigger Buttons Replacement: crwdns2935265:014crwdnd2935265:01crwdnd2935265:01crwdne2935265:0
      • Remove the screw securing the 'R' trigger.

      crwdns2952109:0crwdne2952109:0

      crwdns2917038:0crwdne2917038:0

    5. PSP 300x Trigger Buttons Replacement: crwdns2935265:015crwdnd2935265:01crwdnd2935265:01crwdne2935265:0
      • Remove the white plastic piece that holds the 'R' trigger in place.

      crwdns2952109:0crwdne2952109:0

      crwdns2917038:0crwdne2917038:0

    6. PSP 300x Trigger Buttons Replacement: crwdns2935265:016crwdnd2935265:01crwdnd2935265:01crwdne2935265:0
      • Remove the 'R' trigger from the PSP.

      crwdns2952109:0crwdne2952109:0

      crwdns2917038:0crwdne2917038:0

crwdns2915888:0crwdne2915888:0

To reassemble your device, follow these instructions in reverse order.

crwdns2935221:0crwdne2935221:0

crwdns2935229:011crwdne2935229:0

cmcevill

crwdns2935283:011/05/09crwdne2935283:0

541 crwdns2915208:0crwdne2915208:0

crwdns2935295:0crwdne2935295:0

crwdns2935287:0crwdne2935287:0

Cal Poly, Team 19-2, Maness Fall 2009 crwdns2935289:0Cal Poly, Team 19-2, Maness Fall 2009crwdne2935289:0

CPSU-MANESS-F09S19G2

crwdns2931471:03crwdne2931471:0

crwdns2935297:024crwdne2935297:0

crwdns2947412:00crwdne2947412:0

crwdns2917038:0crwdne2917038:0

crwdns2936625:0crwdne2936625:0:

crwdns2936751:024crwdne2936751:0 10

crwdns2936753:07crwdne2936753:0 64

crwdns2936753:030crwdne2936753:0 261

crwdns2942667:0crwdne2942667:0 24,754