crwdns2933423:0crwdne2933423:0

Ovente Electric Kettle KS88 Series Disassembly

crwdns2942213:0crwdne2942213:0

  1. Ovente Electric Kettle KS88 Series Disassembly, Ovente Electric Kettle KS88 Series Disassembly: crwdns2935265:01crwdnd2935265:01crwdnd2935265:03crwdne2935265:0 Ovente Electric Kettle KS88 Series Disassembly, Ovente Electric Kettle KS88 Series Disassembly: crwdns2935265:01crwdnd2935265:02crwdnd2935265:03crwdne2935265:0 Ovente Electric Kettle KS88 Series Disassembly, Ovente Electric Kettle KS88 Series Disassembly: crwdns2935265:01crwdnd2935265:03crwdnd2935265:03crwdne2935265:0
    • Remove the three 11 mm screws from the center of the kettle's base using a Phillips #2 screwdriver.

    • Remove the one 15mm screw by the handle using a Phillips #2 screwdriver.

  2. Ovente Electric Kettle KS88 Series Disassembly: crwdns2935265:02crwdnd2935265:01crwdnd2935265:03crwdne2935265:0 Ovente Electric Kettle KS88 Series Disassembly: crwdns2935265:02crwdnd2935265:02crwdnd2935265:03crwdne2935265:0 Ovente Electric Kettle KS88 Series Disassembly: crwdns2935265:02crwdnd2935265:03crwdnd2935265:03crwdne2935265:0
    • Remove the two 9 mm screws from either side of the round power receptacle using a Phillips #2 screwdriver.

    • Remove the washer beneath the screw on the left.

    • Remove the power receptacle from the device.

  3. Ovente Electric Kettle KS88 Series Disassembly: crwdns2935265:03crwdnd2935265:01crwdnd2935265:03crwdne2935265:0 Ovente Electric Kettle KS88 Series Disassembly: crwdns2935265:03crwdnd2935265:02crwdnd2935265:03crwdne2935265:0 Ovente Electric Kettle KS88 Series Disassembly: crwdns2935265:03crwdnd2935265:03crwdnd2935265:03crwdne2935265:0
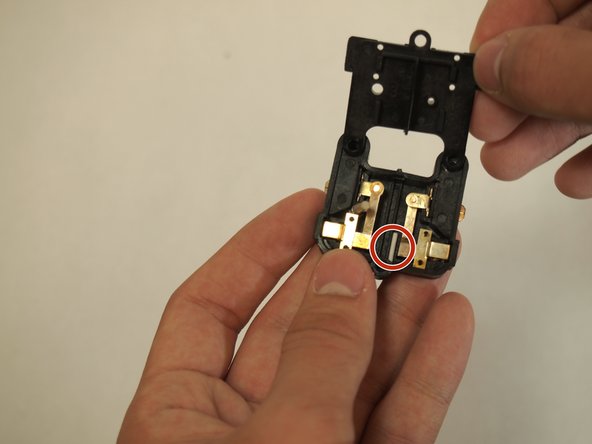
    • Remove the yellow ground wire by pushing down on the small tab with your thumb and pulling.

    • Disconnect the black wires from the thermal cutoff assembly (the black box in the center) by jiggling and pulling outwards.

  4. Ovente Electric Kettle KS88 Series Disassembly: crwdns2935265:04crwdnd2935265:01crwdnd2935265:03crwdne2935265:0 Ovente Electric Kettle KS88 Series Disassembly: crwdns2935265:04crwdnd2935265:02crwdnd2935265:03crwdne2935265:0 Ovente Electric Kettle KS88 Series Disassembly: crwdns2935265:04crwdnd2935265:03crwdnd2935265:03crwdne2935265:0
    • Unfasten the nuts using a 5.5mm nut driver, and take out the thermal cutoff.

    • There is a washer under the nut on the top. Be sure to not lose it.

  5. Ovente Electric Kettle KS88 Series Disassembly: crwdns2935265:05crwdnd2935265:01crwdnd2935265:03crwdne2935265:0 Ovente Electric Kettle KS88 Series Disassembly: crwdns2935265:05crwdnd2935265:02crwdnd2935265:03crwdne2935265:0 Ovente Electric Kettle KS88 Series Disassembly: crwdns2935265:05crwdnd2935265:03crwdnd2935265:03crwdne2935265:0
    • Unscrew the three 8.0 mm Phillips #2 screws, and separate the metal and plastic pieces from the thermal cutoff.

  6. Ovente Electric Kettle KS88 Series Disassembly: crwdns2935265:06crwdnd2935265:01crwdnd2935265:02crwdne2935265:0 Ovente Electric Kettle KS88 Series Disassembly: crwdns2935265:06crwdnd2935265:02crwdnd2935265:02crwdne2935265:0
    • Open the plastic box to examine the thermal cutoff insides.

    • This piece is replaceable as a whole component. Disassembly here isn't a necessity.

    • Remove the small white piece.

  7. Ovente Electric Kettle KS88 Series Disassembly: crwdns2935265:07crwdnd2935265:01crwdnd2935265:01crwdne2935265:0
    • Remove the two remaining connected black wires from the heating element by jiggling and pulling outwards.

  8. Ovente Electric Kettle KS88 Series Disassembly: crwdns2935265:08crwdnd2935265:01crwdnd2935265:03crwdne2935265:0 Ovente Electric Kettle KS88 Series Disassembly: crwdns2935265:08crwdnd2935265:02crwdnd2935265:03crwdne2935265:0 Ovente Electric Kettle KS88 Series Disassembly: crwdns2935265:08crwdnd2935265:03crwdnd2935265:03crwdne2935265:0
    • Take off the handle.

    • Use a spudger and an opening pick in the seams to loosen the sides and bottom of the handle cover.

    • To remove the top, push the handle cover into the kettle and slide up to remove.

  9. Ovente Electric Kettle KS88 Series Disassembly: crwdns2935265:09crwdnd2935265:01crwdnd2935265:01crwdne2935265:0
    • Remove the button from the kettle.

    • Remove the gel stabilizer piece.

  10. Ovente Electric Kettle KS88 Series Disassembly: crwdns2935265:010crwdnd2935265:01crwdnd2935265:03crwdne2935265:0 Ovente Electric Kettle KS88 Series Disassembly: crwdns2935265:010crwdnd2935265:02crwdnd2935265:03crwdne2935265:0 Ovente Electric Kettle KS88 Series Disassembly: crwdns2935265:010crwdnd2935265:03crwdnd2935265:03crwdne2935265:0
    • You should now be looking at the open circuitry of the kettle inside of the handle.

    • Disconnect the wires from the micro-chips by gently pulling using your thumb and forefinger.

  11. Ovente Electric Kettle KS88 Series Disassembly: crwdns2935265:011crwdnd2935265:01crwdnd2935265:03crwdne2935265:0 Ovente Electric Kettle KS88 Series Disassembly: crwdns2935265:011crwdnd2935265:02crwdnd2935265:03crwdne2935265:0 Ovente Electric Kettle KS88 Series Disassembly: crwdns2935265:011crwdnd2935265:03crwdnd2935265:03crwdne2935265:0
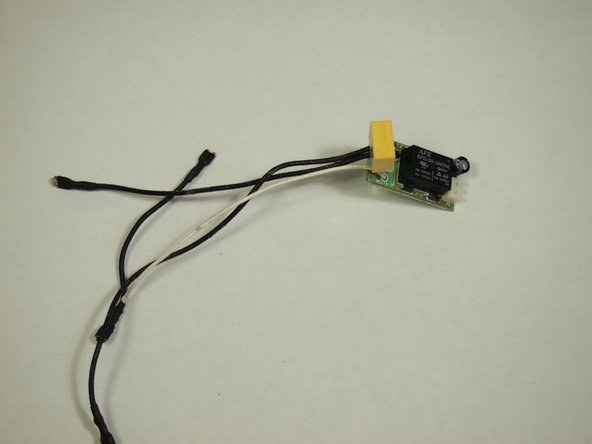
    • Unscrew the bottom chip and take it out of the handle. Use a #1 Phillips screwdriver to take out the 8.2 mm screw.

    • Then, weave it out the wires that were connected to the heating element and the thermal cutoff assembly through the handle base.

    • Remove the chip and it's soldered wires from the handle completely.

  12. Ovente Electric Kettle KS88 Series Disassembly: crwdns2935265:012crwdnd2935265:01crwdnd2935265:03crwdne2935265:0 Ovente Electric Kettle KS88 Series Disassembly: crwdns2935265:012crwdnd2935265:02crwdnd2935265:03crwdne2935265:0 Ovente Electric Kettle KS88 Series Disassembly: crwdns2935265:012crwdnd2935265:03crwdnd2935265:03crwdne2935265:0
    • Weave out the black coated white wire through the base of the handle.

    • Carefully unhook the LED attached to the base of the kettle.

  13. Ovente Electric Kettle KS88 Series Disassembly: crwdns2935265:013crwdnd2935265:01crwdnd2935265:02crwdne2935265:0 Ovente Electric Kettle KS88 Series Disassembly: crwdns2935265:013crwdnd2935265:02crwdnd2935265:02crwdne2935265:0
    • Remove the two 19 mm screws from the top of the handle using a Phillips #2 screwdriver.

    • Take off the handle by pushing down on the button and pulling the handle towards you.

  14. Ovente Electric Kettle KS88 Series Disassembly: crwdns2935265:014crwdnd2935265:01crwdnd2935265:01crwdne2935265:0
    • Remove the temperature sensor from the bottom of the kettle.

  15. Ovente Electric Kettle KS88 Series Disassembly: crwdns2935265:015crwdnd2935265:01crwdnd2935265:03crwdne2935265:0 Ovente Electric Kettle KS88 Series Disassembly: crwdns2935265:015crwdnd2935265:02crwdnd2935265:03crwdne2935265:0 Ovente Electric Kettle KS88 Series Disassembly: crwdns2935265:015crwdnd2935265:03crwdnd2935265:03crwdne2935265:0
    • Using your thumb, push up on the bottom of the microprocessor to remove it from the handle.

  16. Ovente Electric Kettle KS88 Series Disassembly: crwdns2935265:016crwdnd2935265:01crwdnd2935265:03crwdne2935265:0 Ovente Electric Kettle KS88 Series Disassembly: crwdns2935265:016crwdnd2935265:02crwdnd2935265:03crwdne2935265:0 Ovente Electric Kettle KS88 Series Disassembly: crwdns2935265:016crwdnd2935265:03crwdnd2935265:03crwdne2935265:0
    • By using your fingers or a spudger, disconnect the button interface (cover) from the processor.

  17. Ovente Electric Kettle KS88 Series Disassembly: crwdns2935265:017crwdnd2935265:01crwdnd2935265:03crwdne2935265:0 Ovente Electric Kettle KS88 Series Disassembly: crwdns2935265:017crwdnd2935265:02crwdnd2935265:03crwdne2935265:0 Ovente Electric Kettle KS88 Series Disassembly: crwdns2935265:017crwdnd2935265:03crwdnd2935265:03crwdne2935265:0
    • Using a #1 Phillips screw driver, loosen the 8.5mm screw on the processor chip and separate it from the plastic base.

  18. Ovente Electric Kettle KS88 Series Disassembly: crwdns2935265:018crwdnd2935265:01crwdnd2935265:02crwdne2935265:0 Ovente Electric Kettle KS88 Series Disassembly: crwdns2935265:018crwdnd2935265:02crwdnd2935265:02crwdne2935265:0
    • Remove the screw from the inside of the lid.

    • Remove the metal cover from the plastic part of the lid.

  19. Ovente Electric Kettle KS88 Series Disassembly: crwdns2935265:019crwdnd2935265:01crwdnd2935265:03crwdne2935265:0 Ovente Electric Kettle KS88 Series Disassembly: crwdns2935265:019crwdnd2935265:02crwdnd2935265:03crwdne2935265:0 Ovente Electric Kettle KS88 Series Disassembly: crwdns2935265:019crwdnd2935265:03crwdnd2935265:03crwdne2935265:0
    • Use the pointy side of the spudger to push the metal rod through the spring and out of the cover.

    • Make sure to catch the spring if it pops up.

    • Remove the lid from the kettle.

  20. Ovente Electric Kettle KS88 Series Disassembly: crwdns2935265:020crwdnd2935265:01crwdnd2935265:03crwdne2935265:0 Ovente Electric Kettle KS88 Series Disassembly: crwdns2935265:020crwdnd2935265:02crwdnd2935265:03crwdne2935265:0 Ovente Electric Kettle KS88 Series Disassembly: crwdns2935265:020crwdnd2935265:03crwdnd2935265:03crwdne2935265:0
    • After removing the lid, push down on the inside plastic piece and push up on the outside of the remaining plastic part to remove it from the kettle.

    • We are left with the metal kettle stripped of all its circuitry and mechanisms.

  21. Ovente Electric Kettle KS88 Series Disassembly: crwdns2935265:021crwdnd2935265:01crwdnd2935265:02crwdne2935265:0 Ovente Electric Kettle KS88 Series Disassembly: crwdns2935265:021crwdnd2935265:02crwdnd2935265:02crwdne2935265:0
    • Here is a picture of the heating element which cannot be removed from the kettle.

    • The circuit schematic for the kettle is shown here as well.

crwdns2915888:0crwdne2915888:0

To reassemble your device, follow these instructions in reverse order.

Justin Kamal

crwdns2935283:009/16/20crwdne2935283:0

363 crwdns2915208:0crwdne2915208:0

crwdns2935295:0crwdne2935295:0

crwdns2915084:0crwdne2915084:0

Tufts University School of Engineering, Team S1-G11, Bell Fall 2020 crwdns2935289:0Tufts University School of Engineering, Team S1-G11, Bell Fall 2020crwdne2935289:0

TUFTS-BELL-F20S1G11

crwdns2931471:02crwdne2931471:0

crwdns2935303:01crwdne2935303:0

crwdns2944067:00crwdne2944067:0

crwdns2917038:0crwdne2917038:0

crwdns2936625:0crwdne2936625:0:

crwdns2936751:024crwdne2936751:0 3

crwdns2936753:07crwdne2936753:0 5

crwdns2936753:030crwdne2936753:0 64

crwdns2942667:0crwdne2942667:0 2,964