crwdns2933423:0crwdne2933423:0
crwdns2947577:0crwdnd2947577:0crwdne2947577:0

Oster 6329 Power Cord Replacement

crwdns2942213:0crwdne2942213:0

    1. Oster 6329 Power Cord Replacement, Outer Shell Removal: crwdns2935265:01crwdnd2935265:01crwdnd2935265:02crwdne2935265:0 Oster 6329 Power Cord Replacement, Outer Shell Removal: crwdns2935265:01crwdnd2935265:02crwdnd2935265:02crwdne2935265:0
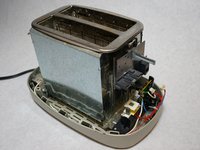
      • Using the Phillips-head #2 screwdriver, unscrew the three 1cm Phillips-head screws on the plastic base of the toaster to separate the outer metal shell from the plastic base.

      crwdns2952109:0crwdne2952109:0

      crwdns2917038:0crwdne2917038:0

    2. Oster 6329 Power Cord Replacement: crwdns2935265:02crwdnd2935265:01crwdnd2935265:01crwdne2935265:0
      • Push the plastic push-down handle down and pull the plastic handle straight from metal arm.

      crwdns2952109:0crwdne2952109:0

      crwdns2917038:0crwdne2917038:0

    3. Oster 6329 Power Cord Replacement: crwdns2935265:03crwdnd2935265:01crwdnd2935265:01crwdne2935265:0
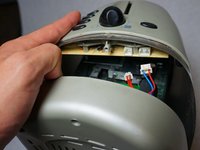
      • Loosen the outer metal shell from the plastic base by holding the plastic base while pulling up on the metal shell.

      • Only lift the outer shell a little so as not to disconnect the cables that connect the circuit board.

      crwdns2952109:0crwdne2952109:0

      crwdns2917038:0crwdne2917038:0

    4. Oster 6329 Power Cord Replacement: crwdns2935265:04crwdnd2935265:01crwdnd2935265:02crwdne2935265:0 Oster 6329 Power Cord Replacement: crwdns2935265:04crwdnd2935265:02crwdnd2935265:02crwdne2935265:0
      crwdns2935267:0crwdne2935267:0
      Tweezers
      $4.99
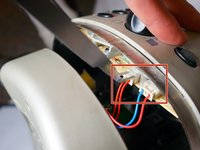
      • Disconnect the cable clips from the circuit board using the tweezers to free the outer metal shell from the plastic base.

      crwdns2952109:0crwdne2952109:0

      crwdns2917038:0crwdne2917038:0

    5. Oster 6329 Power Cord Replacement: crwdns2935265:05crwdnd2935265:01crwdnd2935265:02crwdne2935265:0 Oster 6329 Power Cord Replacement: crwdns2935265:05crwdnd2935265:02crwdnd2935265:02crwdne2935265:0
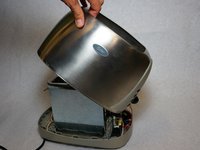
      • Lift the top outer metal shell.

      • Carefully lift the outer metal shell at an angle so as not to damage the components in the front of the toaster.

      crwdns2952109:0crwdne2952109:0

      crwdns2917038:0crwdne2917038:0

    1. Oster 6329 Power Cord Replacement, Power Cord: crwdns2935265:06crwdnd2935265:01crwdnd2935265:01crwdne2935265:0
      • Using a flat-head screwdriver, pry the power cord from the base of the toaster.

      crwdns2952109:0crwdne2952109:0

      crwdns2917038:0crwdne2917038:0

    2. Oster 6329 Power Cord Replacement: crwdns2935265:07crwdnd2935265:01crwdnd2935265:01crwdne2935265:0
      • Using a flat-head screwdriver, pry the white wire from the base.

      crwdns2952109:0crwdne2952109:0

      crwdns2917038:0crwdne2917038:0

    3. Oster 6329 Power Cord Replacement: crwdns2935265:08crwdnd2935265:01crwdnd2935265:01crwdne2935265:0
      • Locate the circuit board at the front of the toaster where the power cord and white wire meet.

      • Pull the circuit board up and out to free the circuit board from the body of the toaster.

      • It is tightly fit and may take moderate force to remove.

      crwdns2952109:0crwdne2952109:0

      crwdns2917038:0crwdne2917038:0

    4. Oster 6329 Power Cord Replacement: crwdns2935265:09crwdnd2935265:01crwdnd2935265:02crwdne2935265:0 Oster 6329 Power Cord Replacement: crwdns2935265:09crwdnd2935265:02crwdnd2935265:02crwdne2935265:0
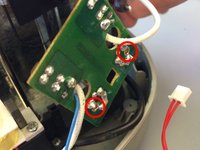
      • Desolder the power cord from the circuit board at the locations show in the diagram.

      • For soldering instructions see the iFixit Soldering Guide.

      • The wires should be free from board when un-soldering is complete.

      crwdns2952109:0crwdne2952109:0

      crwdns2917038:0crwdne2917038:0

    5. Oster 6329 Power Cord Replacement: crwdns2935265:010crwdnd2935265:01crwdnd2935265:02crwdne2935265:0 Oster 6329 Power Cord Replacement: crwdns2935265:010crwdnd2935265:02crwdnd2935265:02crwdne2935265:0
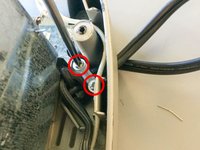
      • Unscrew the two 1.5cm Phillips-head screws at the back of the toaster that are holding the power cord in place to remove the retaining clip.

      • Remove the plastic retaining clip that is holding the cord in place.

      crwdns2952109:0crwdne2952109:0

      crwdns2917038:0crwdne2917038:0

    6. Oster 6329 Power Cord Replacement: crwdns2935265:011crwdnd2935265:01crwdnd2935265:02crwdne2935265:0 Oster 6329 Power Cord Replacement: crwdns2935265:011crwdnd2935265:02crwdnd2935265:02crwdne2935265:0
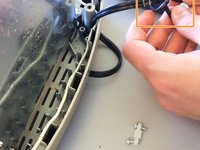
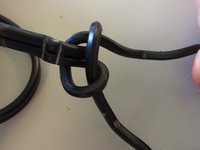
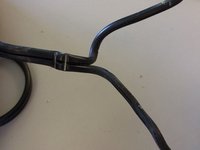
      • Untie the knot in the power cord.

      crwdns2952109:0crwdne2952109:0

      crwdns2917038:0crwdne2917038:0

    7. Oster 6329 Power Cord Replacement: crwdns2935265:012crwdnd2935265:01crwdnd2935265:01crwdne2935265:0
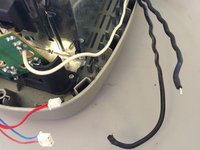
      • Pull the cord from the base to remove the cable.

      crwdns2952109:0crwdne2952109:0

      crwdns2917038:0crwdne2917038:0

crwdns2915888:0crwdne2915888:0

To reassemble your device, follow these instructions in reverse order.

crwdns2935221:0crwdne2935221:0

Timothy Grijalva

crwdns2935283:001/31/14crwdne2935283:0

234 crwdns2915208:0crwdne2915208:0

crwdns2935297:02crwdne2935297:0

crwdns2935287:0crwdne2935287:0

Cal Poly, Team 13-15, Regan Winter 2014 crwdns2935289:0Cal Poly, Team 13-15, Regan Winter 2014crwdne2935289:0

CPSU-REGAN-W14S13G15

crwdns2931471:05crwdne2931471:0

crwdns2935297:012crwdne2935297:0

crwdns2947412:00crwdne2947412:0

crwdns2917038:0crwdne2917038:0

crwdns2936625:0crwdne2936625:0:

crwdns2936751:024crwdne2936751:0 0

crwdns2936753:07crwdne2936753:0 4

crwdns2936753:030crwdne2936753:0 34

crwdns2942667:0crwdne2942667:0 1,395