crwdns2915892:0crwdne2915892:0
Motherboard Replacement guide for Oral-B White Pro 1000 rechargeable electric toothbrush due to faulty operation. This guide illustrates the disassembly of the Oral-B White Pro 1000 electric toothbrush. Use caution not to short the positive (+) and negative (-) terminals when handling the battery. This guide also requires the use of a soldering tool which reaches high temperatures. Refer to this helpful guide for some great soldering and desoldering tips.
crwdns2942213:0crwdne2942213:0
-
-
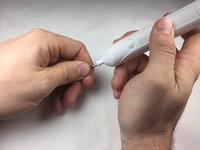
Remove the brush head by pulling the top away from the base.
-
-
-
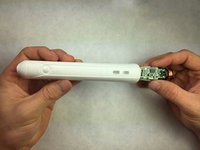
Pry open the end cap from the toothbrush body.
-
Remove the spring.
Man sollte die Zahlbürste 5 Minuten in heißes Wasser stellen, damit wird das Plastik weich und man bricht nicht so leicht den Einraster ab.
You should put the brush in hot water for 5 minutes, so that the plastic becomes soft and you don't break the snap so easily.
Mike -
Thanks for tip, was very easy and non-destructive after heating up.
Tip: Use a big Allen Key (German: Inbus-Schlüssel) as a tool
David -
Die Endkappe lässt sich auch gut mit der Ladehalterung aushebeln.
The end cap can also be easily levered out with the charging bracket
Mike -
Beim (fast?) baugleichen Oral-B Pro 2500 Modell ist an der Vorderseite ca. 5mm unterhalb der untersten Signalleuchte eine kleine Öffnung in der Hartplastikhülle, über die nur die Gummibeschichtung läuft (Also von außen nur erfühlbar, nicht sichtbar). Man kann den vorderen Einraster durch das Gummi nach Innen drücken.
With the (almost?) Identical Oral-B Pro 2500 model, there is a small opening in the hard plastic shell on the front about 5mm below the lowest signal light, over which only the rubber coating runs (i.e. only palpable, not visible from the outside). You can push the front catch inwards through the rubber.
Mike -
the cap actually open from the backside, pivot is on the led side
The bottom cap comes loose easily with a 45 degree twist using pliers and a piece of cloth for protection.
-
-
-
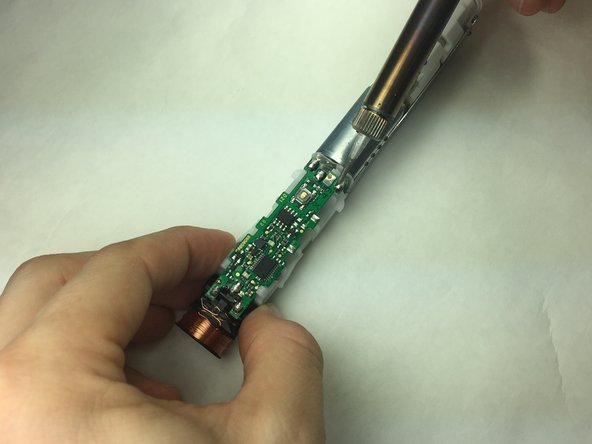
Apply pressure on the brush shaft to release the toothbrush internals.
-
Remove the internals through the bottom of the toothbrush body.
If the green charge led quit flashing, check the hair fine coil connections to the PC board. One of mine was broken and soldering it back was the fix. Probably broke from vibration
-
-
-
-
Use flat head screwdriver to remove power button pressure plate.
On mine, the head end of the pressure plate has a ‘wing’ on each side that can be pushed in to release from the other metal enclosure that has not been removed yet.
-
-
-
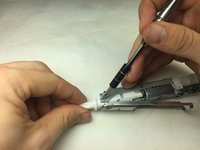
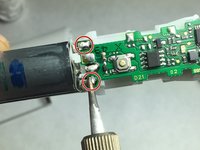
Desolder the coil wire from the motherboard.
-
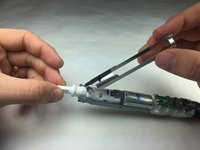
Squeeze and remove coil from motherboard.
Before going further, check these two connections for continuity. With my toothbrush one of the two coil wires was not making a good connection and therefor not charging the battery. Easy fix if that’s your problem.
@ifixit: Second picture is wrong, since it shows soldering the motor and not the coil! But you get the idea :-)
-
-
-
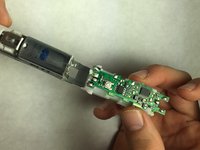
Desolder the motor from motherboard.
-
Remove motherboard and battery from body of toothbrush internals.
pics too small. show after housing off and not how to get there. why even go to this hell and not have replaceable batteries like a remote or flashlight? this is made this hard just so you buy another one.
-
-
-
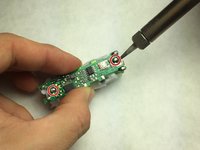
Desolder the battery connections from the motherboard.
-
Remove motherboard from battery holder.
Man kann den Akku durch eine Standard AA Zelle mit Lötfahnen austauschen. Diese sind preiswerter und erhöhen die Kapazität. In diesem Fall muss man nur die Plastik-Abstandshalter im Akkuhalter mit einem Cutter stutzen.
The battery is not soldered it is spot welded
-


Reattach new motherboard and reassemble your device following instructions in reverse order. Solder appropriate connections during reassembly.
Reattach new motherboard and reassemble your device following instructions in reverse order. Solder appropriate connections during reassembly.
crwdns2935221:0crwdne2935221:0
crwdns2935229:04crwdne2935229:0
crwdns2915084:0crwdne2915084:0

IUPUI, Team S5-G4, Baechle Fall 2017 crwdns2935289:0IUPUI, Team S5-G4, Baechle Fall 2017crwdne2935289:0
IUPUI-BAECHLE-F17S5G4
crwdns2931471:03crwdne2931471:0
crwdns2935297:09crwdne2935297:0
crwdns2947410:01crwdne2947410:0
Motor are brushless?